Notification Channels (Android)
With the introduction of Android Oreo, Google has strived to make the Notifications system more user-friendly. Android Oreo has completely redesigned notifications.
Notification Channels are somewhat like groups or categories of notifications - say you’re building a social networking app, the channels can be “activity” - likes, or comments on your posts, “messages”, etc.
To define your channels, take inventory of all the notifications you want to send. Group these notifications into sets that have the following things in common:
Subject matter: A single topic can succinctly describe all of these notifications, such as "Downloads".
Users can get fine control of what they want to be notified about. They can specifically
A. Turn off notifications for a certain channel
B. Specify the importance
C. Set the preferred sound for a particular category of notifications
After you create a notification channel, you cannot change the notification behaviors — the user has complete control at that point. However you can still change a channel's name and description.
Note
If you target Android 8.0 (API level 26) and post a notification without specifying a notification channel, the notification does not appear and the system logs an error.
Creating Notification Channels
You can create stand-alone notification channels in your app, by using the following line of code.
Notifyvisitors.shared.createNotificationChannel(String channel_id, String channel_name, String channel_description,
String channel_importance, boolean enable_lights,
boolean should_vibrate, String light_color, String sound_file_name);

//Example
Notifyvisitors.shared.createNotificationChannel("channel_id_abc", "channel_name_xyz", "channel_description_abc", "3", false, false, "#E9967A", null);
You can create more than one channel using the above line of code, just make sure that the channel ID differs in every Notification Channel. Also, this Channel ID will be used to send Push Notifications using the NotifyVisitors dashboard.
Creating Notification Channel Groups
Once you have the NotifyVisitors Android SDK integrated successfully, you can create a notification channel group. Notification channel groups allow you to manage multiple notification channels with identical names within a single app, which can be useful if your app supports multiple accounts. You can create a notification group using the following line of code –
Notifyvisitors.shared.createNotificationChannelGroup(String groupl_id,  String group_name);

//Example
Notifyvisitors.shared.createNotificationChannelGroup("group_id_ab", "group_name_xy");
Deleting Notification Channels
You can delete the notification channels created previously in your app. There is no error thrown when you try to delete a notification channel that doesn’t exist. You can delete the notification channels using the following line of code.
Notifyvisitors.shared.deleteNotificationChannel(String channel_id);

//Example
Notifyvisitors.shared.deleteNotificationChannel("channel_id_abc");
Deleting Notification Groups
NotifyVisitors SDK also allows you to remove the notification groups you have created previously. Please note that you will need to delete all the channels associated with a group prior to deleting a group. You can delete a notification group using the following line of code.
Notifyvisitors.shared.deleteNotificationChannelGroup(String groupl_id);

//Example
Notifyvisitors.shared.deleteNotificationChannelGroup("group_id_ab");
Notification Channel ID Settings in Dashboard
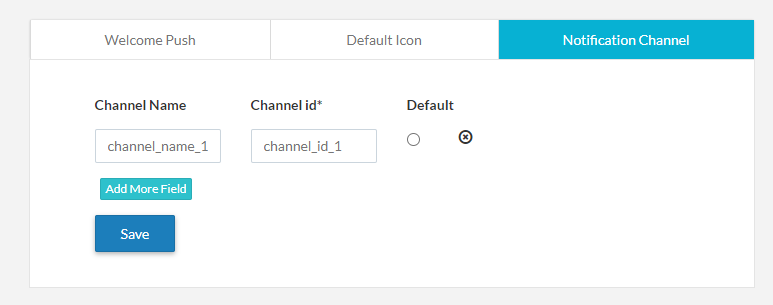
You can choose to have a notification channel ID as optional or mandatory for creating a push notification. Select the 'Notification Channels' option. It is available at Mobile Push → Configuration → Assets → Notification Channels. You can create a selection list of channel IDs for your messages.

By default, we have a channel called “General Notifications”. If you want to change the default setting then you can mark any of your custom channels as default in the dashboard.
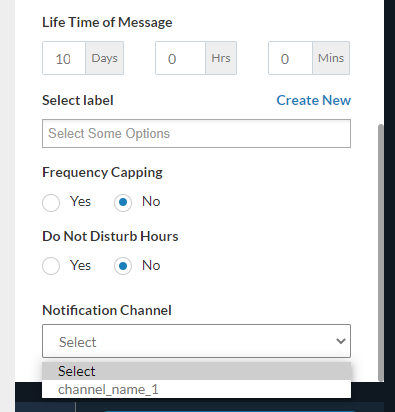
After you are done with the setting whenever you create or send the push notification you can choose the channel among the defined channels in “Advanced Options” of the push notification.

Importance Level(s)
Channel Importance affects the interruption level of all notifications posted in the channel. There are five importance levels available, ranging from IMPORTANCE_NONE(0) to IMPORTANCE_HIGH(4). The importance level you assign to a channel applies to all notification messages that you post to it.
| User-Visible Importance Level | Importance (Android 8.0 and higher) | Priority (Android 7.1 and lower) |
|---|---|---|
| Urgent Makes a sound and appears as a heads-up notification | IMPORTANCE_HIGH | PRIORITY_HIGH or PRIORITY_MAX |
| High Makes a sound | IMPORTANCE_DEFAULT | PRIORITY_DEFAULT |
| Medium No sound | IMPORTANCE_LOW | PRIORITY_LOW |
| Low No sound and does not appear in the status bar | IMPORTANCE_MIN | PRIORITY_MIN |
Once you submit the channel to the Notification Manager, you cannot change the importance level. However, the user can change their preferences for your app's channels at any time.
| IMPORTANCE | USAGE | EXAMPLES |
|---|---|---|
| HIGH | Time-critical information that the user must know, or act on, immediately | Text messages, alarms, phone calls |
| DEFAULT | Information that should be seen at the user’s earliest convenience, but not interrupt what they're doing | Traffic alerts, task reminders |
| LOW | Notification channels that don't meet the requirements of other importance levels | New content the user has subscribed to, social network invitations |
| MIN | Non-essential information that can wait or isn’t specifically relevant to the user | Nearby places of interest, weather, promotional content. |
Updated over 1 year ago
