Push Notifications
Configure push notifications using NotifyVisitors.
- Android Push Notifications are one of the most engaging tools when it comes to marketing automation, since they are concise yet captivating pop-up messages that Android displays outside of an app's UI to provide users with time-sensitive information, reminders, intimations from other people and thereby encourage the receivers to take specific actions such as view an online catalogue of products, purchase new goods and services, RSVP to events etc.
- Such communications are used by brands worldwide to dispatch personalized messages and timely convey relevant information to their clients. Users can tap the notification to open a brand’s app or take actions directly from within the notification itself.
- So, they’re incorporated by various brands and almost all types of apps such as health apps, to remind subscribers to timely consume their medicine; sports apps, to notify users whenever their favourite team scores; or banking apps, to request approval for a particular transaction. This way, they add value to the app and keep users engaged.
- In a nutshell, android push notifications are essentially a part of a brand’s overall marketing endeavours of delivering strategically timed, targeted messages to its customer base so as to drive more conversions by way of user engagement, enhance consumer retention and build healthy relationships or long-lasting connections with the audience.
- Click here to learn more about Android Push Notifications.
1. Configure in NotifyVisitors Panel
a) Go to FCM and register your app.
b) Copy Sender Id and Server key from FCM.
c) Go to NotifyVisitors panel and from mobile push menu go to Android section inside configuration section from left side menu panel and Paste Sender Id and Server key there.
2. Configure in App
Follow the undermentioned steps, in case you don't have your own Firebase Integration:
a) Download the latest config json file (google-service.json file) and paste it into your app folder in IDE.
b) Add a Google Services plugin as a dependency in your project-level build.gradle file.
plugins {
   id 'com.google.gms.google-services' version '4.4.0' apply false
}
plugins {
   id("com.google.gms.google-services") version "4.4.0" apply false
}
c) Add a Google Services plugin in your module-level build.gradle file.
plugins {
   id 'com.google.gms.google-services'
}
plugins {
   id("com.google.gms.google-services")
}
d) Add the dependency for Firebase Cloud Messaging in your module-level build.gradle file.
dependencies {
  implementation platform('com.google.firebase:firebase-bom:30.3.1')
  implementation ('com.google.firebase:firebase-messaging')
}
e) Add the below NotifyVisitors service for Firebase Messaging Service in the app module’s manifest file.
<service
   android:exported="false"
   android:name="com.notifyvisitors.notifyvisitors.NVFirebaseMessagingService"
   android:permission="${applicationId}.notifyvisitors.custom.PERMISSION">
   <intent-filter>
       <action android:name="com.google.firebase.MESSAGING_EVENT" />
   </intent-filter>
</service>
Perform the below function in case you have your own firebase integration:
try {
   if (intent.hasExtra("nv_source")) {
       String value = intent.getExtras().getString("nv_source");
       if (value.equals("1")) {
           if(NotifyVisitorsApi.getInstance(this).isPayloadFromNvPlatform(remoteMessage.toIntent())) {
                  NotifyVisitorsApi.getInstance(this).getNV_FCMPayload(remoteMessage.toIntent());
           }
       }
   }
} catch (Exception e) {
   e.printStackTrace();
}
try {
    if (intent.hasExtra("nv_source")) {
       val value = intent.extras!!.getString("nv_source")
       if (value == "1") {
             if (NotifyVisitorsApi.getInstance(this).isPayloadFromNvPlatform(remoteMessage.toIntent())) {
                   NotifyVisitorsApi.getInstance(this).getNV_FCMPayload(remoteMessage.toIntent())
             }
       }
    }
} catch (e: Exception) {
    e.printStackTrace()
}
3. Configure Icons -- IMPORTANT
| For below Lollipop devices | For Lollipop & above devices |
| Devices below Lollipop show only one icon in the push notifications, which you can configure from the notifyvisitors panel. To change the default notification icon, replace icon sm_push.png in your app’s module app/src/main/res/drawable folder. | Devices supporting Lollipop & above show two notification icons i.e., small push icon & large push icon. Large push icon: It is configured from the panel & is shown as the main push icon. However, if a large push icon is not configured from the panel then a small push icon is shown as the main push icon. Small push icon: It will be set according to Android documentation (https://developer.android.com/about/versions/android-5.0-changes.html). It should be transparent, otherwise, it will be shown as a square white spot. |
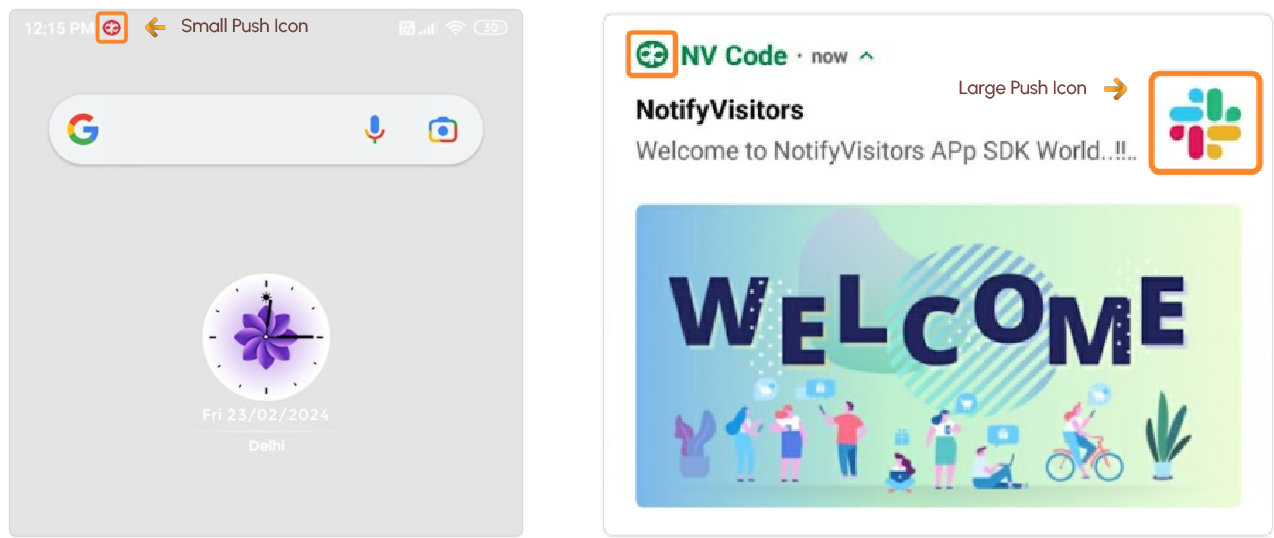
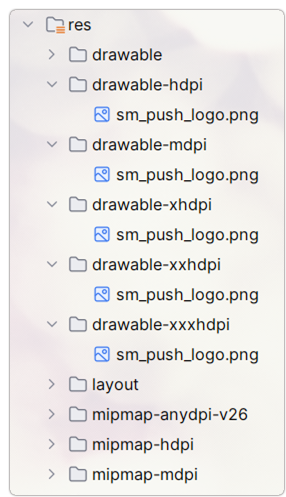
Small Icon
Small icon density and size.
|
Density (dp)
|
Size (px)
|
File Path (in Project)
|
|
MDPI |
24 x 24
|
res/drawable-mdpi/sm_push_logo.png
|
|
HDPI |
36 x 36
|
res/drawable-hdpi/sm_push_logo.png
|
|
XHDPI |
48 x 48
|
res/drawable-xhdpi/sm_push_logo.png
|
|
XXHDPI |
72 x 72
|
res/drawable-xxhdpi/sm_push_logo.png
|
| XXXHDPI |
96 x 96
|
res/drawable-xxxhdpi/sm_push_logo.png
|
Note
To change the default small push icon, add the icon as “sm_push_logo.png” in your app’s module app/src/main/res/drawable folder.
Follow the undermentioned steps, to get a small push icon effect in your status bar,
1. Go to Android Asset Studio.
2. Select Notification Icon Generator.
3. Select Image under the Source menu ( Note: Here, select your Monochrome icon).
4. Copy and paste your small push icon there on.
5. Enter its name in the 'Name Menu' on the left side ( Note: Name here will be as 'sm_push_logo') .
6. Download the images from the top-right-corner icon. Download it as a zip file.
7. Unzip it and paste all folders in your app.
Important
The notification small icon must be white on a transparent background as Android only uses the alpha channel for the icon.
Small Icon Accent Color
Android 5.0+ enforces your small icon to only be white and transparent, however, it still allows tinting on the notification, known as the "accent color". (The status bar icon color will still be unaffected).
To set a default color, add the following line to your res/values/colors.xml file in your project.
<resources>
    <!-- It sets all NotifyVistors push notification's accent color to Dark Red by default.  -->
   <color name="push_small_icon_background">#a03844</color>
</resources>
Some device manufacturers display the image as it is (multi-colored image; ignoring the alpha channel rule).
We highly recommend following the alpha rule as the icons may not look consistent on all devices. Google designed it in this way, since the icon is too small to see any meaningful detail, so enforcing a single color helps enforce an easier-to-recognize icon at a glance.
Large Icon
The large notification icon will show up to the left of the notification text on Android 4.0.3 - 6.0 devices and to the right for Android 7.0+ devices. If you do not set a large icon, the app icon will be used instead. The recommended size of the large icon is 200x200 pixels.

[ Android 6.0 ]
[ Android 10.0 ]
[ Android 13.0 ]
4. Notification Preferences
Give a user the option to subscribe to a specific category of notifications, or to unsubscribe completely from push notifications.
First, you will need to define the categories in NotifyVisitors Panel. Click here to learn how and then you can implement the below code in your app.
NotifyVisitorsApi.getInstance(activityContext).pushPreferences((preferenceList (JSONArray), isUnSubscribeFromAll (boolean));
NotifyVisitorsApi.getInstance(activityContext).pushPreferences(preferenceList: JSONArray?, isUnSubscribeFromAll: Boolean)
Here the parameter "isUnSubscribeFromAll" is passed as a boolean. If you pass as FALSE, then it will work as a subscribing user according to the preferenceList passed. If you pass as TRUE, then it will work as unsubscribing user according to the preferenceList you passed.
Below are some cases with examples that will help you understand the scenarios of subscribing and unsubscribing.
Case 1: Subscribe the user to all the three categories passed in the array.
JSONArray jsonArray = new JSONArray();
jsonArray.put("category1");
jsonArray.put("category2");
jsonArray.put("category3");
NotifyVisitorsApi.getInstance(activityContext).pushPreferences(jsonArray, false);
val jsonArray = JSONArray()
jsonArray.put("category1")
jsonArray.put("category2")
jsonArray.put("category3")
NotifyVisitorsApi.getInstance(activityContext).pushPreferences(jsonArray, false)
Case 2: Subscribe the user to all the categories by default.
NotifyVisitorsApi.getInstance(activityContext).pushPreferences(null, false);
NotifyVisitorsApi.getInstance(activityContext).pushPreferences(null, false)
Case 3: UnSubscribe the user to all the three categories passed in the array.
JSONArray jsonArray = new JSONArray();
jsonArray.put("category1");
jsonArray.put("category2");
jsonArray.put("category3");
NotifyVisitorsApi.getInstance(activityContext).pushPreferences(jsonArray, true);
val jsonArray = JSONArray()
jsonArray.put("category1")
jsonArray.put("category2")
jsonArray.put("category3")
NotifyVisitorsApi.getInstance(activityContext).pushPreferences(jsonArray, true)
Case 4: UnSubscribe the user from all the categories.
NotifyVisitorsApi.getInstance(activityContext).pushPreferences(null, true);
NotifyVisitorsApi.getInstance(activityContext).pushPreferences(null, true)
5. Callbacks Related to Push Notifications
Implement the callback method below if you want to receive any of the below callbacks in your app. This will provide you with a response in JSONObject format.
NotifyVisitorsApi.getInstance(this).getEventResponse(new OnEventTrackListener() {
   @Override
   public void onResponse(JSONObject data) {
       //do your task here
   }
});
NotifyVisitorsApi.getInstance(activityContext).getEventResponse(object : OnEventTrackListener{
   override fun onResponse(data: JSONObject?) {
       //do your task here
   }
})
I. Push Registered
This callback will be received whenever the user gets registered in our NotifyVisitors Dashboard. Below is the sample output which you will receive in the above callback for this case-
{
   "status":"success",
   "eventName":"Push_Registered",
   "attributes":{
      "subscriptionId":"e90RM4olWRU:APA91bGhn2dL38cpy2r7eMqqqgmctPwU9wvbomq9x1TaPO6u8aDZQoiRWu5oY3-bpPe5oBwVZkzDUK5llw1t2FNnbJ5B3fjjFyi2ojnVDRLqQIFcea6ury5_KCGpwB61iTyu0fQd2ha1"
   }
}
II. Push Clicked
This callback will be received whenever the user clicks on push notification received from NotifyVisitors Dashboard. In this callback, you will also get all attributes associated with the click type of the push notification. Below is the sample output which you will receive in the above callback for this case:
{
   “status”:“success”,
   “eventName”:“Push_Clicked”,
   “message”:“Push clicked successfully.”,
   “type”:18.5,
   “attributes”:{
      “actionURL”:“https:\/\/www.notifyvisitors.com\”,
      “target”:1,
      “callToAction”:1,
      “action_params”:{
         “paramKeyOne”:3
      },
      “notification_id”:“203501”
   },
   “callbackType”:“push”
}
{
   “status”:“success”,
   “eventName”:“Push_Clicked”,
   “message”:“Push clicked successfully.”,
   “type”:18.6,
   “attributes”:{
      “actionURL”:“com.tnpnv_.notifycodeapp.MainActivity”,
      “target”:0,
      “callToImageIndex”:2,
      “action_params”:{
         “paramKeyOne”:164906,
         “paramKeyTwo”:“img99",
         “paramKeyThree”:true
      },
      “notification_id”:“164906”
   },
   “callbackType”:“push”
}
Values against parameters mentioned in the above responses are described below. These details are for the "Push_Clicked" callback only.
status- success or fail (as String)
eventName - Push_Clicked (as String)
message - Push clicked successfully (as String)
type - 18.6 or other (as Double) used for SDK's internal purpose
callbackType - push/inbox (as String), "inbox" appears only when push is clicked from the notification center
attributes - null or JSONObject value, it contains the following parameters:
actionURL - defines the CTA target's value like web URL, text to share, activity URL to be launched (as String)
target - 0[Navigate to App], 1[Navigate to Web], 2[Navigate to Third-Party App], 3[Share], 4[Call], 6[Universal Link] (as Integer)
callToImageIndex - 1[Image One], 2[Image Two], 3[Image Three] (as Integer) only appears when the image is clicked in slider/carousal templates
callToAction - 0[Defaut Button], 1[Button One], 2[Button Two] (as Integer) only appears when the CTA is clicked
action_params - contains all key-values actionParams you have set against the click in the push (as JSONObject)
notification_id - id of the notification clicked (as String)
6. Notification Runtime Permission
- Android 13 (API level 33) and higher supports a runtime permission for sending non-exempt (including Foreground Services (FGS)) notifications from an app: POST_NOTIFICATIONS. This change helps users focus on the notifications that are most important to them.
- In essence, the new runtime permission feature, enables users to grant or not grant an app the permission to display/post notifications. Additionally, via this specific feature developers can control exactly when a permission dialog will get displayed.
- In case users deny the notification permission, then they don’t see intimations regarding foreground services within the notification drawer. However, users still see messages related to foreground services in the Foreground Services Task Manager, whether or not the notification permission was granted.
- Kindly refer to our official documentation for more details.
Updated 11 months ago