Notification Service Extension
Notification Service Extension has been introduced in iOS 10 by Apple which allows your push to add images, audio or video content to your push notification, notifyvisitors SDK will use it to enable you to add Action buttons, badge counts and to track delivery counts in your notifyvisitors panel also. So It is an Important step which you need to configure properly as described in this documentation.
Add Notification Service Extension
- Create Notification Service Extension in your project to do so in Xcode go to File >> New >> Target.
- Now Select Notification Service Extension template under iOS section of the dialog box and press on next button to proceed.

- In the next prompt, provide the name of the extension target, and select the programming language which you want to use and then click on the Finish button, as shown in the screenshot below.

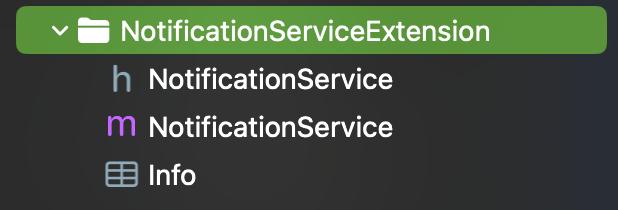
- Once the target is created, press 'Cancel' when prompted to activate the scheme. After this your notification service extension will be added to the project you will see a class with the extension name you specified during creation, as well as an info.plist file associated with it.
Swift:

Objective-C
- Now, we can proceed to add further configuration to this newly created target. Under this target you need to complete Configure info.plist, Import NotifyVisitors header file, add code to NotificationService file and configure AppGroup properly to complete this setup further steps are defined below in detail to complete this setup.
Configure Service Extension’s info.plist
From Project navigator, go to your Notification Service Extension project target and open info.plist as source code (right click on info.plist and click on Open as >> Source code) and add the following code in it.
<key>App Bundle identifier</key>
         <string>YOUR_APP_MAIN_TARGRT_BUNDLE_ID</string>
         <key>NSExtension</key>
         <dict>
                     <key>NSExtensionPointIdentifier</key>
                     <string>com.apple.usernotifications.service</string>
                     <key>NSExtensionPrincipalClass</key>
                     <string>$(PRODUCT_MODULE_NAME).NotificationService</string>
                     <key>NSExtensionAttributes</key>
                    <dict>
                               <key>UNNotificationExtensionDefaultContentHidden</key>
                               <true/>
                               <key>UNNotificationExtensionInitialContentSizeRatio</key>
                               <real>0.7</real>
                    </dict>
         </dict>
You can simply open the info.plist & add the keys which works the same as above for this.
- Add a new row by going to the menu and clicking Editor>Add Item. Set a key App Bundle identifier as String and set its value to your app’s main target Bundle Identifier.

- Expand NSExtension & add NSExtensionAttributes as Dictionary. Inside NSExtensionAttributes dictionary, add two keys, first key is UNNotificationExtensionDefaultContentHidden as Boolean, its value should be YES and the second key is UNNotificationExtensionInitialContentSizeRatio as Number, its value should be 0.7

Import NotifyVisitors SDK in your Notification Service Extension:
Option 1: Integration Through CocoaPods:
If you are using cocoapods to integrate NotifyVisitors SDK in the main target of your project, then it is recommended to install our notifyvisitorsNotificationService cocoapod in your Notification Service Extension target via cocoapods dependency. To do so, follow the below steps.
1.1 Now close your project opened in Xcode, then open your Podfile with your favorite text editor like: textEdit, Vim, Sublime, etc. This is the same Podfile that is already created in your project’s root folder while integrating notifyvisitors SDK in your main project target.
1.2 Add the notifyvisitorsNotificationService dependency at the end within the Podfile for your Notification Service Extension name target like below.
target 'YourNotificationServiceExtension' do
     pod 'notifyvisitorsNotificationService'
end
1.3 Make sure your current Xcode project is closed and run the following command in the terminal from the project root directory.
$ pod install
1.4 Now, re-open your project into Xcode by double clicking on <Your_Project_Name>.xcworkspace file and follow the steps mentioned below to complete the remaining Notification Service Extension integration process.
1.5 If you have selected Objective-C as the language while creating the Notification Service Extension in the above steps, then you can directly import our header file in your NotificationService.m file. However, if you are using Swift language then you need to create a separate Bridging-Header file and then import our header file as done earlier in the app’s main target. To do so create a new header file and name it as per the following format YOUR_ServiceExtension_NAME-Bridging-Header.h
For example, if your Service Extension name is MyNotificationServiceExtension, then the header file name will be MyNotificationServiceExtension-Bridging-Header.h. Now add the following import statement in YOUR_ServiceExtension_NAME-Bridging-Header.h for accessing SDK Classes.
Note:
Make sure that the path of your bridge-header.h file is included in build settings under Swift compiler-code generation as Objective-C bridging header: YOUR_ServiceExtension_NAME/YOUR_ServiceExtension_NAME-Bridging-Header.h
#import <notifyvisitorsNotificationService/notifyvisitorsNotificationService.h>
Option 2: Manual Integration:
2.1 Now you need to import our SDK to your Notification Service Extension target. In order to do so in Xcode, simply go to your Project navigator, then select the notifyvisitors.xcframework which has been imported into your main project. Next, go to File Inspectors (View >> Inspectors >> File) and under the Target Membership tab, check mark the Notification Service Extension option as shown in the screenshot provided below.
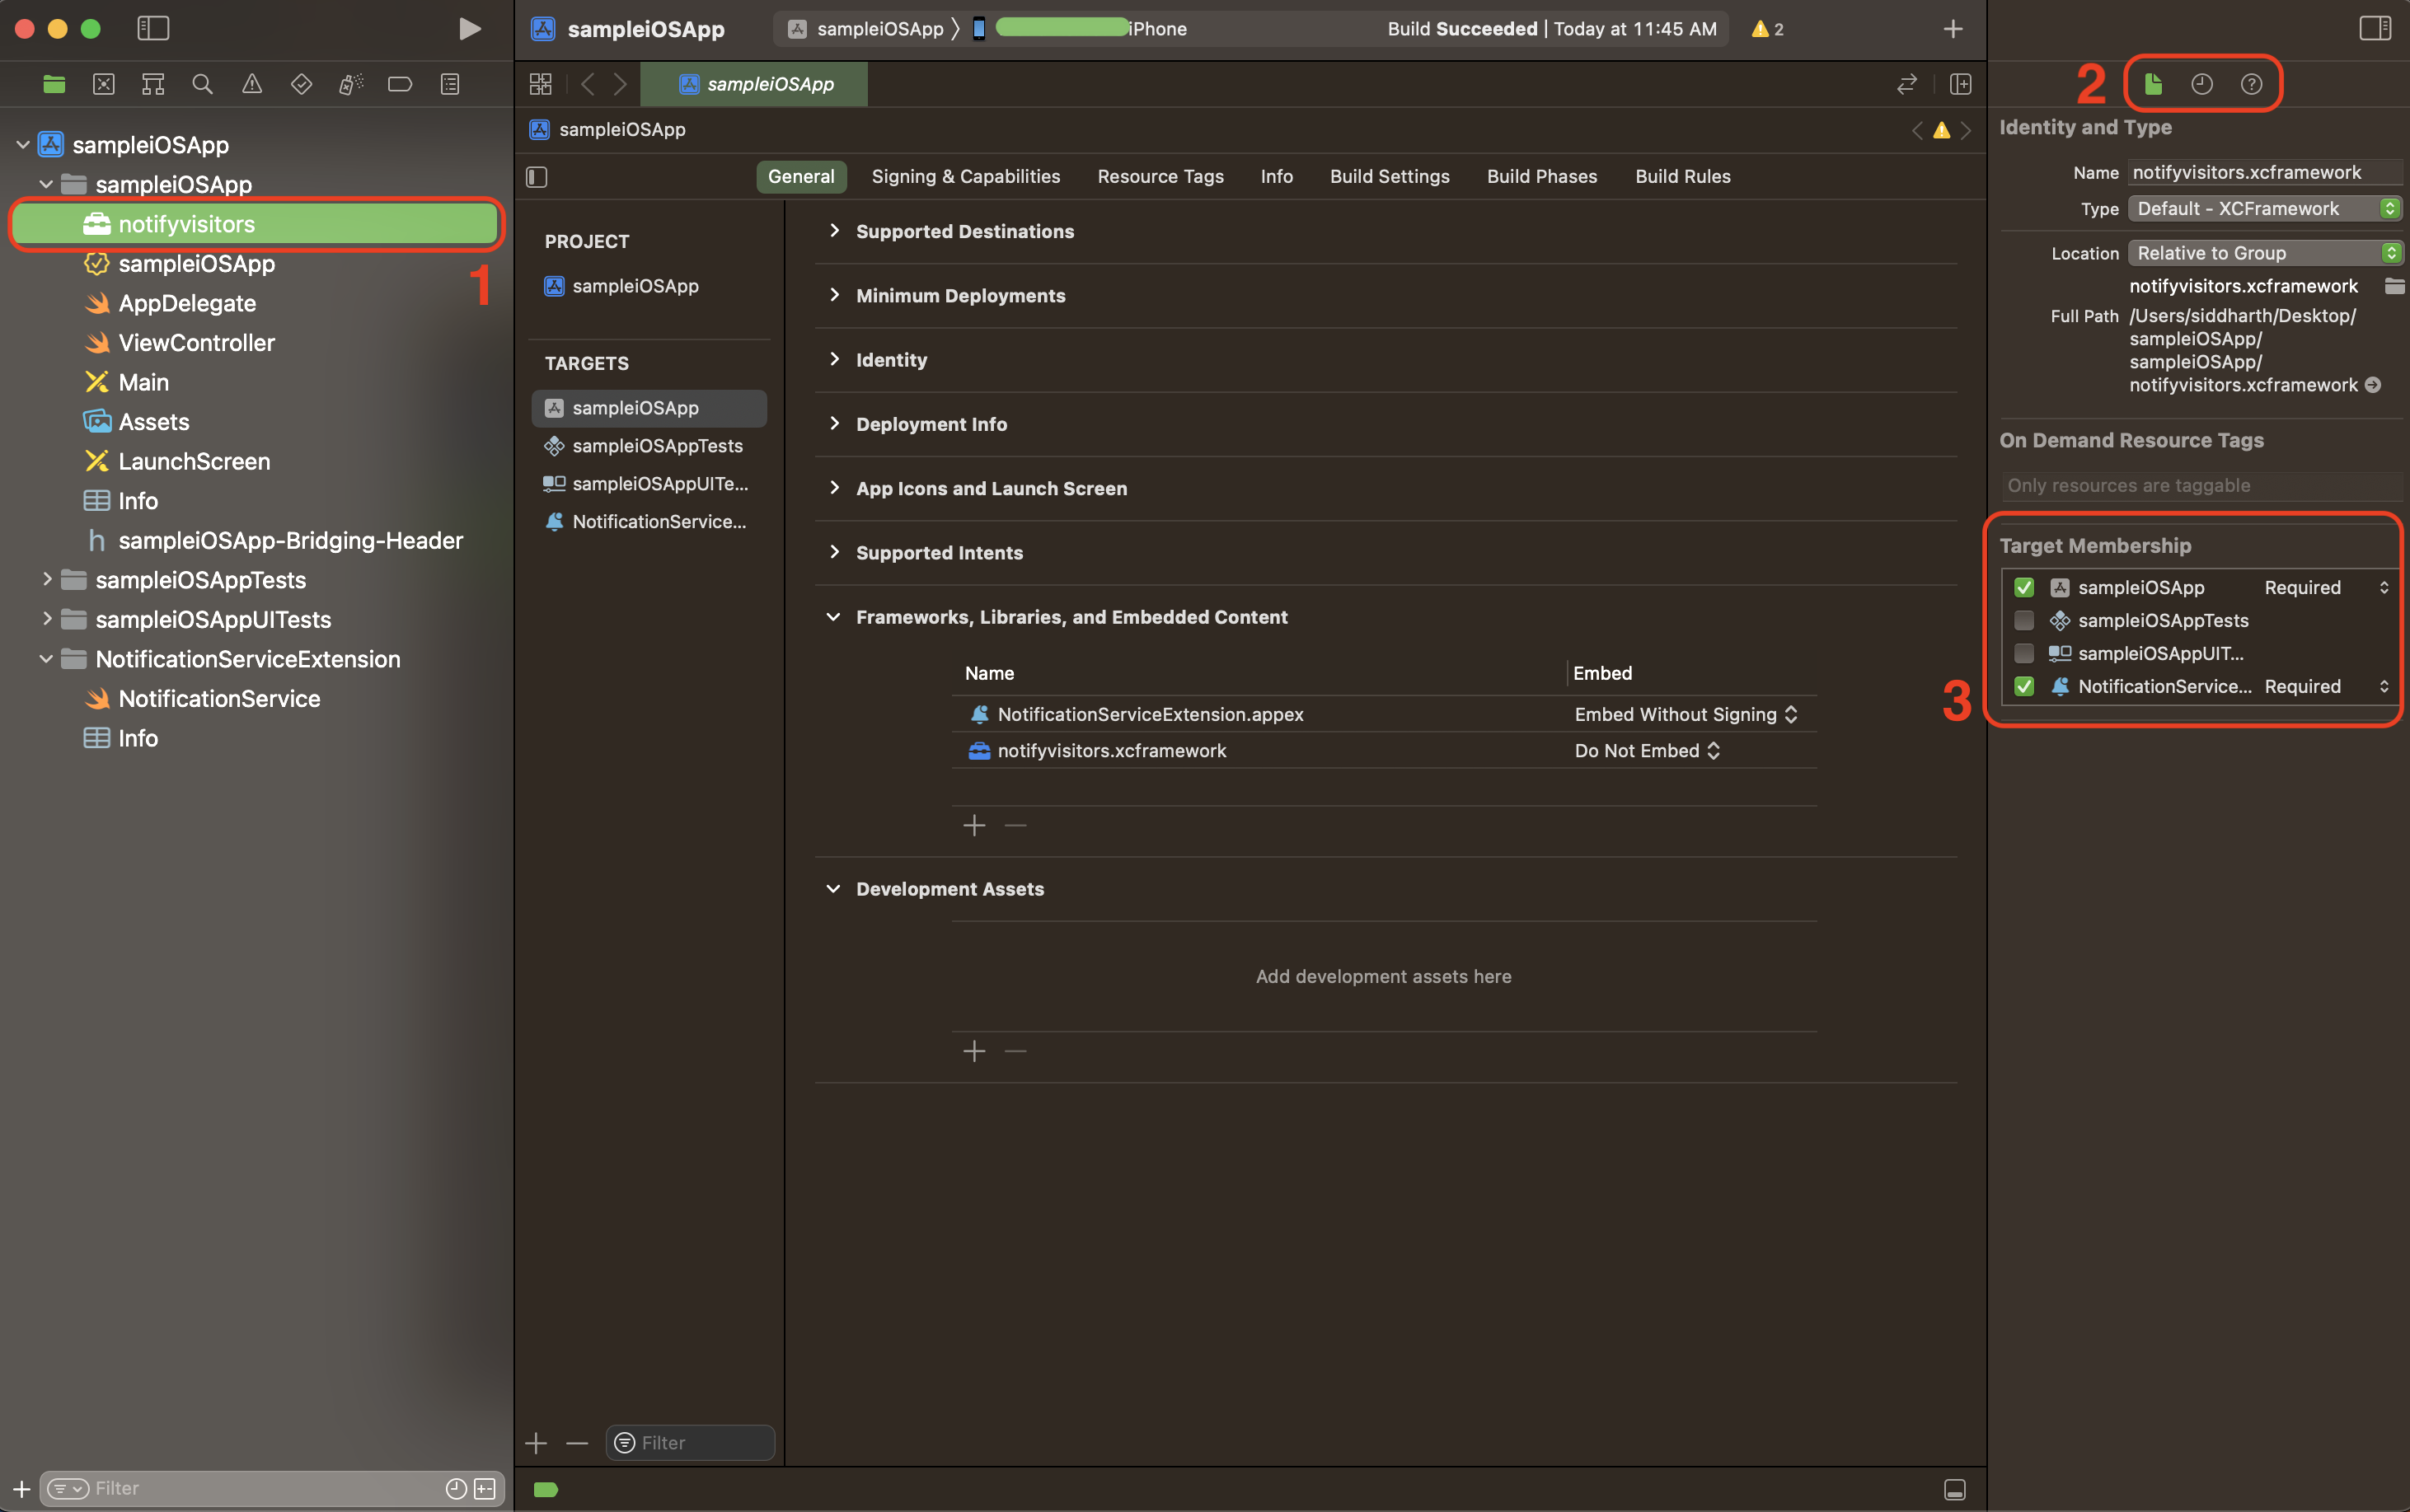
Note
Make sure your App’s Main Target and Notification Service Extension both targets should be checked to use the same SDK file in your both targets otherwise you will see errors in importing SDK files.
2.2 Now If you have selected Objective-C in the language while creating the Notification Service Extension then you can directly import our header file in your NotificationService.m file. But if you are using Swift language then you need to create a separate Bridging-Header file and then import our header file as well as done in the main app’s target. To do so Add a new header file and name it with the following format. YOUR_ServiceExtension_NAME-Bridging-Header.h
For example, if your Service Extension name is MyNotificationServiceExtension. Then the header file name will be MyNotificationServiceExtension-Bridging-Header.h. Now add the following import statement in YOUR_ServiceExtension_NAME-Bridging-Header.h for accessing Native SDK Class.
Note
Make sure that path of your bridge-header.h file should be included in build settings under Swift compiler-code generation as Objective-C bridging header: YOUR_ServiceExtension_NAME/YOUR_ServiceExtension_NAME-Bridging-Header.h
#import <notifyvisitors/notifyvisitors.h>
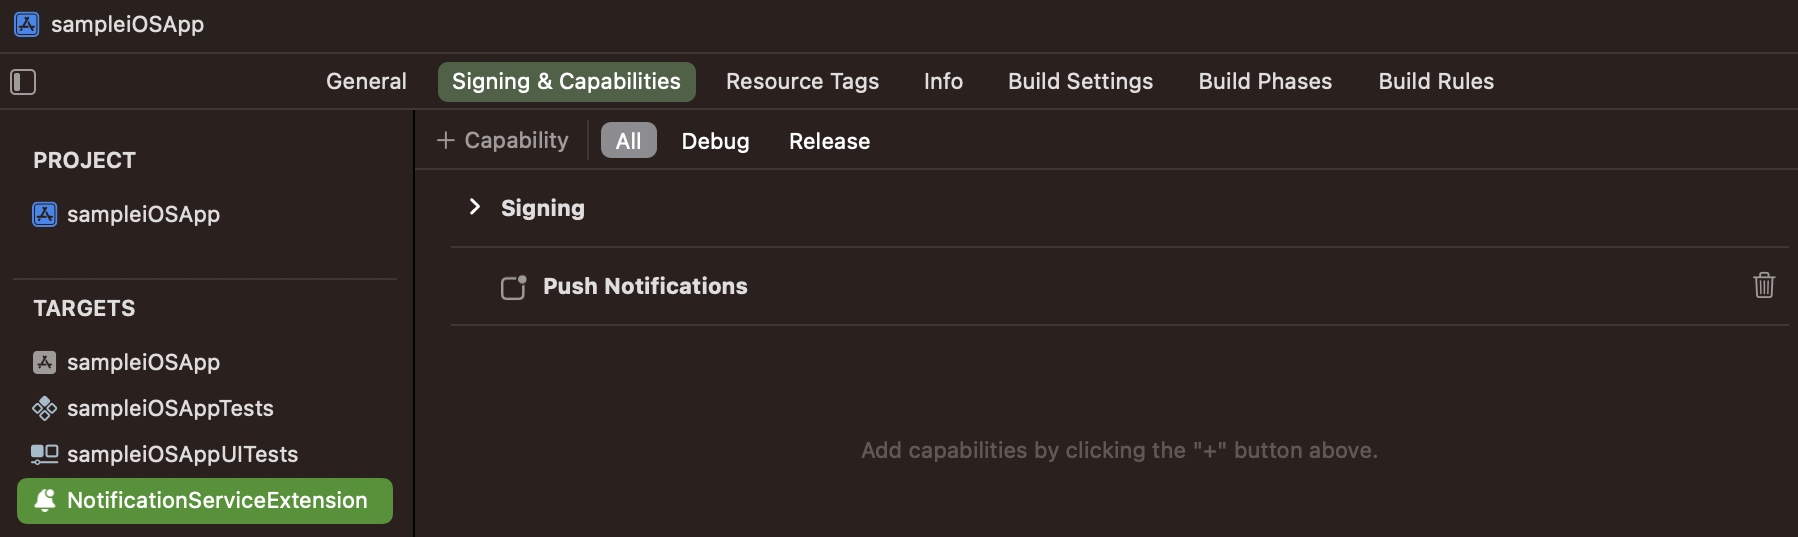
Configure Push in SignIn and Capabilities:
Go to Signing & Capabilities tab of your Notification Service Extension target and click on + symbol on the left corner of this tab and add Push Notifications and if you are upgraded Xcode and Push Notifications was already added in previous version of Xcode then remove Push Notifications and add it again to configure push notification properly for the upgraded devices.
Modify Push Payload in Notification Service Extension
Option 1: Integration Through CocoaPods:
If you are using cocoapods to integrate the integration of notifyvisitorsNotificationService sdk in your Notification Service Extension target you need to modify Push payload to download and attach media content if available in your payload to display rich media content (image, audio or video). To do so go to your NotificationService.swift/NotificationService.m file and update the didReceiveNotificationRequest() method as shown below.
override func didReceive(_ request: UNNotificationRequest, withContentHandler contentHandler: @escaping (UNNotificationContent) -> Void) {
        self.contentHandler = contentHandler
        bestAttemptContent = (request.content.mutableCopy() as? UNMutableNotificationContent)
        if let bestAttemptContent = bestAttemptContent {

notifyvisitorsNotificationService.didReceive(request, withBestAttempt: bestAttemptContent, withContentHandler: self.contentHandler)
    }
}
- (void)didReceiveNotificationRequest: (UNNotificationRequest *)request withContentHandler:(void (^)(UNNotificationContent * _Nonnull))contentHandler {
    self.contentHandler = contentHandler;
    self.bestAttemptContent = [request.content mutableCopy];

 [notifyvisitorsNotificationService didReceiveNotificationRequest: request withBestAttemptContent: self.bestAttemptContent withContentHandler: self.contentHandler];

}
Make sure notifyvisitorsNotificationService.didReceive() method of our SDK is called in the end of the didReceiveNotificationRequest() if you modify payload after calling this method then SDK may not work properly so you can put some checks to identify your other payloads if you need to handle any.
Now in your same NotificationService.swift/NotificationService.m file update the serviceExtensionTimeWillExpire() method as shown below.
override func serviceExtensionTimeWillExpire() {
if let contentHandler = contentHandler, let bestAttemptContent =  bestAttemptContent {


notifyvisitorsNotificationService.serviceExtensionTimeWillExpire()
  }
}
- (void)serviceExtensionTimeWillExpire {

 [notifyvisitorsNotificationService serviceExtensionTimeWillExpire];
}
Option 2: Manual Integration:
If you are using manual integration of NotifyVisitors SDK in your Notification Service Extension target you need to modify Push payload to download and attach media content if available in your payload to display rich media content (image, audio or video). To do so, go to your NotificationService.swift/NotificationService.m file and update the didReceiveNotificationRequest() method as shown below.
override func didReceive(_ request: UNNotificationRequest, withContentHandler contentHandler: @escaping (UNNotificationContent) -> Void) {
self.contentHandler = contentHandler
bestAttemptContent = (request.content.mutableCopy() as? UNMutableNotificationContent)
if let bestAttemptContent = bestAttemptContent {

// Modify the notification content here…
notifyvisitors.loadAttachment(with: request, bestAttempt: bestAttemptContent, withContentHandler: self.contentHandler)
      }
}
-(void)didReceiveNotificationRequest:(UNNotificationRequest *)request withContentHandler:(void (^)(UNNotificationContent * _Nonnull))contentHandler {
self.contentHandler = contentHandler;
self.bestAttemptContent = [request.content mutableCopy];

// Modify the notification content here…


[notifyvisitors LoadAttachmentWithRequest: request bestAttemptContent: self.bestAttemptContent withContentHandler: self.contentHandler];
}
Make sure LoadAttachmentWithRequest() method of our SDK is called in the end of the didReceiveNotificationRequest() if you modify payload after calling this method then SDK may not work properly so you can put some checks to identify your other payloads if you need to handle any.
Important Note
Till the above steps are completed, your app will be able to receive rich push, Action Buttons, and badge counts can be displayed, but till now, delivery count is not enabled, so you will see 0 as the delivery count to enable push delivery count in from your app to our panel you need to follow the next step to configure AppGroup properly to enable delivery count.
Configure App Groups for All Targets:
Let's set up AppGroups in your app to count push deliveries in your NotifyVisitors panel. First, we'll select an AppGroupID and set it up in each of the info.plist of your two targets (i.e. Your App's Main Target and Your Notification Service Extension Target), and then we'll use the same AppGroupID to create and activate the same AppGroup in both target’s Signing & Capabilities Tabs. To configure this way, follow the steps listed below.
- Let’s assume the AppGroupID we want to use is group.{Your App Bundle Identifier}.Notifyvisitors where {Your App Bundle identities} is the same as your App Bundle Identifier of your Main App Target.
- Now from the Project Navigator, go to your Main App project target, open info.plist as source code (right-click on info.plist and select Open as >> Source code), and paste the following code into it.
<key>nvAppGroupKey</key>
         <string>group.{Your App Bundle Identifier}.notifyvisitors</string>
You can simply open the info.plist, add a new row, and define a nvAppGroupKey as a String with a value of group.{your app bundle identifier}.notifyvisitors

- Repeat step 2 for the info.plist file in your Notification Service Extension Target project folder and enter the exact same key and values as in step 2.
Note
Make sure it is case sensitive and is exactly the same in both the info.plist files.
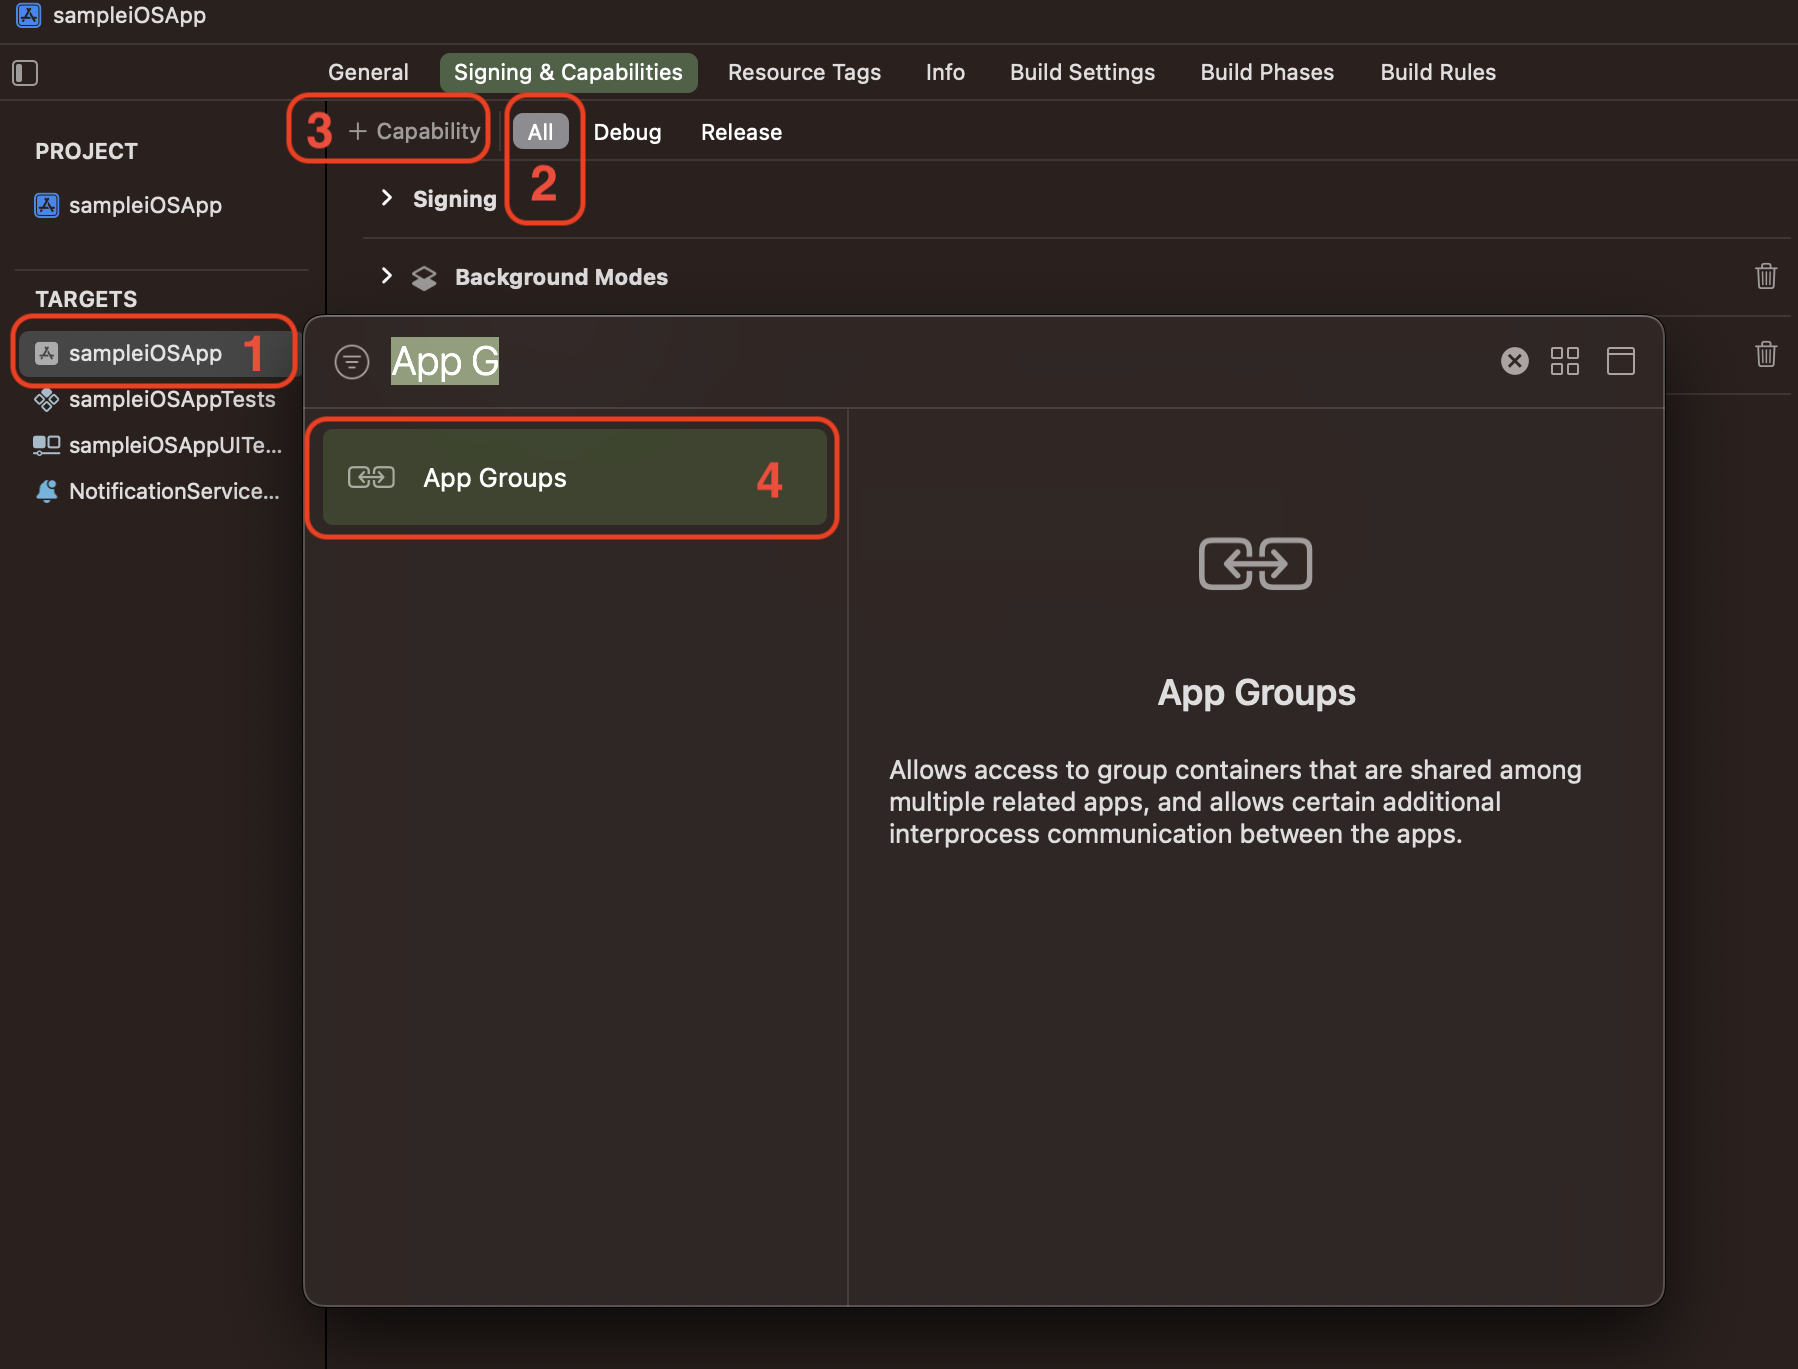
- Now, from the Project Navigator, select your app's Main Target and go to the Signing & Capabilities tab. If App Groups have not already been added, click + Capabilities symbol in the left corner of this tab and add App Groups, as shown in the screenshot below.
- Once you have finished adding AppGroups capabilities you will be able to see it in your Signing & Capabilities and then under AppGroups click "+" button to create a new app group with the same name as the value added to info.plist for both targets (i.e group.{Your App Bundle Identifier}.Notifyvisitors), as shown in the screenshot below. Finally, click OK.
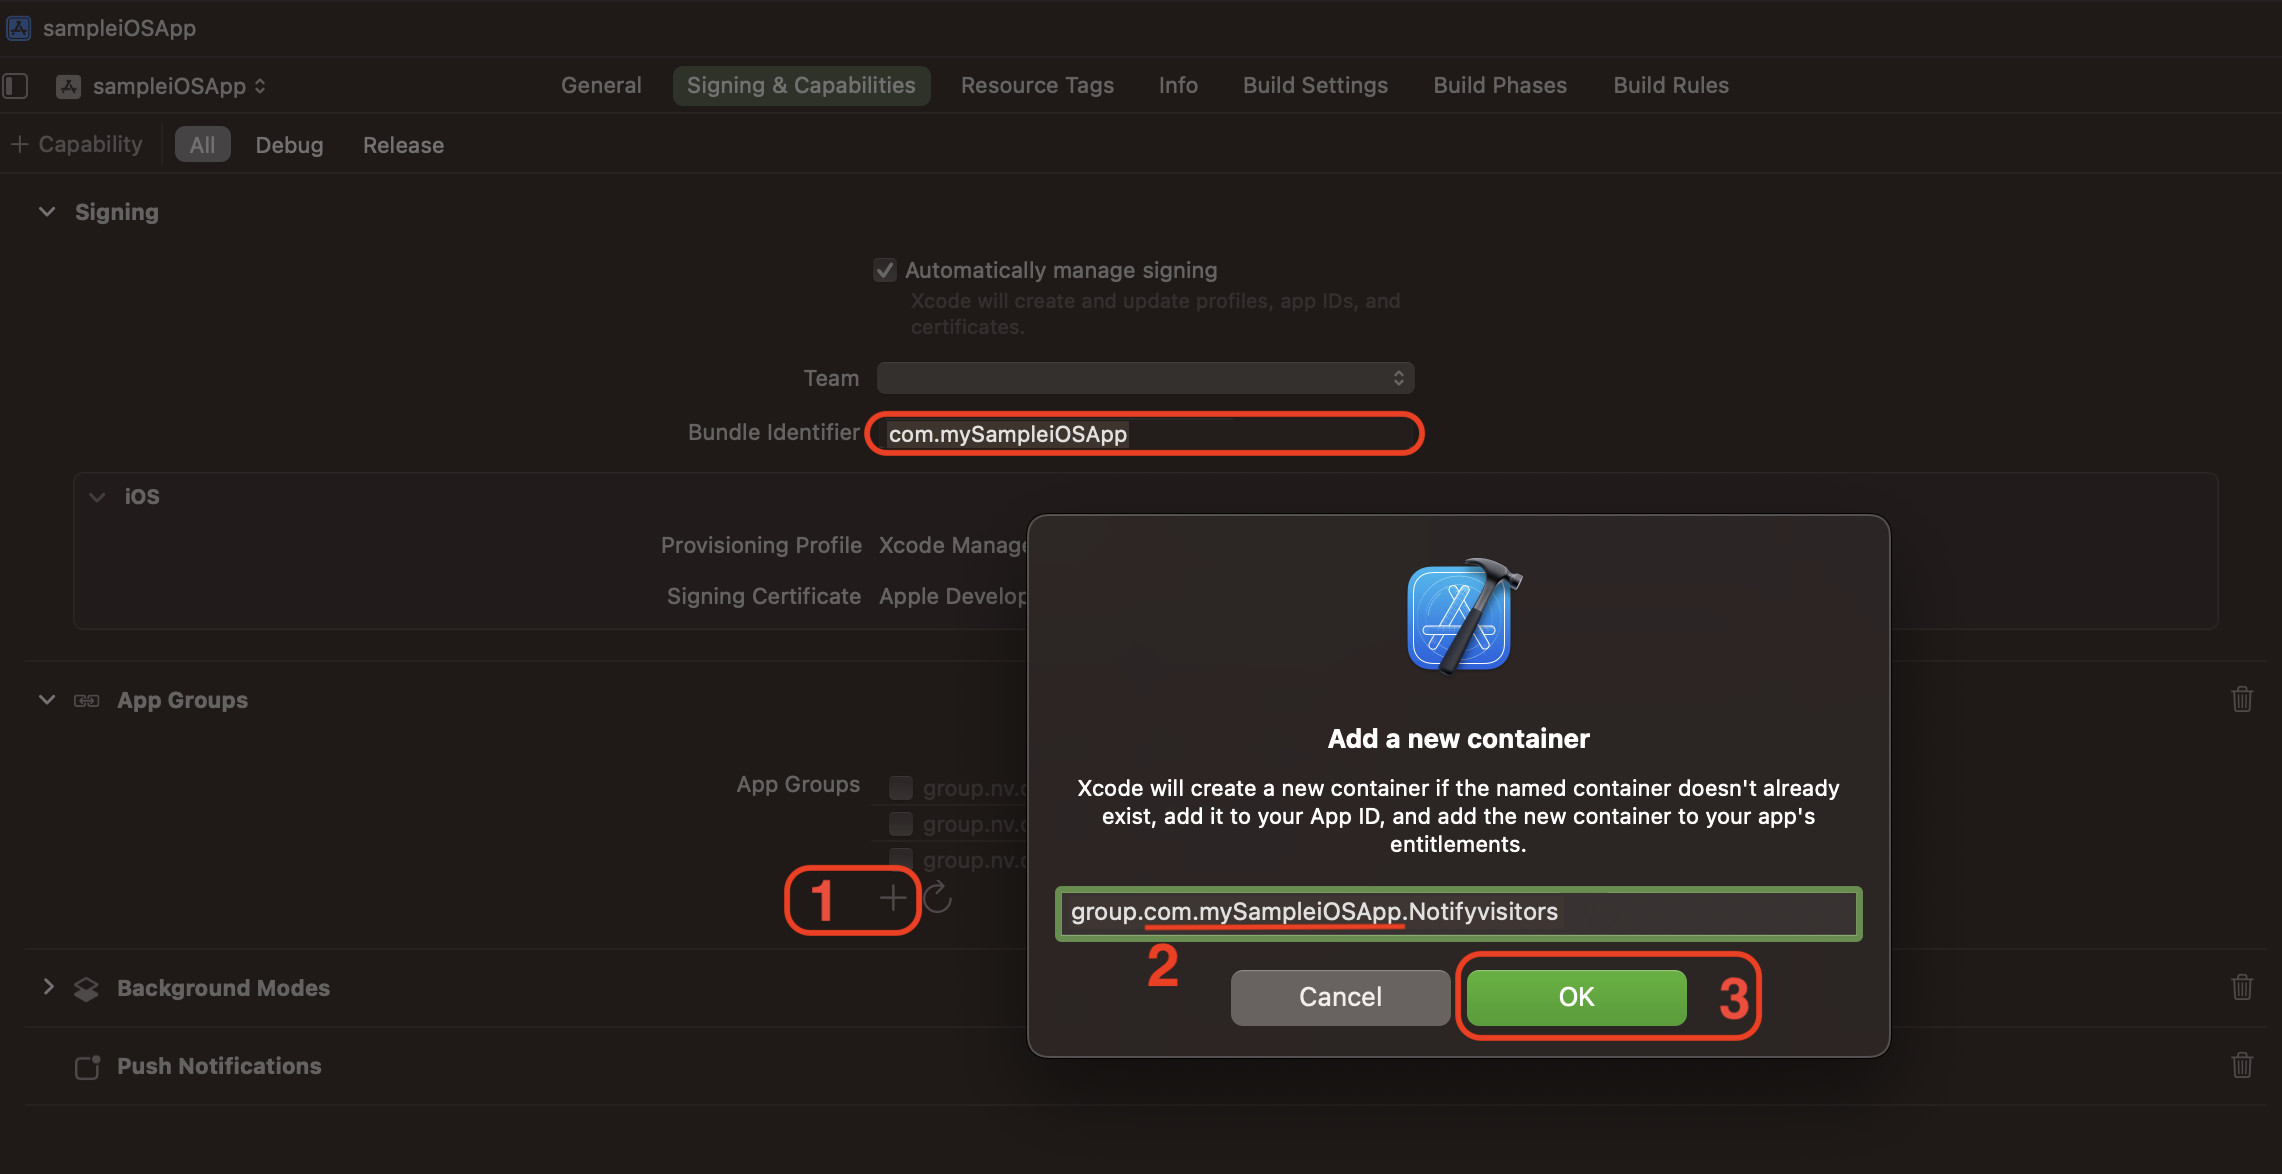
- Example: If you have set the AppGroupID to group.com.mySampleiOSApp.Notifyvisitors in both info.plist files, then add the same AppGroup to Signing & Capabilities, and ensure that this newly created AppGroup is checked (Turned On), as shown in the screenshot below.

- Once you have configured AppGroups in your Main App Target, you must activate the same AppGroup in your Notification Service Extension Target. To do so, select your Notification Service Extension target from the Project Navigator and go to the Signing & Capabilities tab. If AppGroups have not already been added, click the + Capabilities symbol in the left corner of this tab and add App Groups as shown in the screenshot below.
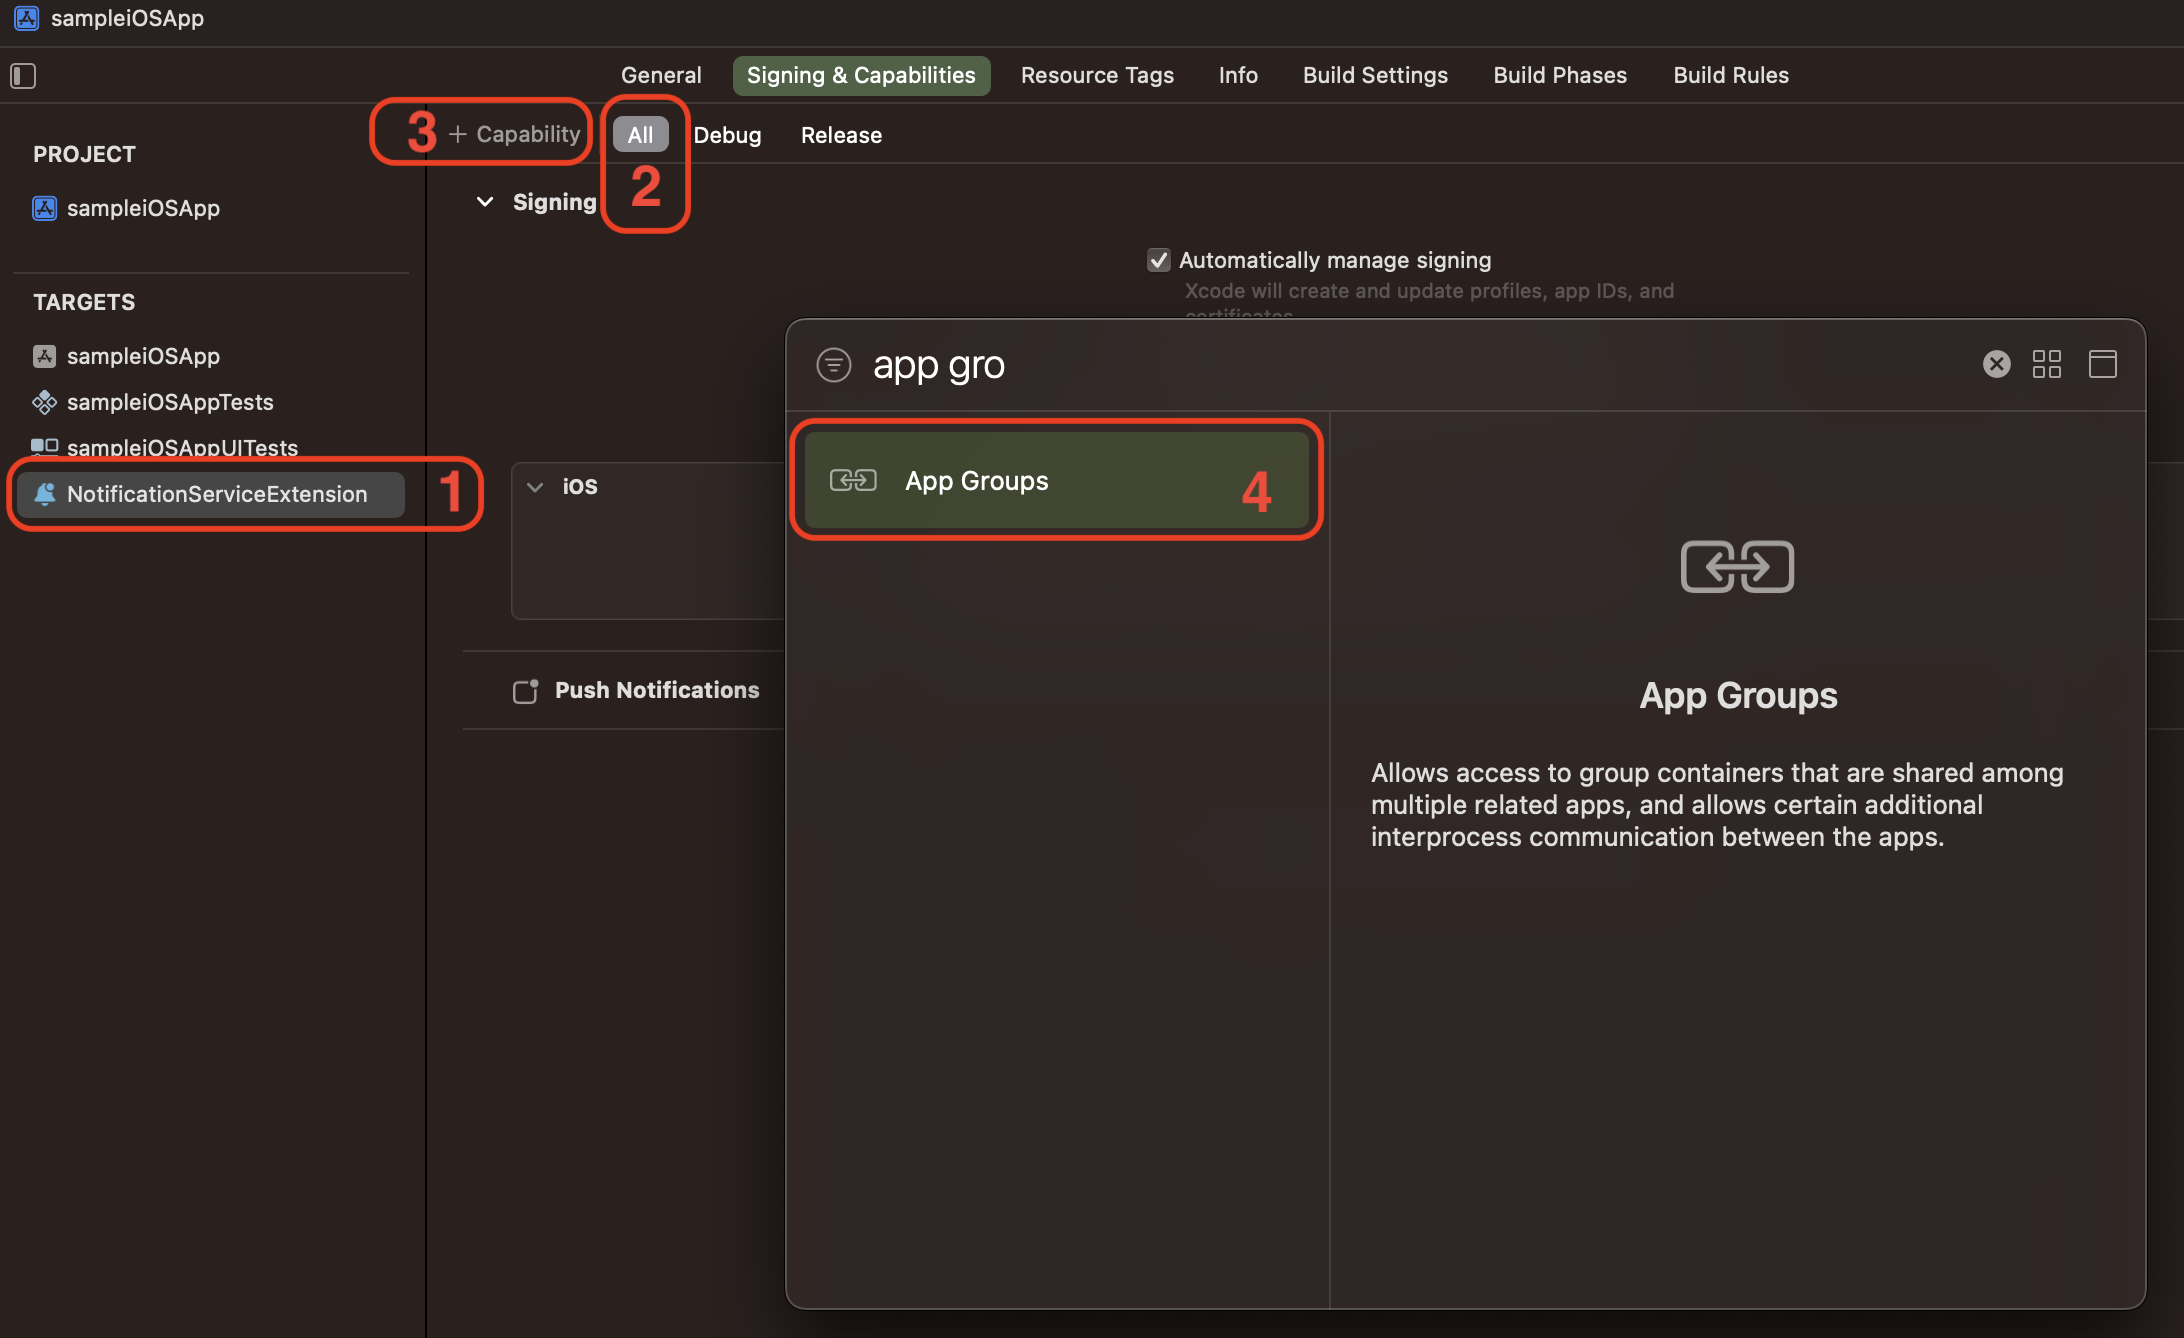
Once you've added AppGroups capabilities, you'll be able to see them in your Notification Service Extension Target's Signing & Capabilities. If a previously created AppGroupID isn't visible, click the refresh button next to the + symbol under App Groups to refresh the list of AppGroups configured in your Apple Developer account. Select the previously created app group and ensure that the same AppGroupID is checked (Turned on) in your Notification Service Extension Target as you did for your Main App Target.
Example: You have recently created an AppGroupID called group.com.mySampleiOSApp.Notifyvisitors for your Main App Target, and make sure the same AppGroupID is visible and checked (Turned On) in the Signing & Capabilities of your Notification Service Extension Target.

Updated 11 months ago