Push Notifications
In this era of globalization, businesses can be headquartered in one particular geographical location yet can attract customers from across the entire world. This is done primarily by leveraging the vast and expansive outreach of the internet. It is rare nowadays for any successful business to not have its own official website which it uses to engage, retain and expand its customer base. That said, mostly every business strives to enhance traffic to its official website, since more visitors means higher probability of gaining conversions. Moreover, in this day and age, people don’t access the internet exclusively via desktops, they also use portable gadgets & devices such as tablets, smartphones and even smartwatches for the same purpose.
In order to increase the website’s traffic and to timely reach out to customers irrespective of their choice of device, businesses employ a powerful marketing tool namely Web Push Notifications. This specific tool or technique enables businesses to enhance their brand’s awareness through customer engagement by delivering targeted and adequately timed web-based notifications to specific segments of their website's visitors.
In other words, Web Push Notifications are informative, concise yet captivating pop-up messages, designed essentially to gain the visitor's consent to convey product or service related offers, reminders, updates and promotions in the near future with the ultimate goal of converting a casual visitor to a regular customer. Since Web Push Notifications are browser, platform and device independent, they serve as a convenient communication channel to instantly grab the customer’s attention.
This special kind of notification first appears within the prospective customer's web browser when the customer visits an organization’s official website and if any visitor subscribes to the notification, then from there onwards it becomes effortless for the organization to connect with and engage that subscriber, even when the subscriber is not actively surfing the organization's website. Simply put, Web Push Notifications are a means to boost conversions via transforming mere visitors to subscribers and in turn converting those subscribers to consumers by way of customer engagement.
Steps To Setup Web Push Notifications
Follow the procedure delineated below to setup your Web Push Notifications: -
Integrate NotifyVisitors Push Notifications With Your ECommerce Store
-
In order to send Push Notifications to your customers you must first integrate your ecommerce domain or your online store with NotifyVisitors.
-
Our organization offers seamless integration exclusively to Shopify customers through the NotifyVisitors Shopify App, which means that in case you are already a Shopify customer then you will not be required to manually configure your Web Push Integration since we will handle the entire integration process for you.
-
However, if you avail the services of other ecommerce platforms for which NotifyVisitors does not provide pre-built integration, then you will have to manually integrate your ecommerce store or your website’s domain with NotifyVisitors.
Shopify Customers
As mentioned above, Shopify customers have an added advantage of bypassing the Web Push Integration process since they can integrate directly through the NotifyVisitors Shopify App. Check out the link provided below to learn how to integrate via the NotifyVisitors Shopify App.
How to integrate via the NotifyVisitors Shopify App.
Customers From Other ECommerce Platforms
Customers from ecommerce platforms other than Shopify, will have to follow a step by step procedure mentioned below in order to display their push notifications.
- Navigate to NotifyVisitors Dashboard > Settings > Web Push.
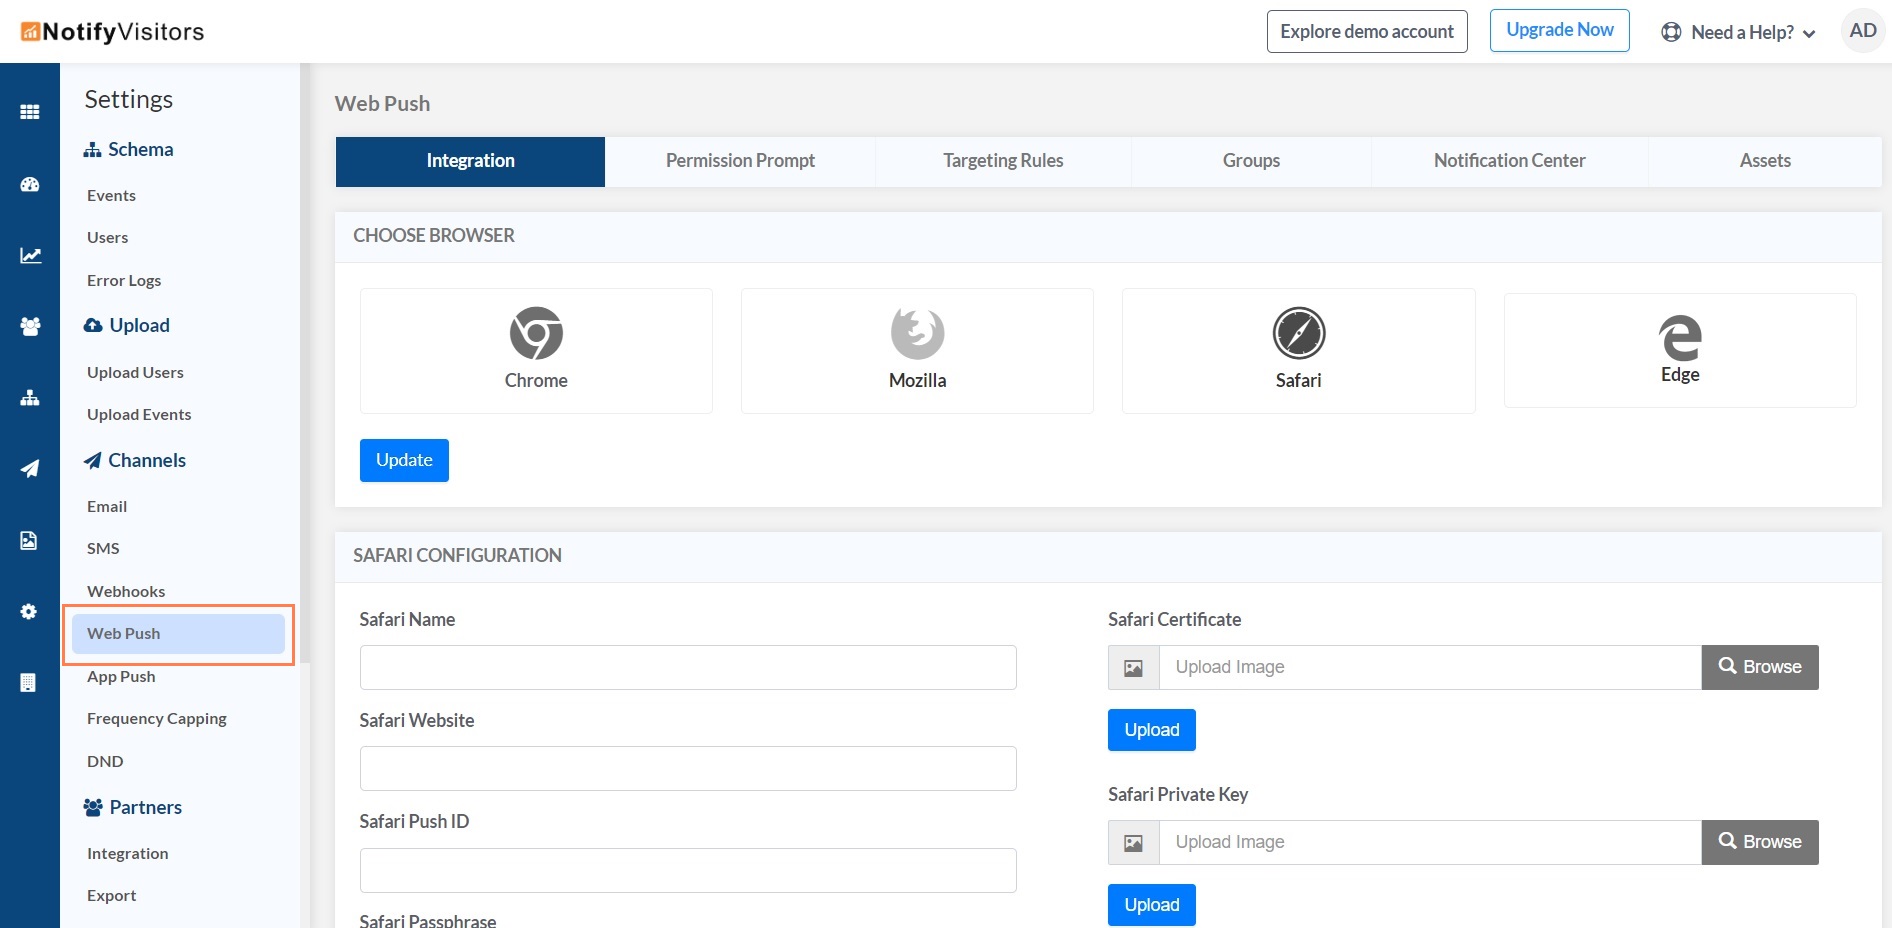
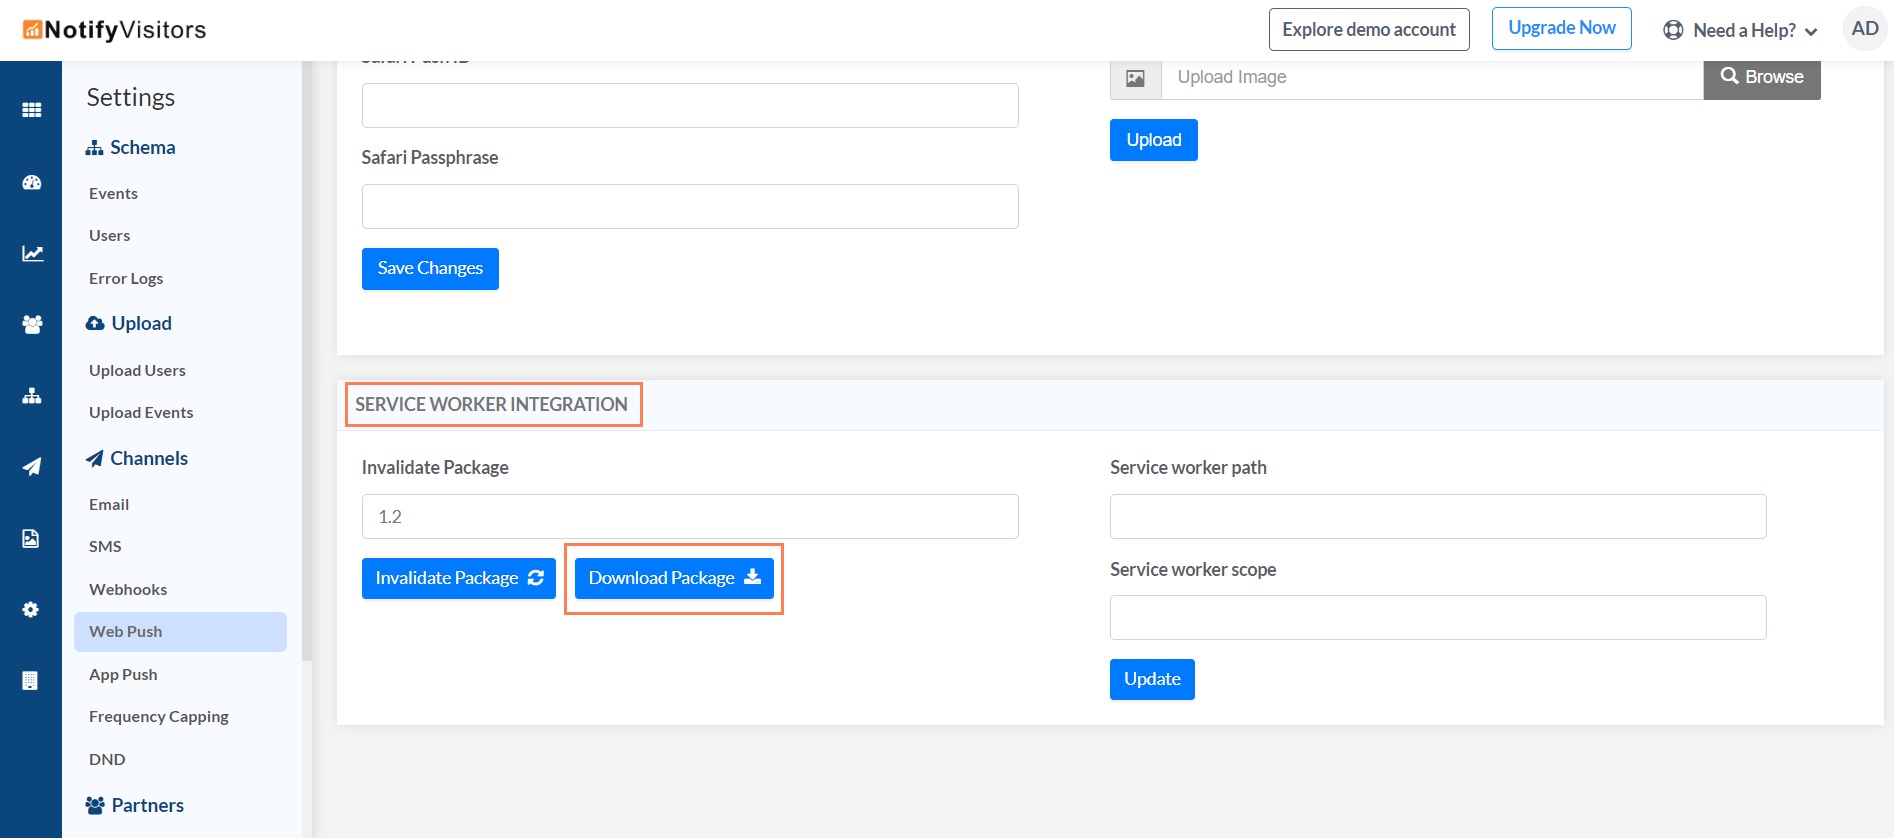
- Under the Integration tab look for the section titled ‘SERVICE WORKER INTEGRATION’.
-
Within the‘SERVICE WORKER INTEGRATION’ section, click on the ‘Download Package’ button.
-
A compressed package titled ‘package-(brand ID)’ will get downloaded to your system.
-
Decompress that package and you will get a folder titled ‘notifyvisitors_push’ along with a Javascript file titled ‘service-worker’
Note: Upon decompression, in total you will get two files viz. one folder and one Javascript file.
-
Place both of these files within your Store Website’s root folder & shift the files to the top-level root of your site’s directory.
Note: Remember that all URLs should be publicly accessible: **https://yoursite.com/service-worker.js
-
The final step to complete this process is to include the NotifyVisitors integration code in the head section of your organization’s website. Check out the link provided below in order to learn how to add the integration code:
How to add the integration code
General Configuration Settings For All ECommerce Platforms
Once your website’s domain / ecommerce store has been successfully integrated with NotifyVisitors, you can then set up the remaining configuration settings under the Integration tab, as per your marketing requirements.
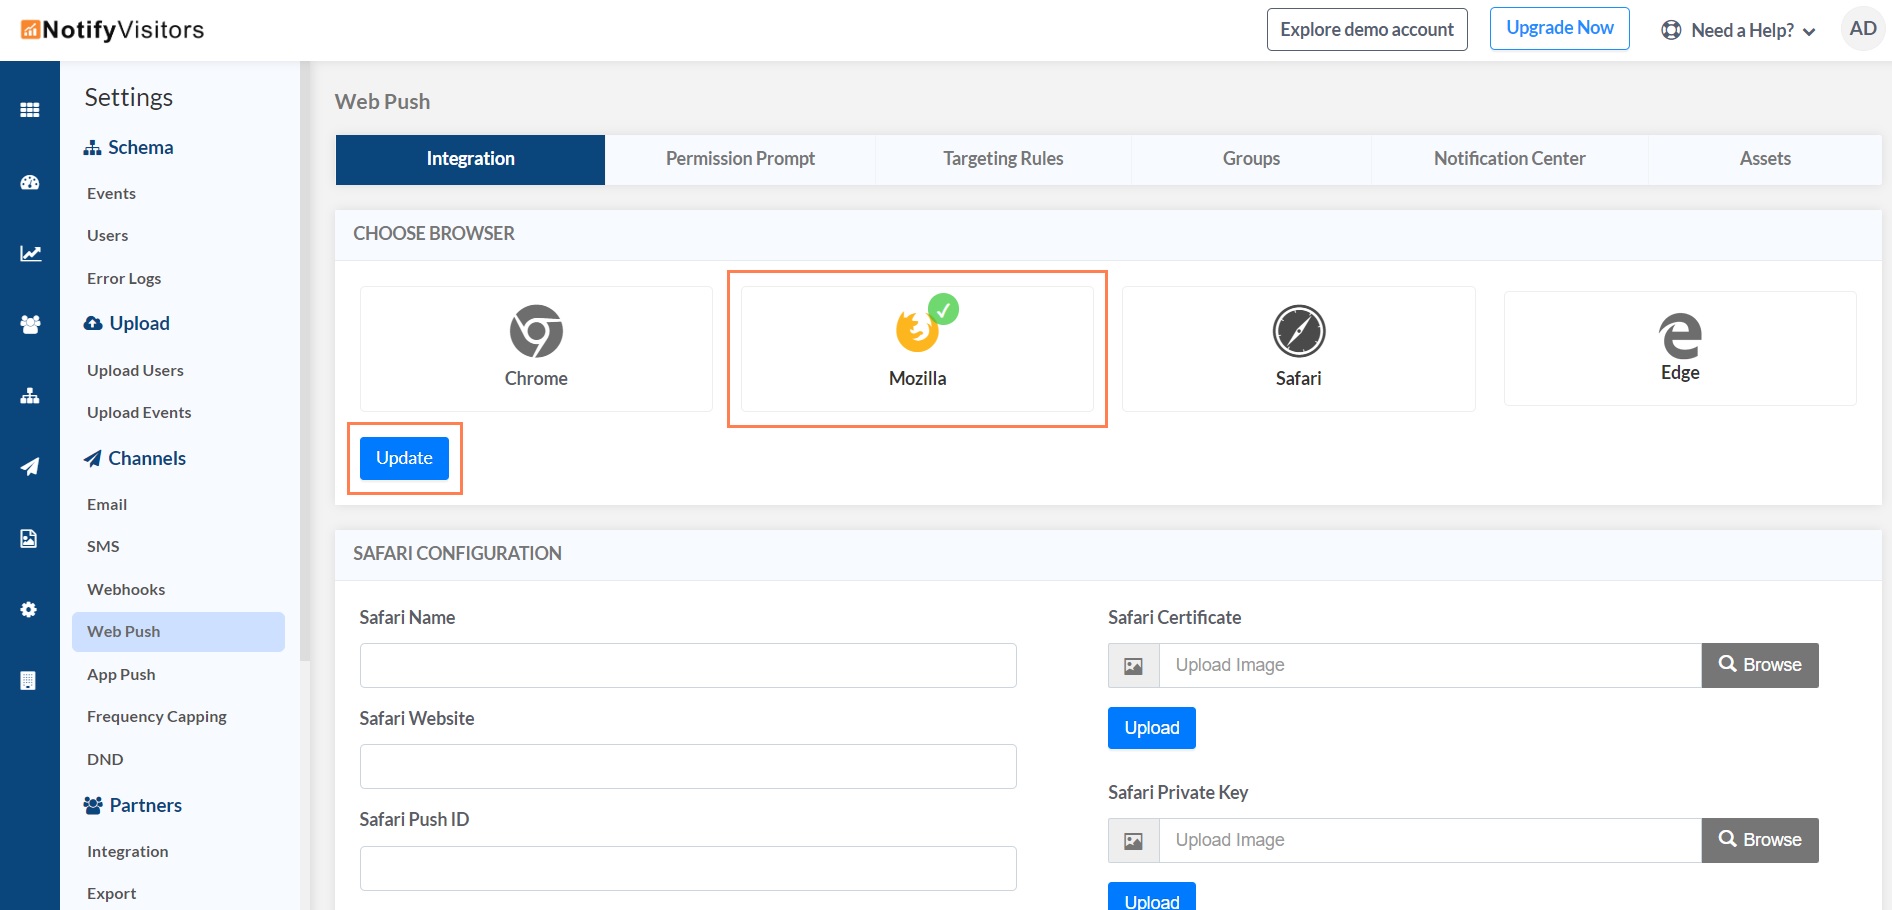
- Using the ‘CHOOSE BROWSER’ section under the Integration tab, you can select the specific browsers in which you intend to deploy your Web Push Notifications. In order to select a browser, first click on the browser’s name and a tick mark would appear on it, then click on the ‘Update’ button to finalize your selection.Note that your Web Push Notifications would work only for the selected browsers.
-
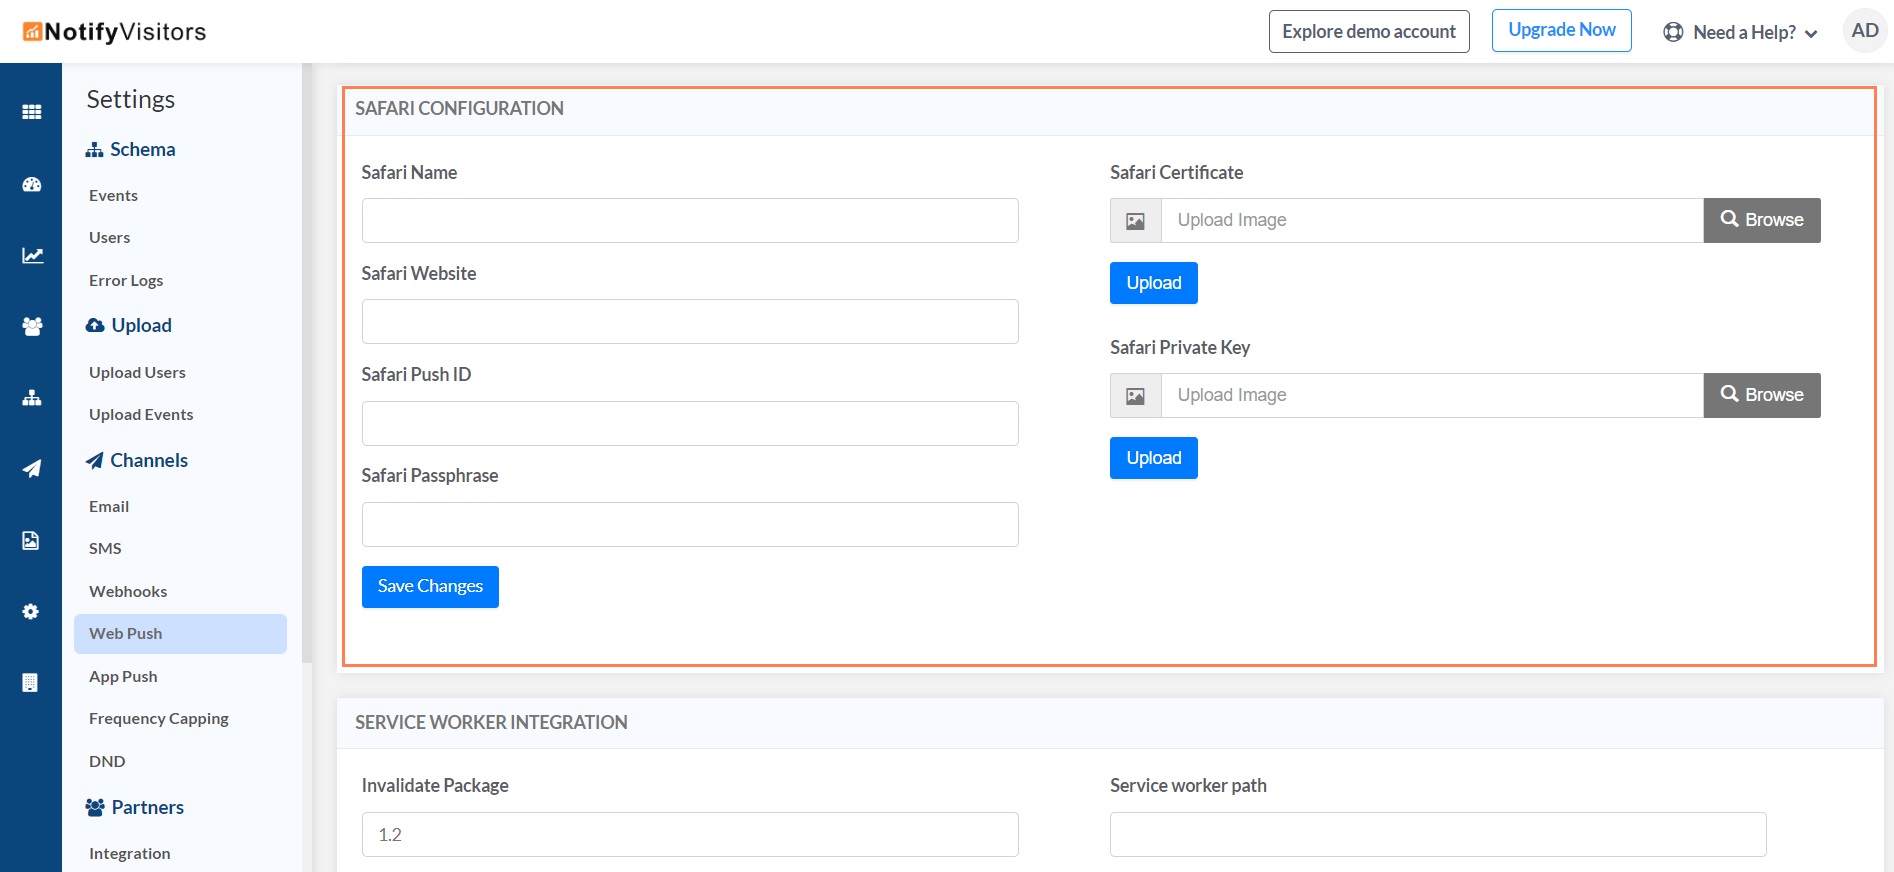
The Safari web browser does not allow Web Push Notifications to run within it by default. Additional certificates are required to be uploaded and certain configurations are meant to be set, in order for Push Notifications to run within this specific web browser.
-
Using the ‘SAFARI CONFIGURATION’ section under the Integration tab, you can set the required configuration and upload your organization’s proprietary Safari Web Push Certificates in order to deploy Push Notifications within the Safari web browser. Check out the guide in the link provided below to learn more about uploading your organization’s proprietary Safari Web Push Certificates.
Guide To Safari Web Push Certificate
Configure Permission Prompts
The next step after successfully integrating your website, is to configure the Permission Prompts. Permission Prompts appear when a prospective customer first visits your organization’s official website. The primary purpose of the prompt is to seek the website visitor's consent to receive additional push notifications regarding product-related offers, reminders and promotions in the near future. Permission Prompts can be customized and configured in many ways as follows: -
-
Under the Permission Prompt tab there are three sections namely ‘CONFIGURATION’, ‘PERMISSION BOX’ and ‘RICH OVERLAY CONTENT’. Using these three sections, you can configure the Permission Prompt’s exact time of appearance, device of appearance and also customize its design and content.
-
Using the settings within the ‘CONFIGURATION’ section, you can choose to display the Permission Prompt immediately upon the webpage's initial load or display it only after the visitor has performed a particular action / event. To be exact, the ‘Custom Call’ feature allows you to withhold the Permission Prompt from being displayed up until the visitor has performed a specific action such as clicking on the custom notification bell icon, usually present at the topmost bar or header of the website.
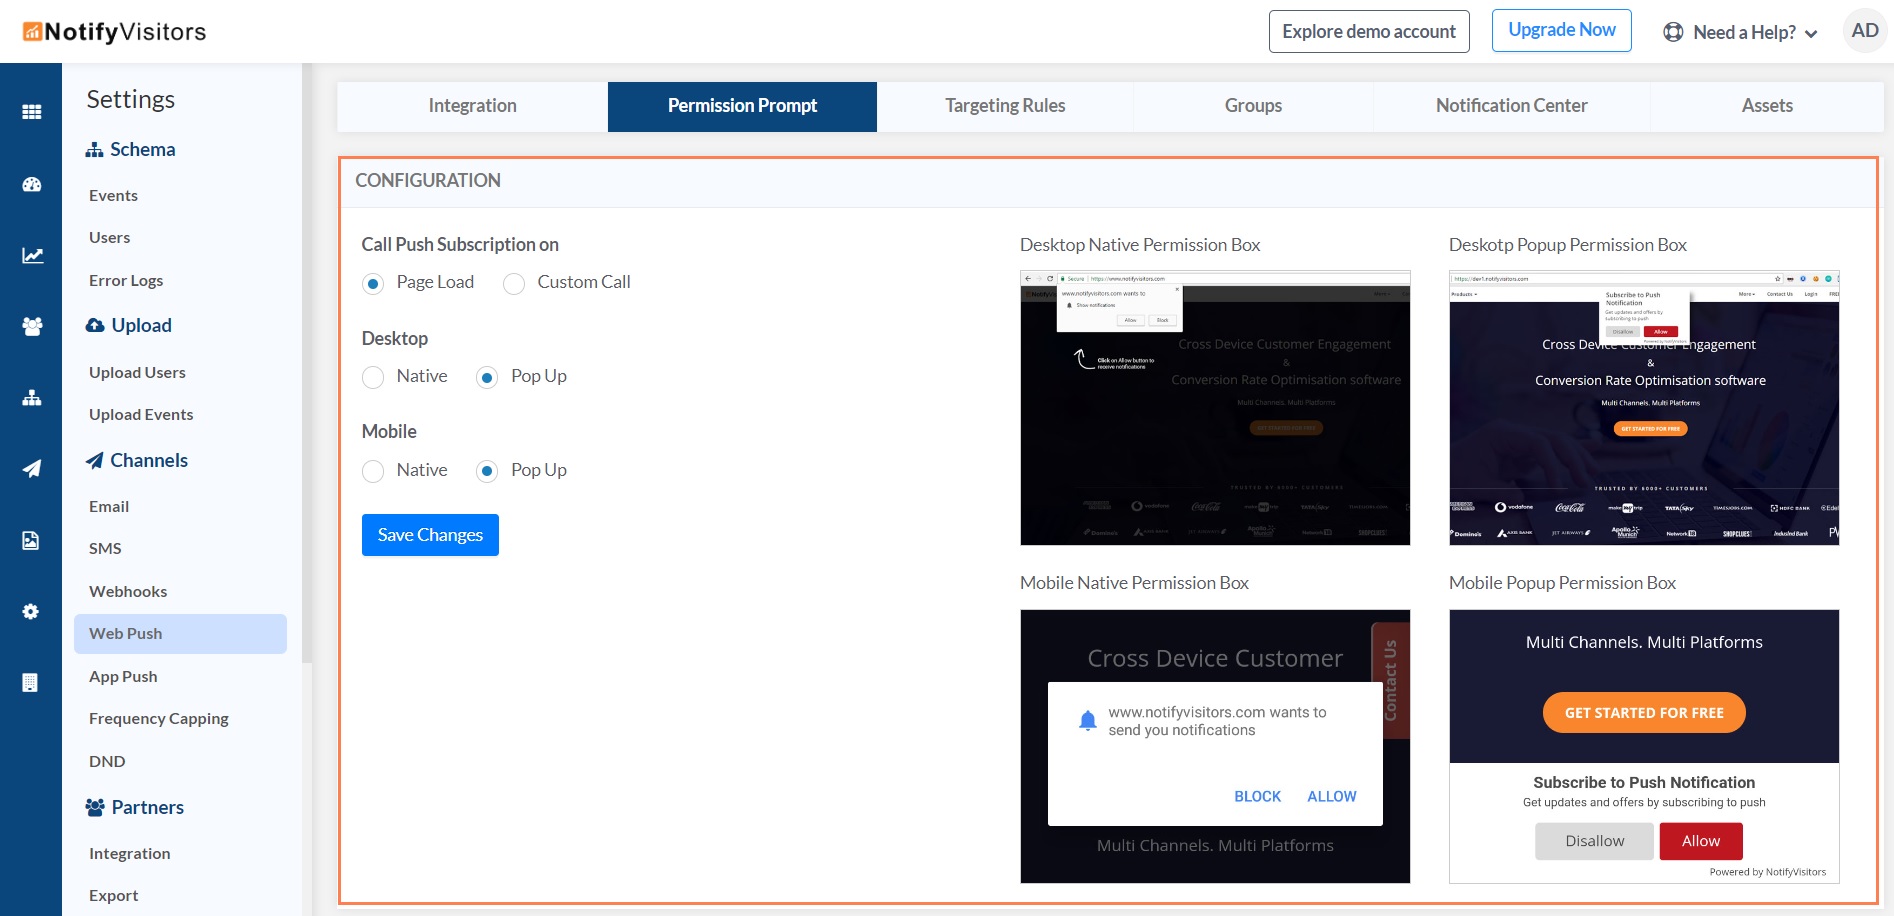
- Additionally, every browser, be its mobile or desktop version, has its own native format of displaying a permission prompt. Using the settings within the ‘CONFIGURATION’ section, you can choose to either display your organization’s custom-designed permission prompt (Pop-Up) or display the prompt in the browser’s ‘Native’ format. Moreover, you can choose to do so independently for both the mobile and desktop versions of any browser.
Note: Nowadays, certain web browsers such as Safari and Mozilla Firefox have discontinued showing
permission prompts in their ‘Native’ format upon page load.
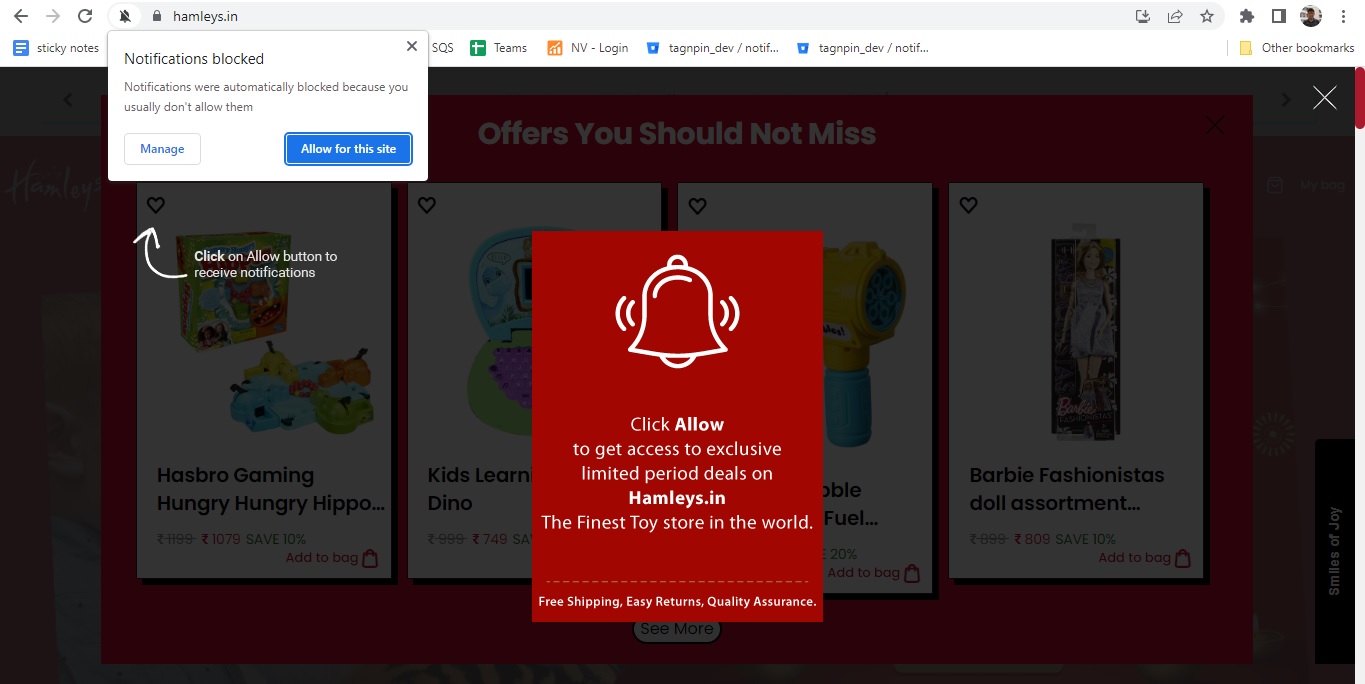
So,for such browsers, you will have to set up your custom Permission Prompt anyway, since your website’s visitors would require it to convey their consent to receive future notifications through click actions on buttons available within the Permission Prompt such as the ‘Allow’ button. Furthermore, you can also include rich overlay content which would appear once the visitor clicks on the ‘Allow’ button.
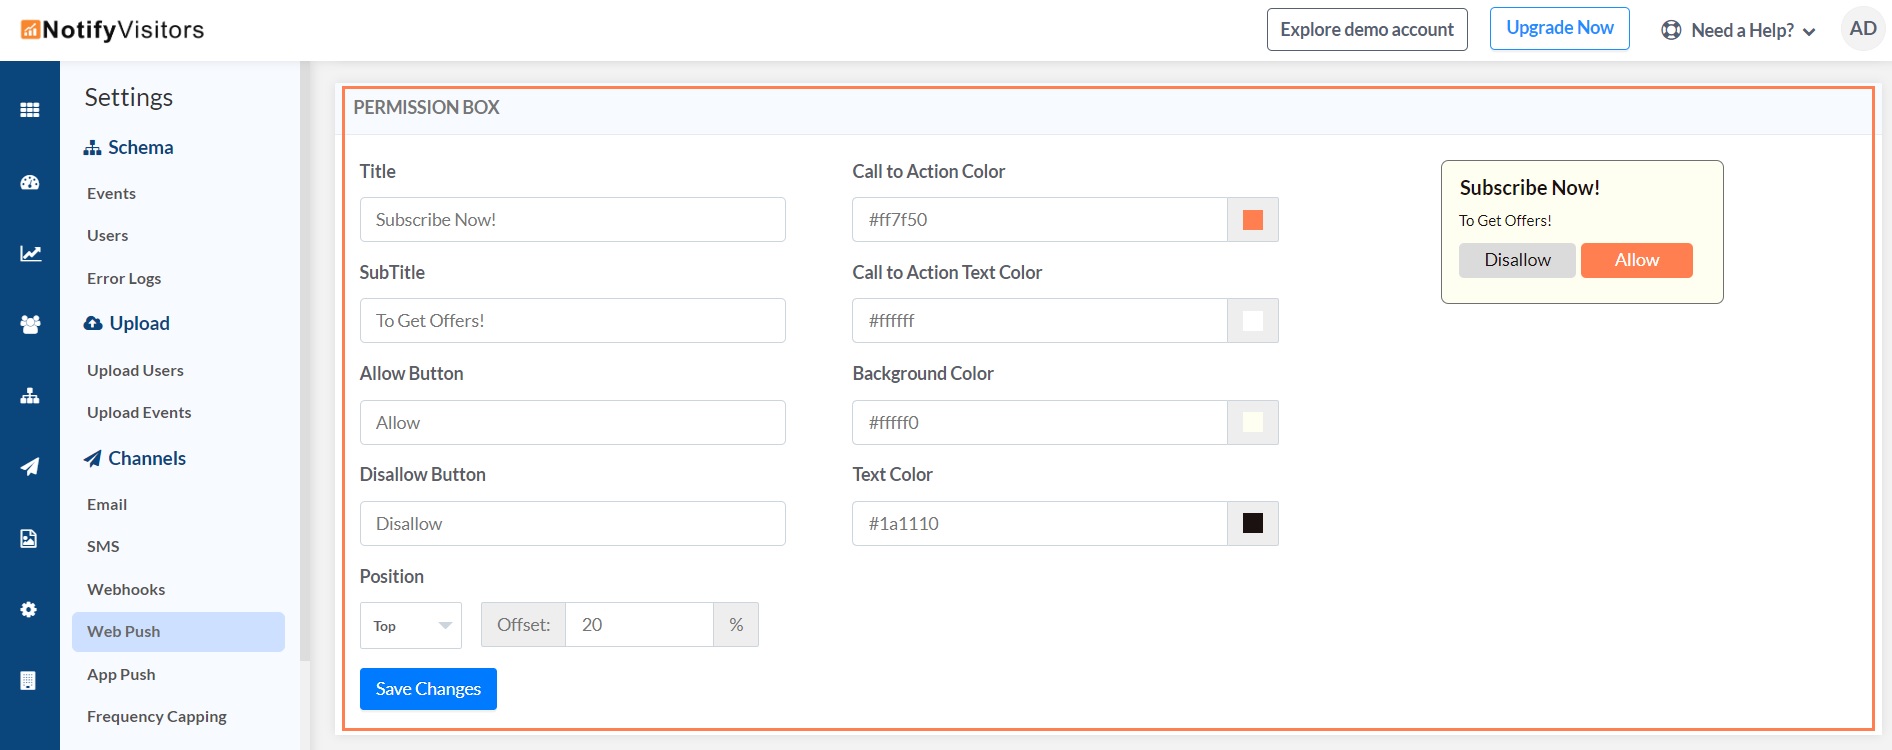
- Using the settings within the ‘PERMISSION BOX’ section, you can customize the design and layout of your Permission Prompt pop-up. You can customize the buttons within the pop-up, the text within the pop-up, the background color of the pop-up and even set the position where the pop-up should appear within the browser window.
Set Targeting Rules
The next step after configuring the Permission Prompt, is to set the targeting and URL rules.
-
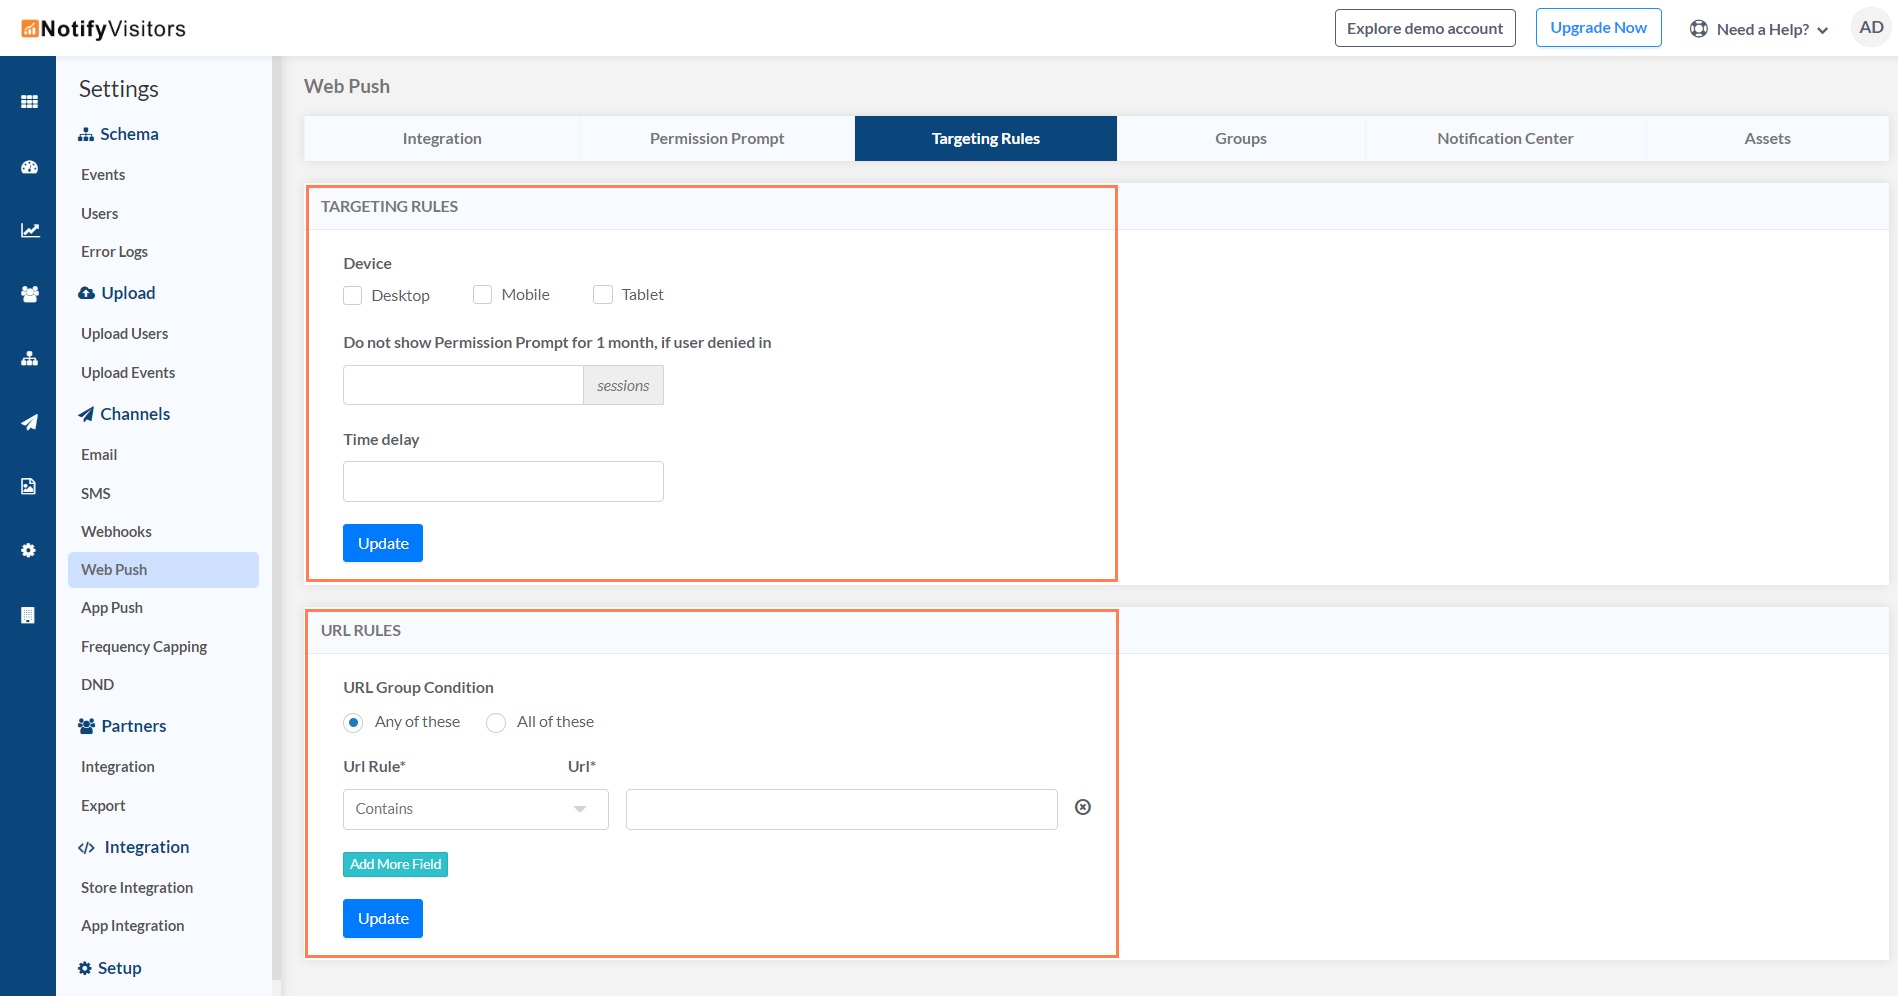
Under the ‘Targeting Rules’ tab, there exist two sections namely ‘TARGETING RULES’ and ‘URL RULES’. Targeting rules allow you to select the specific platforms viz. desktop, mobile and tablet on which you could forward or target your Web Push Notifications.
-
Furthermore, this section enables you to set time delays for your permission prompts and also allows you to control whether or not to display further messages seeking visitor’s consent, in case the visitor has already denied to receive any future alerts regarding service or product-related offers.
-
The configuration settings within the ‘URL RULES’ section, allow you to precisely target your Subscription prompts to specific web pages of your organization’s website. This is made possible by allowing you to define certain portions of a web address or keywords for which the URLs of all the web pages within your organization’s website will be searched and the push notifications will appear only on those URLs that satisfy a specific condition (URL Rule) associated with those predefined keywords.
-
You can add as many keywords along with their associated conditions (URL Rules) as you like, by clicking on the ‘Add More Field’ button. Additionally, you can also choose whether all or any of the specified conditions associated with the defined keywords should be satisfied in order for the Web Push Notifications to get successfully deployed.
Create Subscription Groups
The next step after setting the targeting rules, is to create subscription groups.
Nowadays, most companies don’t sell one solitary product, instead they offer a variety of products that could appeal to people belonging to different age groups, cultures, genders, professions etc. For instance, the company Adidas sells distinct sportswear for men, women and kids. So, an organization can offer a product that might interest a certain type of audience or in other words, only to a specific section of its website’s visitors.
For this reason, organizations intend to design their Web Push Notifications in a manner that allows them to seek consent form their website’s visitors to receive alerts only for those specific products or services in which their visitors are interested. This strategy is employed in order to ensure that the visitors are not sent irrelevant product-related offers and promotions.
-
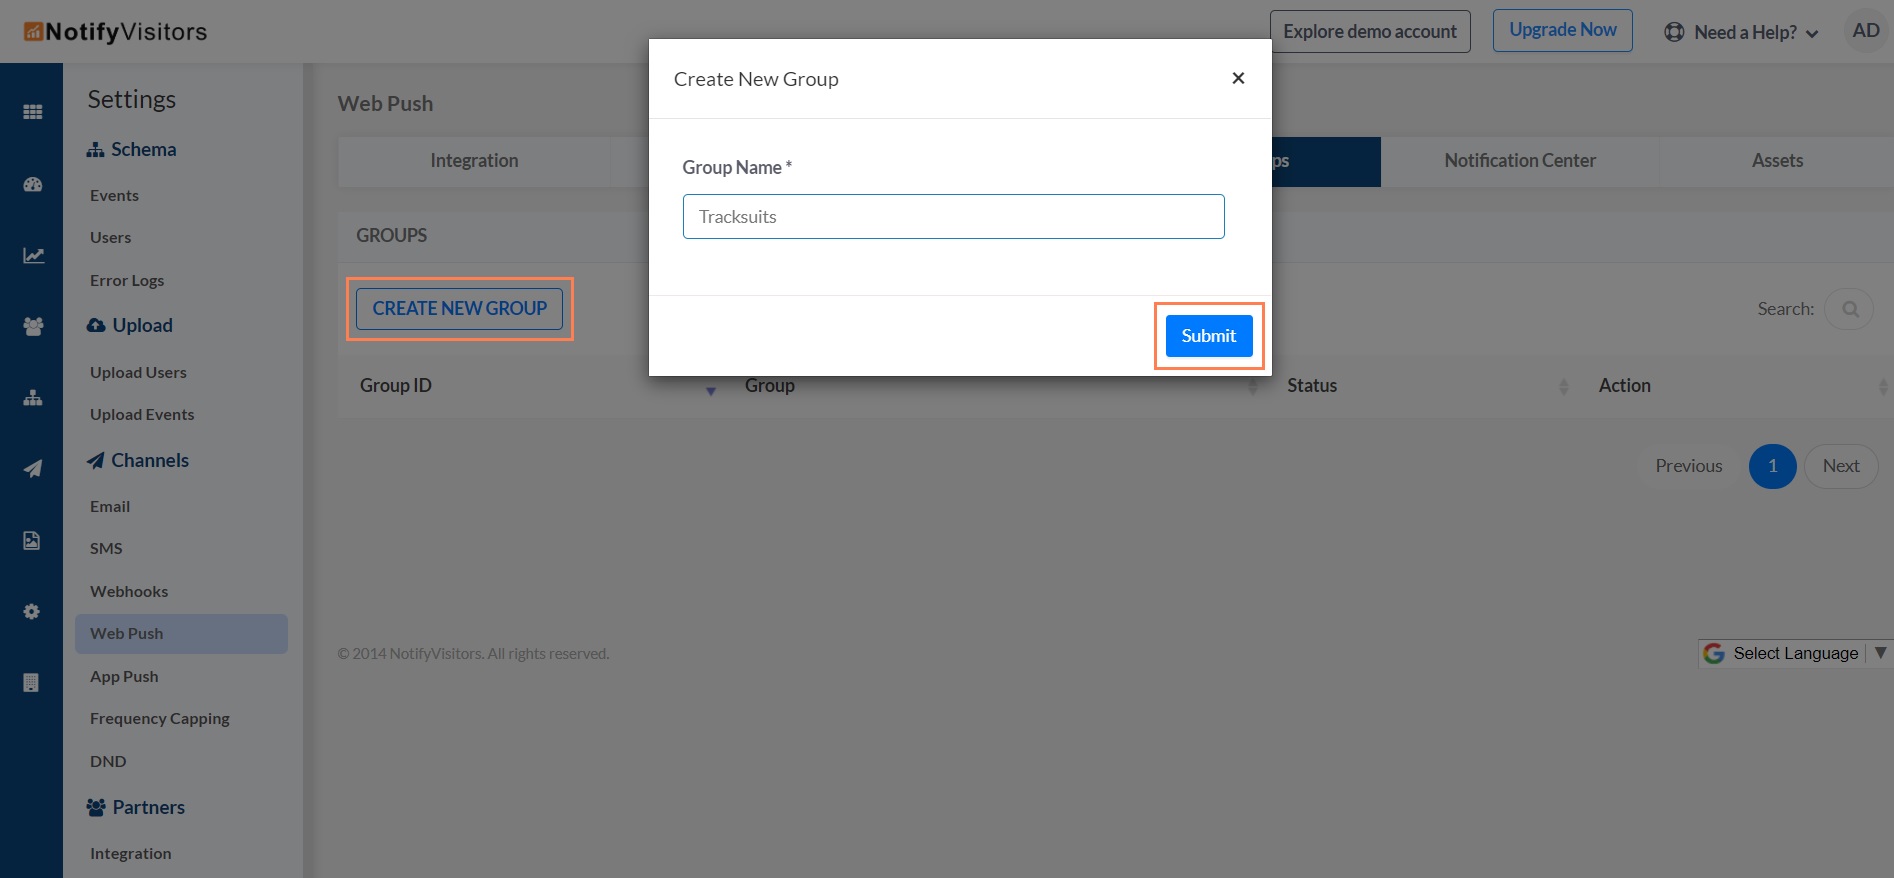
Under the ‘Groups’ tab there exists only one section with an identical title i.e ‘GROUPS’. In order to create a new subscription group, click on the ‘CREATE NEW GROUP’ button and a pop-up would appear on-screen prompting you to enter a group name. Enter the desired group name and then click on the ‘Submit’ button present within the same pop-up.
Note: We recommend that you choose a relevant group name, which means that the chosen group name should clearly convey to the visitor about a specific product or service offered by your organization.
- All the subscription groups you create will get listed under the ‘GROUPS’ section. Adjacent to the name of each subscription group, there will be a toggle switch through which you can enable or disable that specific subscription group.
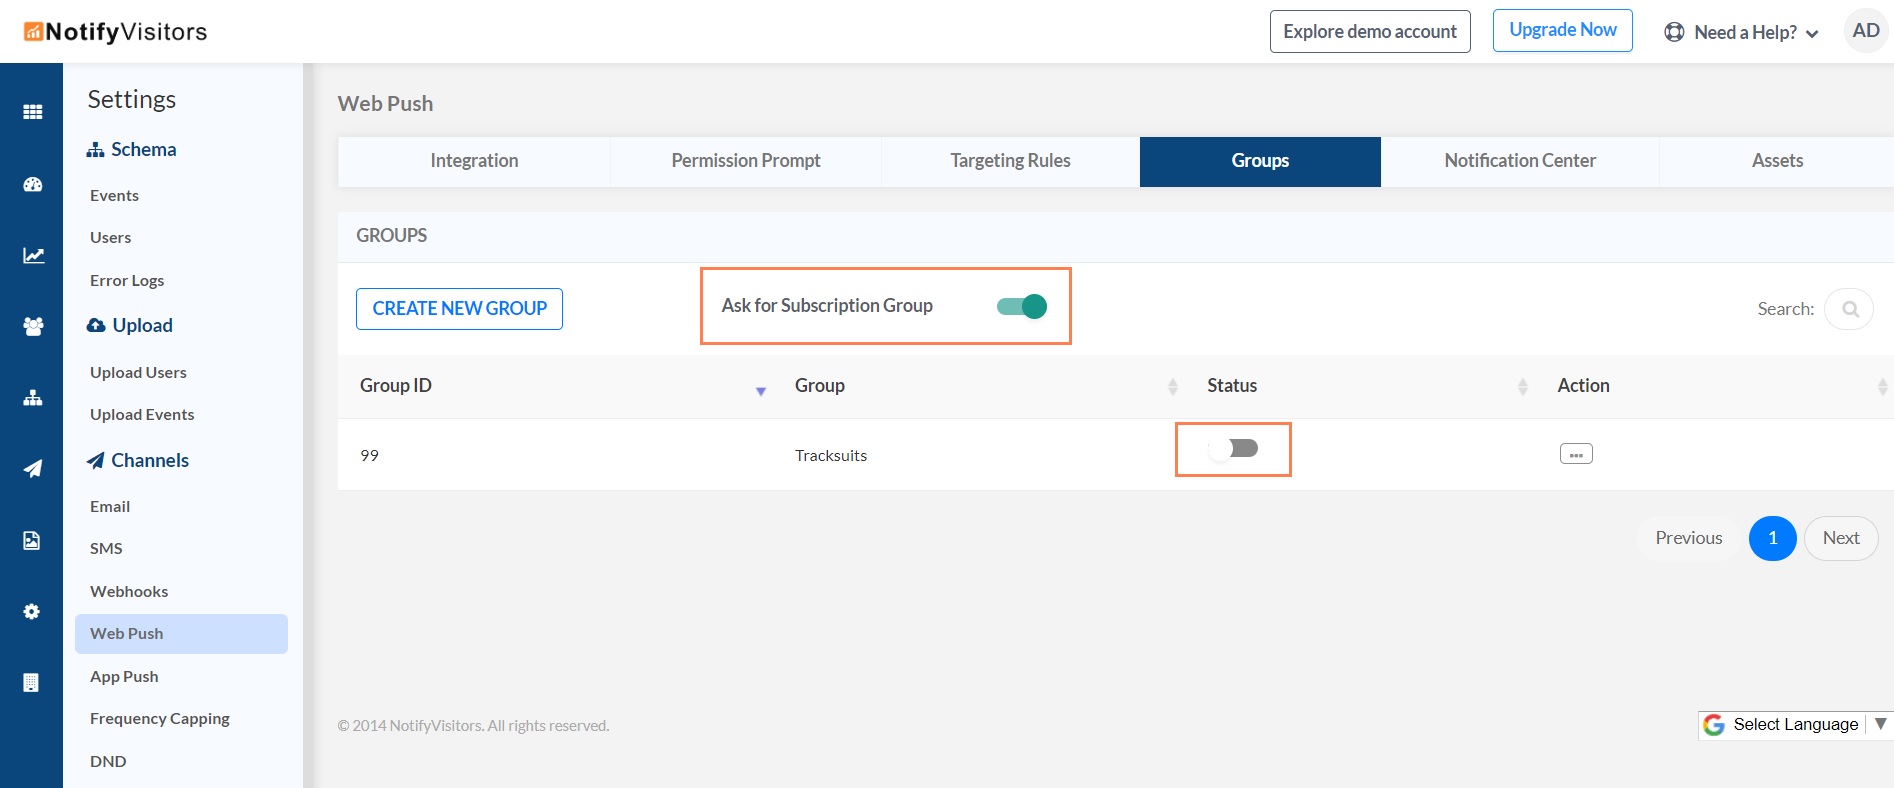
- All those subscription groups which are enabled would appear in the form of a checklist within the deployed Permission Prompt. Your website’s visitors can then select specific groups from within the Prompt that appeal to their interest. Kindly note that the subscription groups would get listed within the Permission Prompt only if you have enabled the main toggle switch titled ‘Ask For Subscription Group’.

Configure The Notification Center
Push Notifications can be clubbed or combined at one place i.e within the Notification Center. Clubbing is essential in scenarios where multiple push notifications get sent to a particular subscriber and it is quite possible that the subscriber might miss reading a few. The Notification Center acts as a repository on your website where all the sent notifications get accumulated and can be accessed anytime by the subscriber.
Visitors can check for a particular notification that interests them, simply by choosing it from within the Notification Center. A web browser may have its own native or default Notification Center but it can also be manually added, designed and configured by you through the NotifyVisitors panel.
-
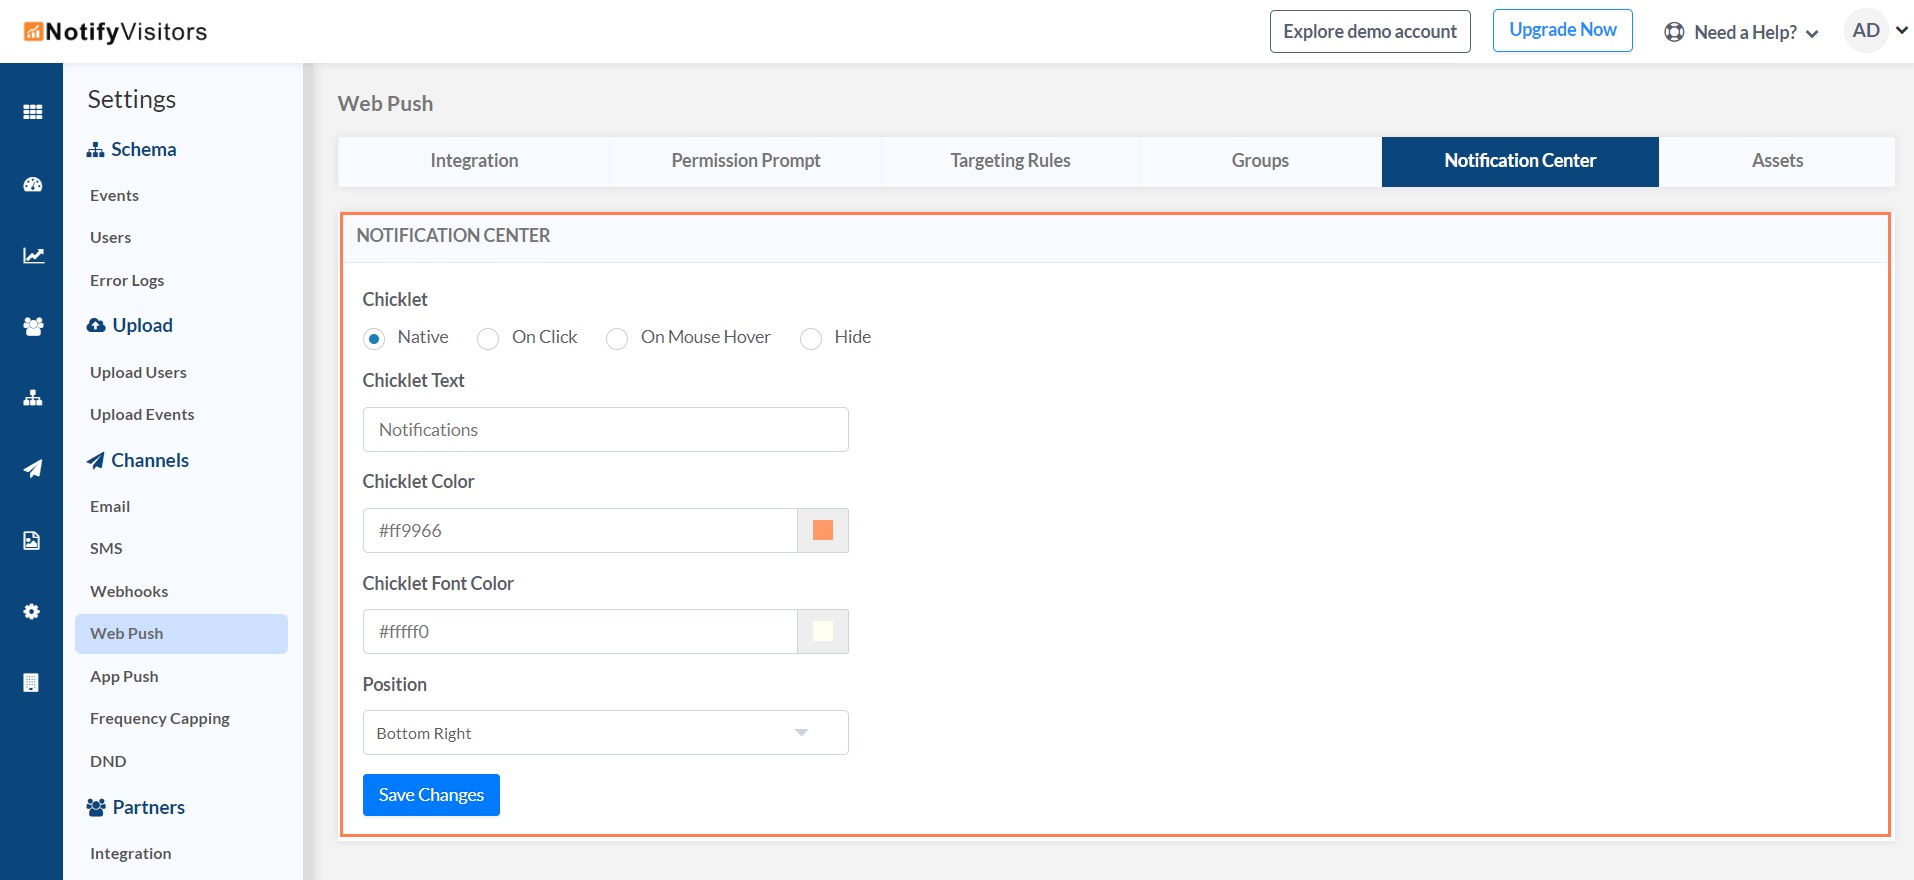
Under the ‘Notification Center’ tab there exists a section with the same title i.e ‘NOTIFICATION CENTER’. Using the settings present within this section, you can configure the Notification Center for your organization’s official website. You can choose to either display the Notification Center in three modes viz. Native, On Click & On Mouse Hover or completely hide the Notification Center.
-
You can also modify the Notification Center’s label, background color and font color. In addition to this, you can even adjust the position of the Notification Center to appear either at the bottom left or at the bottom right on the webpages of your organization’s website.
Include Assets
NotifyVisitors offers you the functionality to include some of your organization’s assets such as a Welcome Push, company’s default logo and badge icon. A Welcome Push is nothing but a notification that is instantly sent to a visitor upon first subscribing to receive service or product-related offers in the near future from your organization. A Welcome Push is entirely optional, which means it is not mandatory to include one while you are configuring your Web Push Notifications.
Under the ‘Assets’ tab there is a section with an identical title i.e ‘ASSETS’ wherein there exist three main buttons namely ‘Welcome Push’, ‘Default Icon’ and ‘Badge Icon’. The functionality of all the three buttons is described below: -
Welcome Push
In order to create a Welcome Push, simply click on the ‘Welcome Push’ button & you will notice that a dropdown appears on-screen under the heading ‘Select Notification’. In case you had already created a Welcome Push in the past, then it would be listed within the dropdown and you can select it from there in order to reuse it for your current iteration of Push Configuration. Remember to click on the ‘Update’ button in order to save your selection. You could also choose to design or create a new Welcome Push by clicking on the ‘Create New’ button.
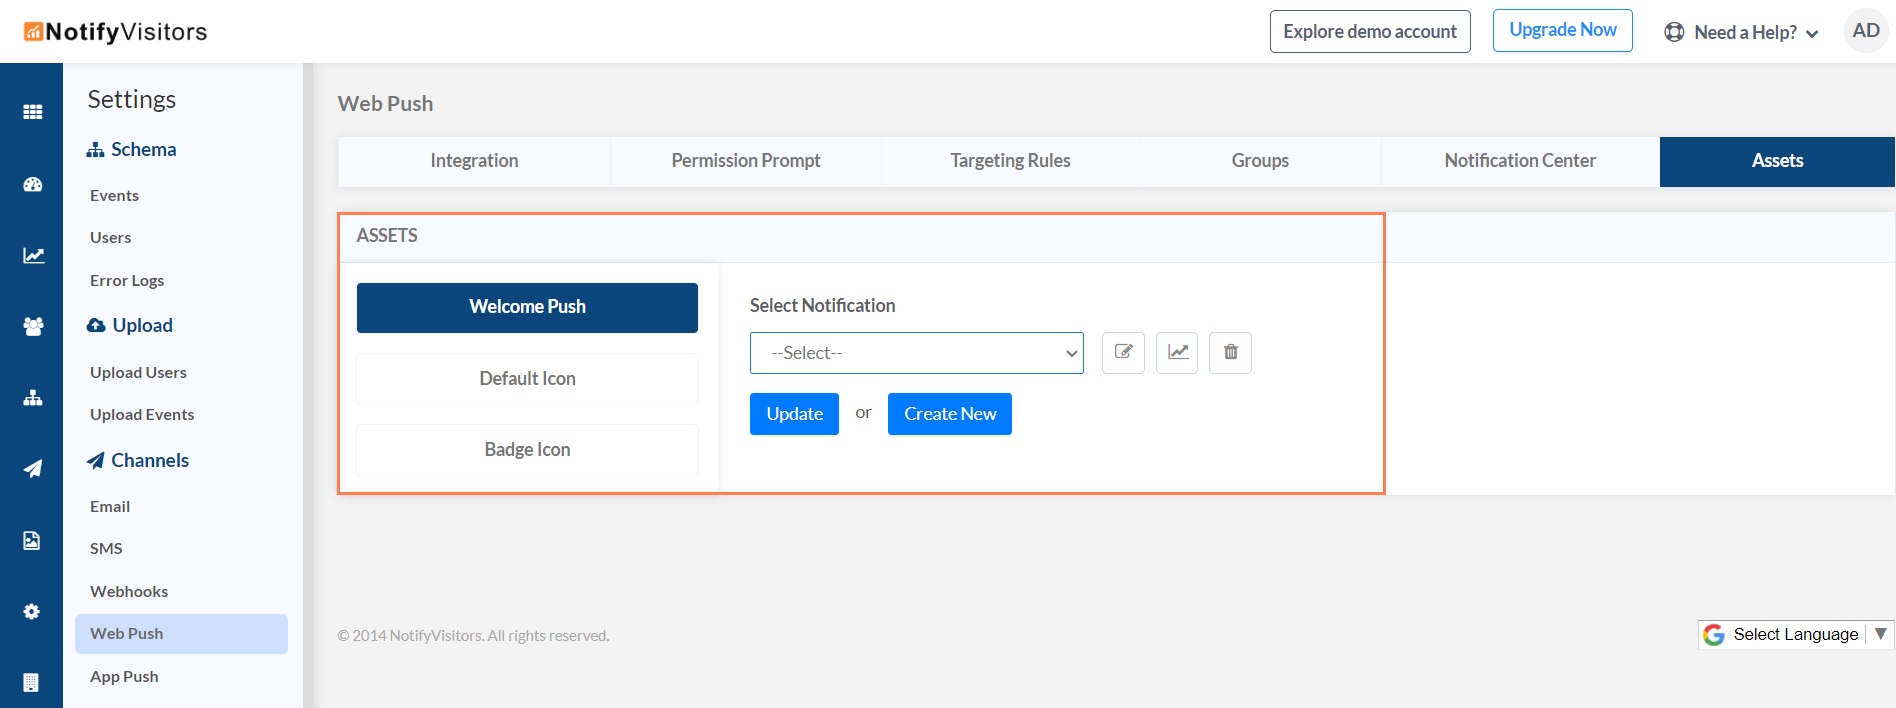
Once you click on the ‘Create New’ button, a new frame would appear on-screen wherein you can choose to create either a Standard Welcome Push Notification or a Rich Welcome Push Notification. The process to create this notification is similar to the one for creating a Web Push Campaign. Check out the guide provided in the link below to learn more about creating a Web Push Campaign.
Once you have successfully created a new Welcome Push, then it too gets listed within the dropdown present under the heading ‘Select Notification’. Click on the dropdown to select the Welcome Push Notification you created and then click on the ‘Update’ button in order to finalize your selection.
Default Icon
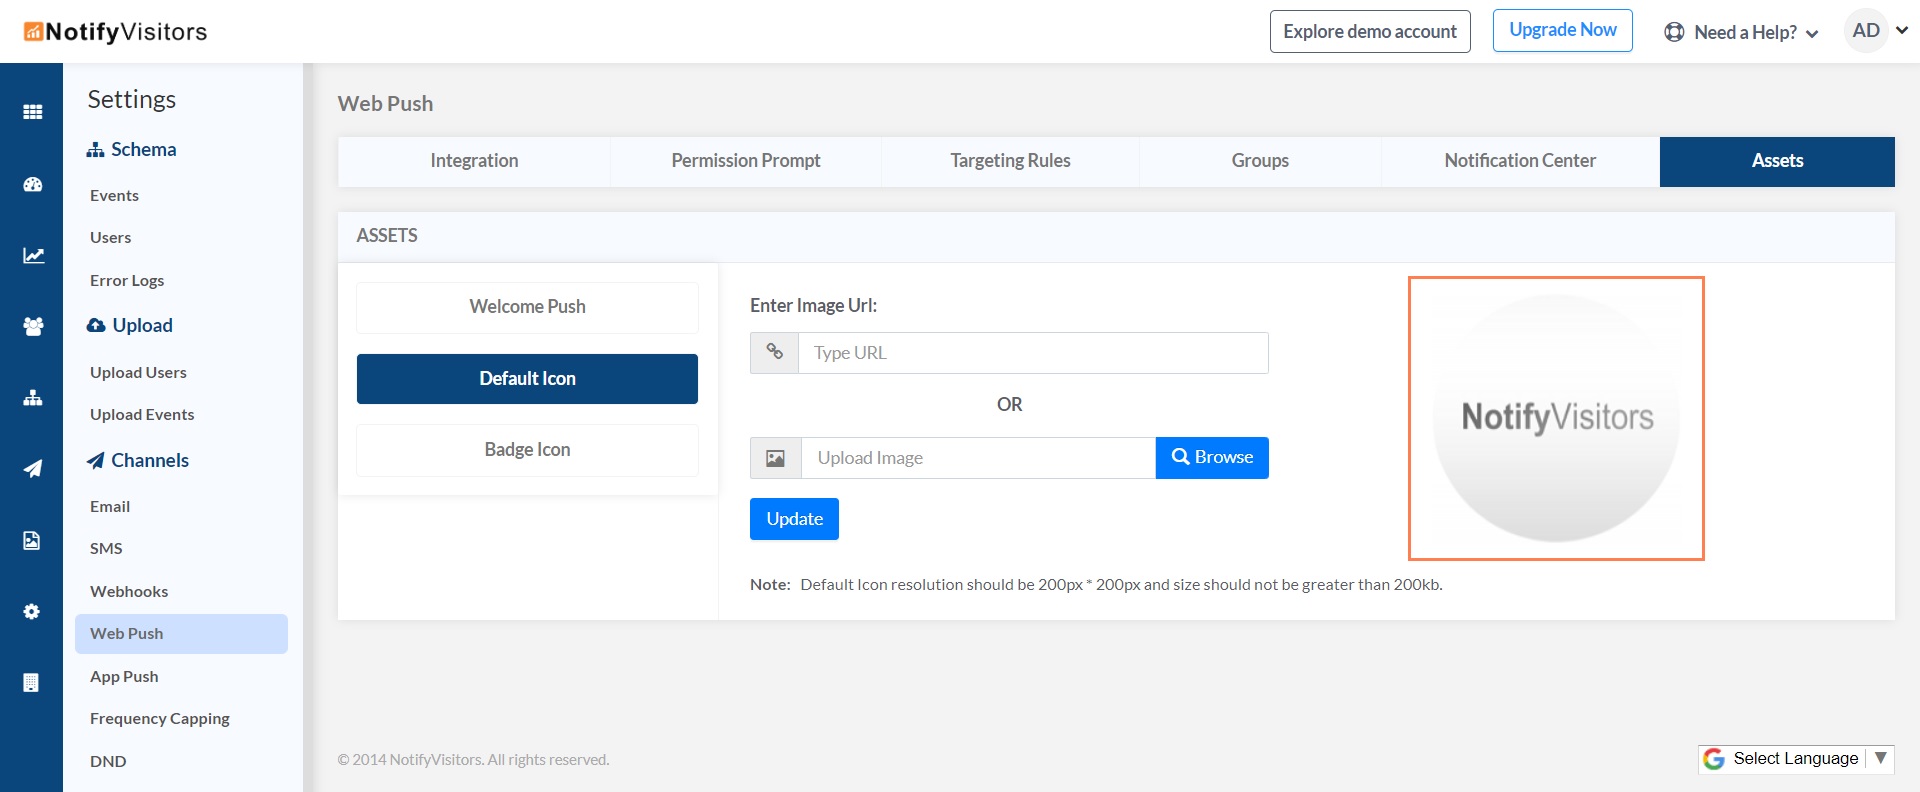
In case you wish to include your organization’s logo as a default icon for your Welcome Push & Web Push Notifications, then click on the button titled ‘Default Icon’. Once you click on the ‘Default Icon’ button, two fields would appear on-screen, in one of which you can provide a URL link to the image you wish to upload as your organization’s default icon and by using the other field you can browse your computer system for your organization’s trademark image or any other image which you intend to upload as a default icon for your Push Notifications.
For instance, the ‘Default Icon’ is highlighted in the image provided below. Kindly note that the default icon you choose to upload should have both its height and width, no more than 200 pixels and its file size should not exceed 200kb.
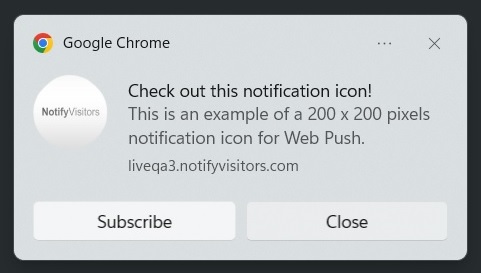
The default icon that you choose will appear in your Push Notifications as shown in the image below: -
Badge Icon
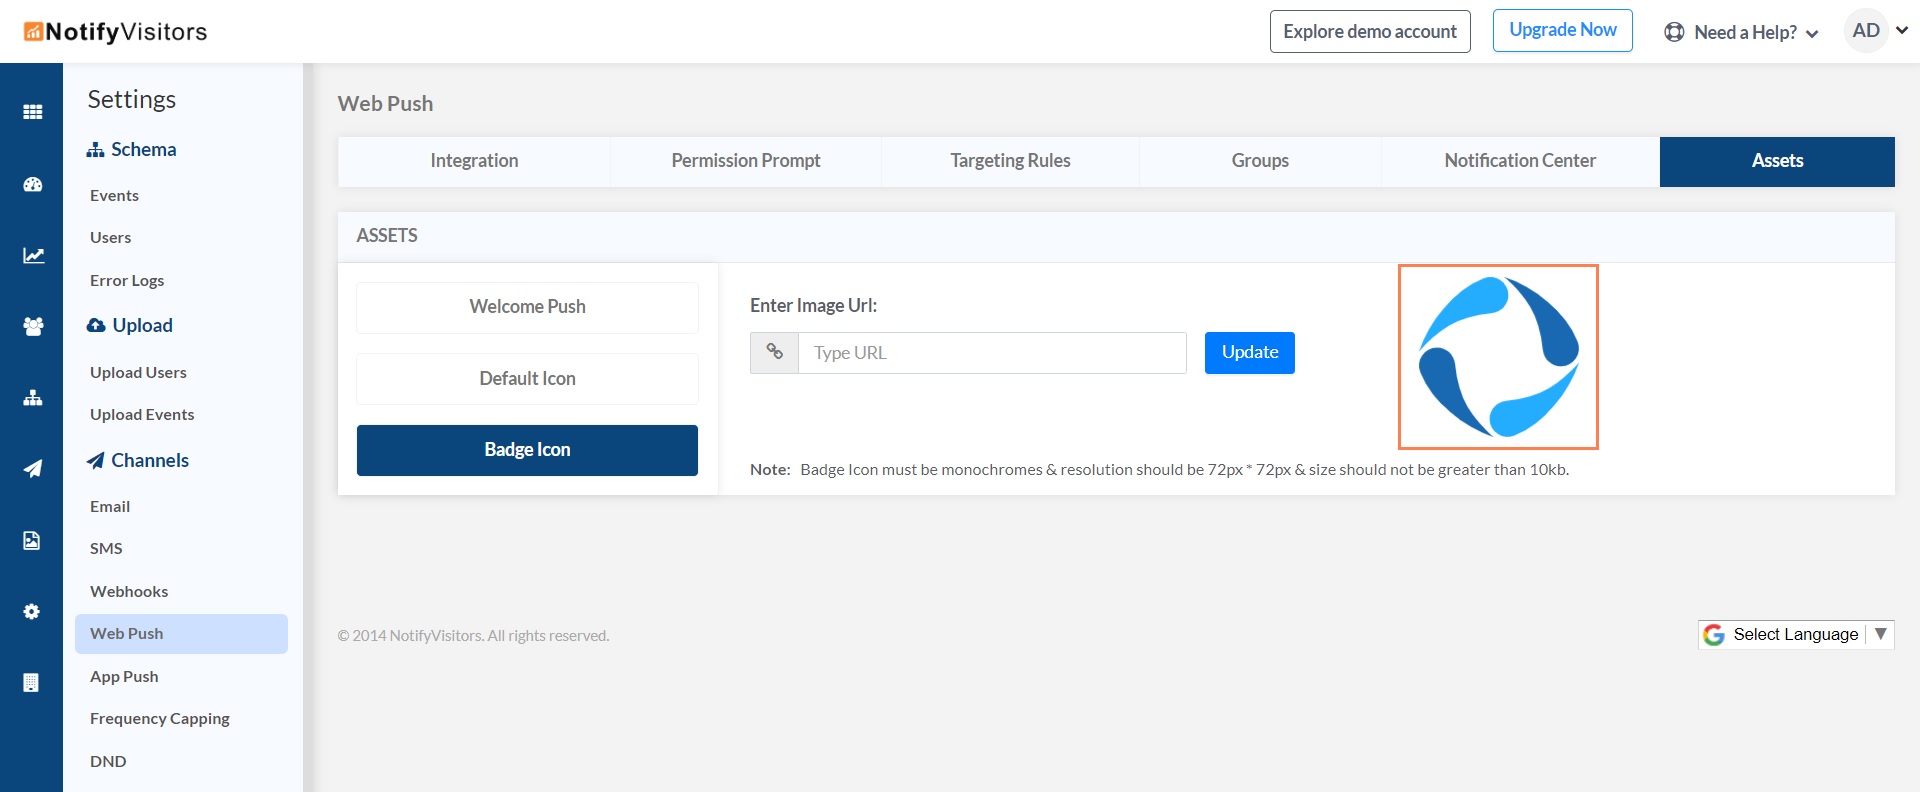
In case you aim to include your organization’s specifically designed badge icon, then simply click on the button titled ‘Badge Icon’. Once you click on the ‘Badge Icon’ button, a blank field would appear on-screen wherein you can enter a URL link to the image you wish to upload as your organization’s badge icon for Web Push Notifications.
For instance, the ‘Badge Icon’ is highlighted in the image provided below. Kindly note that the badge icon you choose to upload should be monochrome, should have both its height and width no more than 72 pixels and its file size should not exceed 10kb.
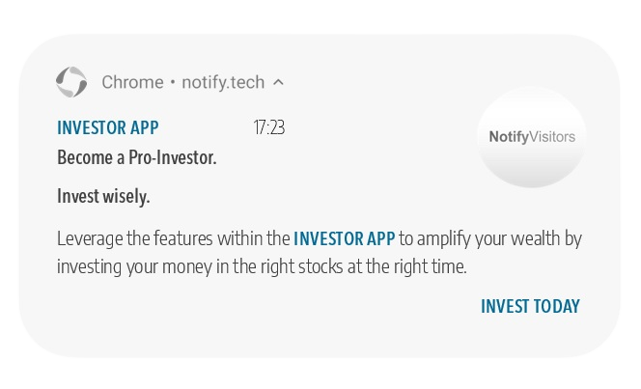
Your badge icon will appear as shown in the image below: -
Important Note
Always remember to click on the ‘Save Changes’ or the ‘Update’ button within every section in order to finalize your configuration settings.
This is how you can set up your Web Push Notifications and thereby leverage them to convert casual visitors to your organization's website into frequent customers.
Updated about 3 years ago
