WooCommerce
Integrate NotifyVisitors with WooCommerce
- WooCommerce is a popular, open-source and flexible e-commerce plugin built on WordPress. It empowers both small and medium-sized organizations to conduct business online by building exactly the kind of store they want. Since it’s flexible, it enables organizations to customize shipping rates for their e-commerce stores and it has a wide array of built-in tools that help brands to efficiently manage their business operations.
- Since it’s open-source, brands can eternally retain full ownership of their store’s data. It powerfully blends website content and commerce, thus enabling anyone to sell anything anywhere. As a consequence, it engenders an opportunity to attract customers globally.
- By integrating your WooCommerce-powered online store with NotifyVisitors, you can better engage customers, track user activity, monitor consumer behavior, timely dispatch product notifications, forward service reminders and thereby boost revenue and build brand loyalty. If you aim to run NotifyVisitors campaigns on your store, it is imperative to understand the process of integrating our software with WooCommerce.
How to integrate NotifyVisitors with WooCommerce
- There are essentially two methods to integrate your NotifyVisitors account with WooCommerce.
Method I
Integrate via your WooCommerce-powered WordPress website or online store
- Process described in step nos. 1 to 5 is illustrated in the GIF provided below.
- Visit your WooCommerce website and login to your Admin Dashboard.
- Next, navigate to your account’s Dashboard > Plugins > Add New.
- Search for the NofifyVisitors plugin via the 'Search Bar' by typing in the keyword 'NotifyVisitors'.
- The NotifyVisitors plugin will get filtered out from all the available plugins. Click on the 'Install Now' button in order to install the plugin on your WordPress website.
Note
There exists an alternate method/process to install the NotifyVisitors plugin that is described in the next section.
- Once the plugin gets installed successfully, an 'Activate' button would appear exactly where the 'Install Now' button existed. Click on that ‘Activate’ button in order to activate the NotifyVisitors plugin on your website/store.

- Once the plugin is activated, it will get listed towards the end of your WordPress account’s navigation pane (as shown in the screenshot provided below).
Note
Although the plugin has been activated, your WordPress website or online store still isn’t integrated with your NotifyVisitors account. Proceed as follows to do the same.
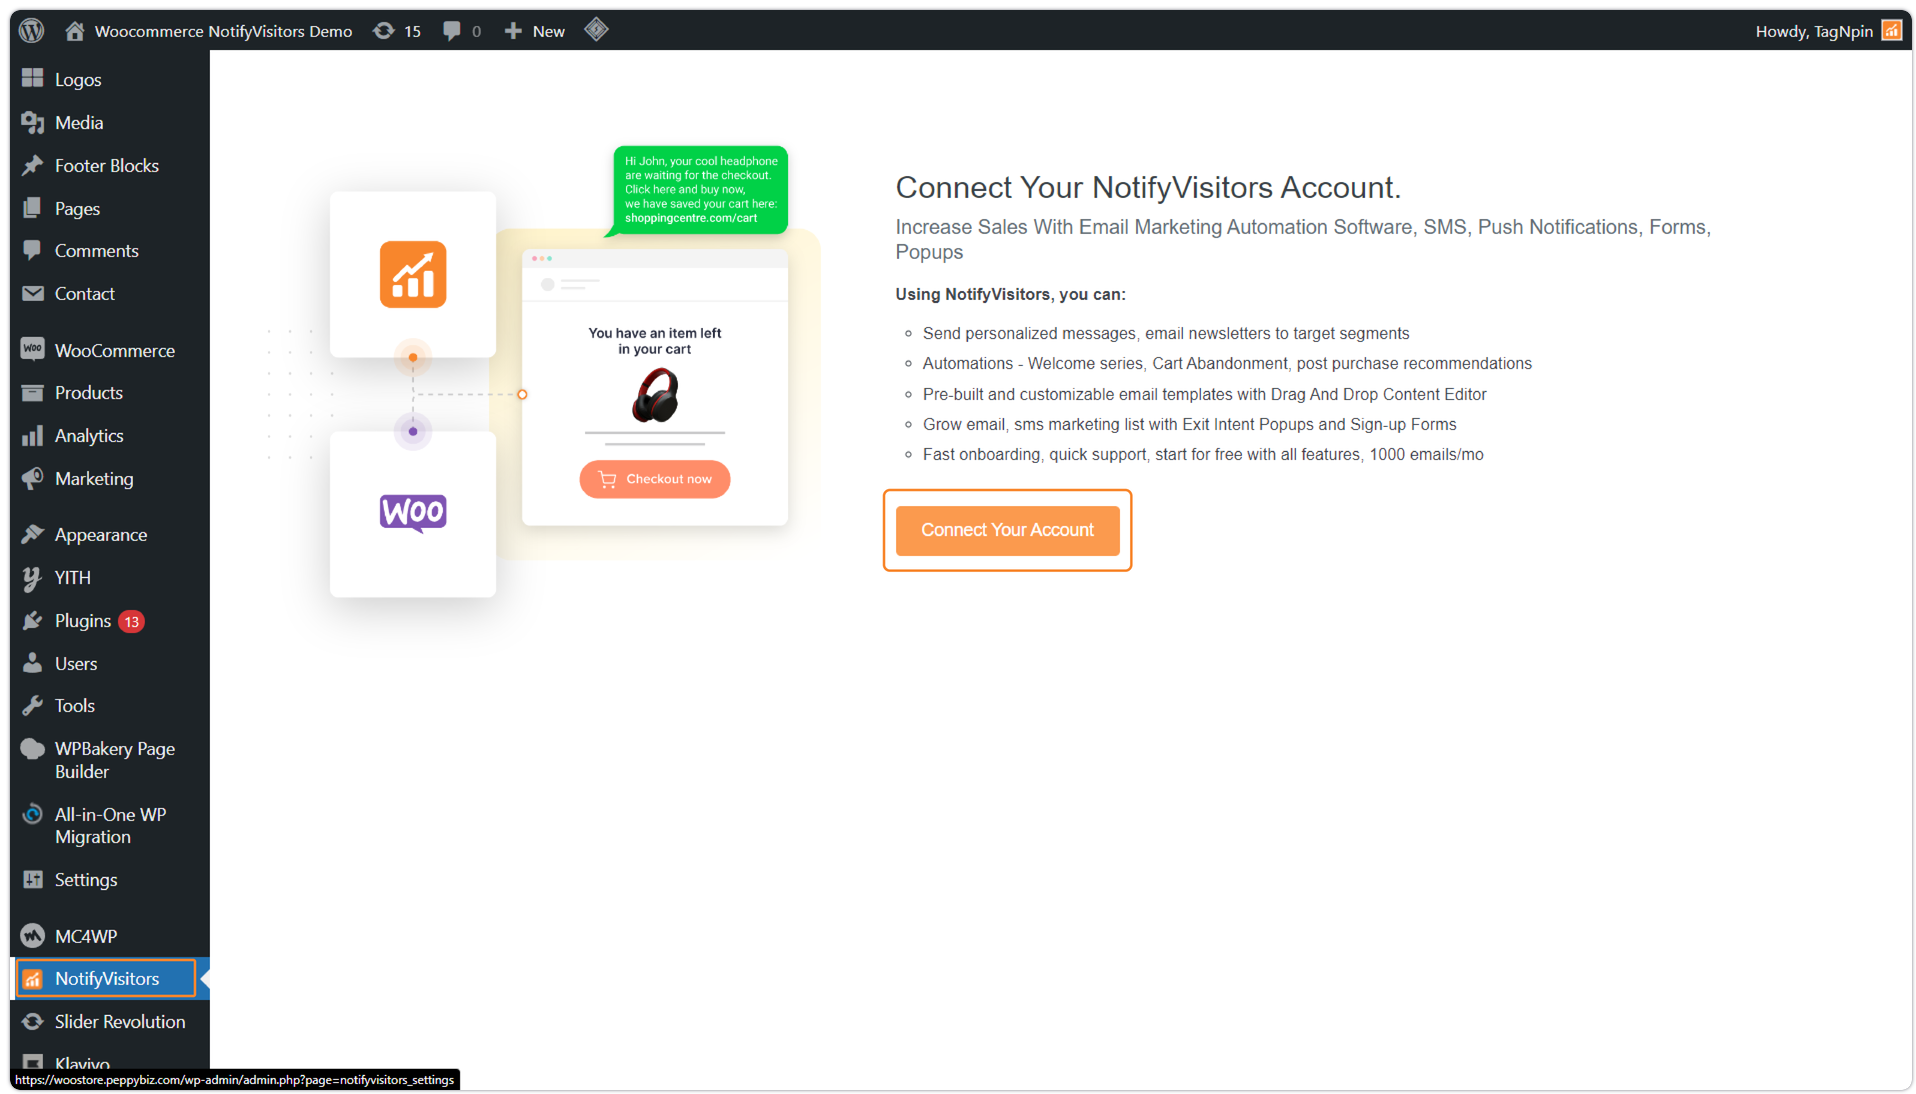
- Navigate to your WordPress account’s Dashboard > NotifyVisitors plugin, in order to finally connect your store with your NotifyVisitors account.
- Click on the button titled 'Connect Your Account'.
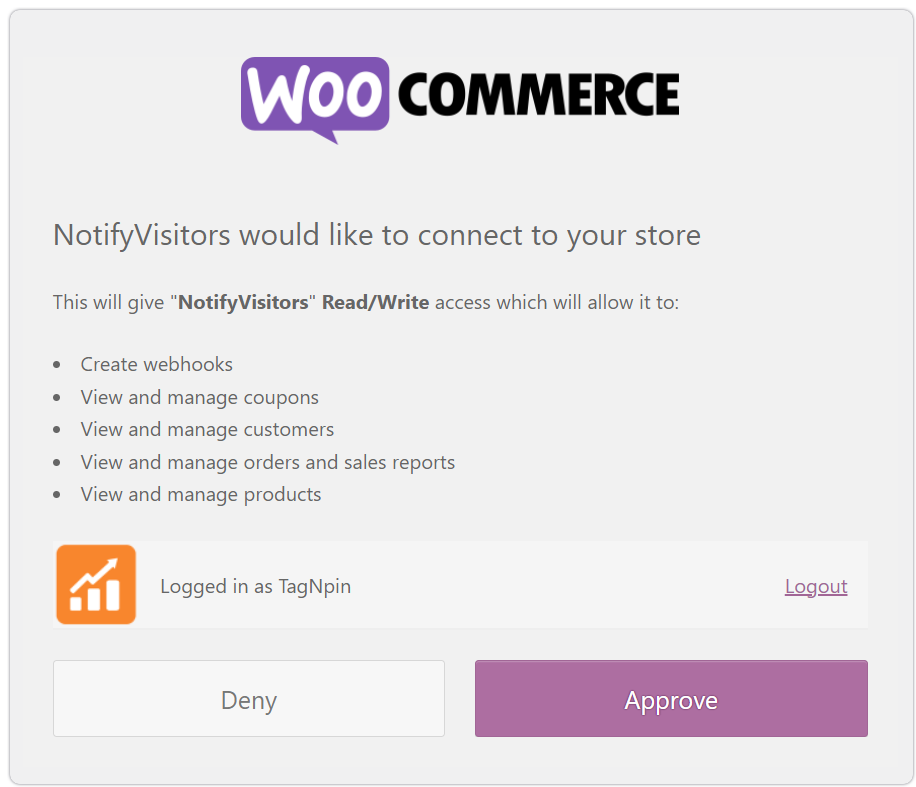
- Once you click on the aforementioned button, you will be automatically redirected to the login page of the NotifyVisitors website. 'Sign Up' in case you do not have a NotifyVisitors account or 'Sign In' in case you already have one.
- Once you login to your NotifyVisitors account, you will encounter the following prompt, wherein you will have to provide permission to the NotifyVisitors software to connect with your WooCommerce-powered online store. Click on the button titled 'Approve' to grant permission.
Note
In case you are already logged in to your NotifyVisitors account, then you will not have to perform step no. 9, since in such a scenario you will encounter the prompt straight away.
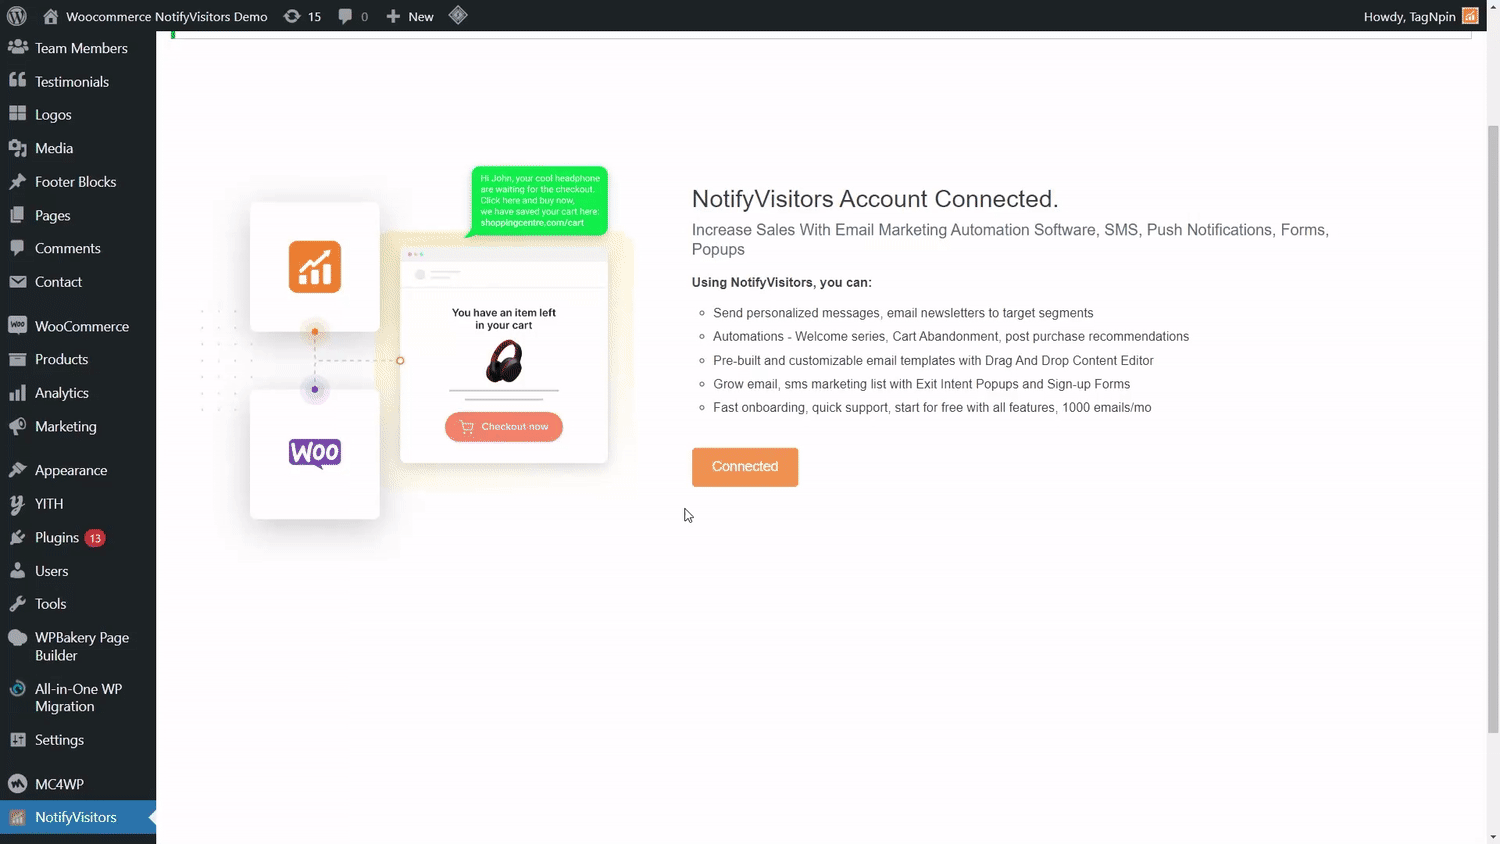
- Once you click on the 'Approve' button, a fleeting pop-up confirming successful integration of your online store with your NotifyVisitors account will appear on-screen. Once the pop-up disappears, you will be redirected back to your WooCommerce-powered online store, which in turn would also display a confirmation affirming successful integration.
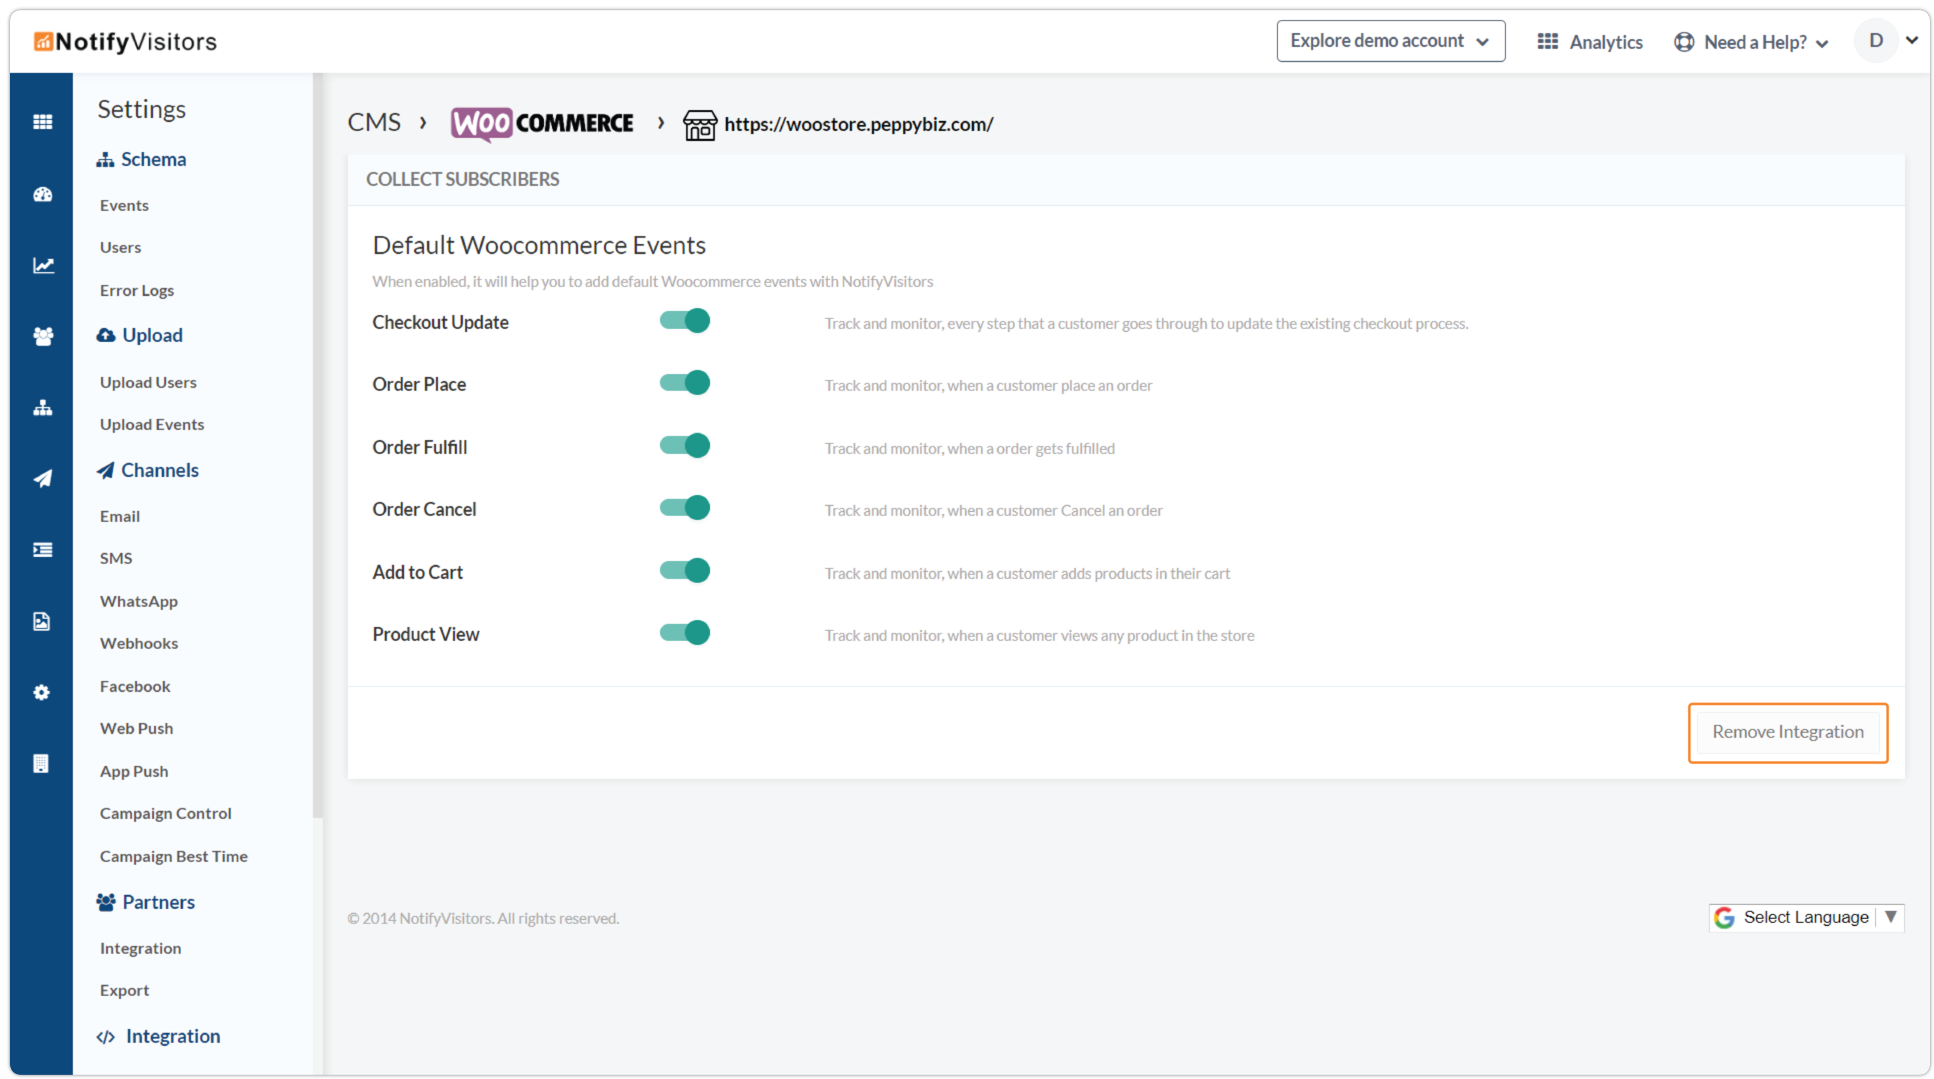
- Next, click on the button titled 'Connected', in order to configure your WooCommerce integration from within your NotifyVisitors account i.e. toggle tracking of specific WooCommerce events on/off.
Note
Once you click on the 'Connected' button, you will be redirected to a particular section of your NotifyVisitors account viz. NotifyVisitors Dashboard > Settings > Store Integration > CMS > WooCommerce Configuration.
- Moreover, you would notice that tracking of all the WooCommerce events is toggled on or enabled by default. You can however enable/disable the tracking of any of these events at any given time (kindly refer to the GIF provided below).
- Once you complete the aforementioned step-by-step integration process, you will be able to leverage and execute all the services offered by NotifyVisitors, on your WooCommerce-powered WordPress website or online store.
Alternate method to install the NotifyVisitors plugin
- You can download the NotifyVisitors plugin from this link and upload it directly to your WooCommerce-powered website or online store. Once you have successfully uploaded the plugin, you can install it by means of simply clicking a button. The entire process is delineated as follows:
- Open this link in your web browser: https://wordpress.org/plugins/notifyvisitors/
- Next, click on the 'Download' button in order to download & save the plugin on your computer system.

- Next, perform step nos. 1 and 2 mentioned in the previous section.
- Then, click on the button titled 'Upload Plugin'.
- Once you click on the aforementioned button, a message prompt along with a new button titled 'Choose File' (screenshot provided below) will appear on-screen via which you can upload the plugin saved on your computer system, to your online store.
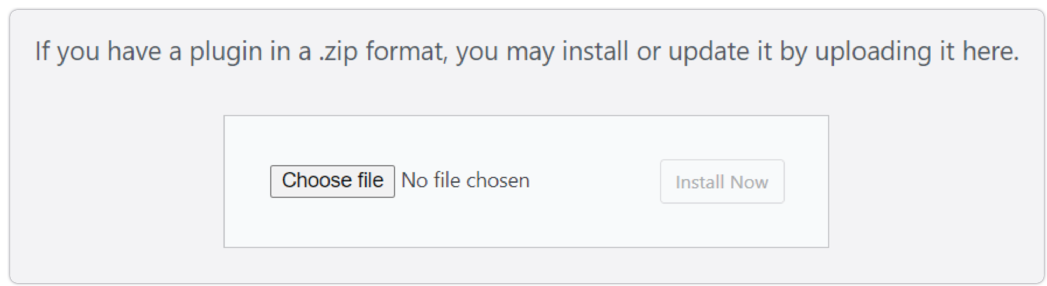
- Once you successfully upload the plugin, the 'Install Now' button will get activated. Click on the 'Install Now' button in order to commence the installation of the plugin.
- Next, once the plugin gets installed, click on the button titled 'Activate Plugin' in order to activate the installed NotifyVisitors plugin on your website/store.
- Perform step nos. 6 to 12 mentioned in the previous section to integrate your WooCommerce-powered website or online shopping store with NotifyVisitors.

Method II
Integrate directly via your NotifyVisitors account
- You can integrate your WooCommerce-powered online store with your NotifyVisitors account directly via your account itself. The process to do the same is delineated as follows:
- Perform step nos. 1 to 6 mentioned in the section titled 'Integrate via WordPress website'.
- Open a new tab in your web browser and login to your NotifyVisitors account.
- Next, navigate to NotifyVisitors Dashboard > Store Integration.
- Click on the tab titled 'CMS' and then click on the button titled 'Connect to WooCommerce'.
- Upon doing so, a new pop-up prompting you to provide your WooCommerce-powered online store’s URL, will appear on-screen. Enter your store’s URL in the field and then click on the button titled 'Connect to WooCommerce' present within the same pop-up.
- Next, perform step nos. 10 to 12 mentioned in the section titled 'Integrate via WordPress website'.
Remove WooCommerce integration
- You can remove the WooCommerce integration from within your NotifyVisitors account at any given time.
- To do so, simply:
- Navigate to NotifyVisitors Dashboard > Store Integration.
- Click on the tab titled 'CMS' and then click on the button titled 'Configure'.
Note
It is from this very section of your NotifyVisitors account that you can also enable/disable WooCommerce events at any given time.
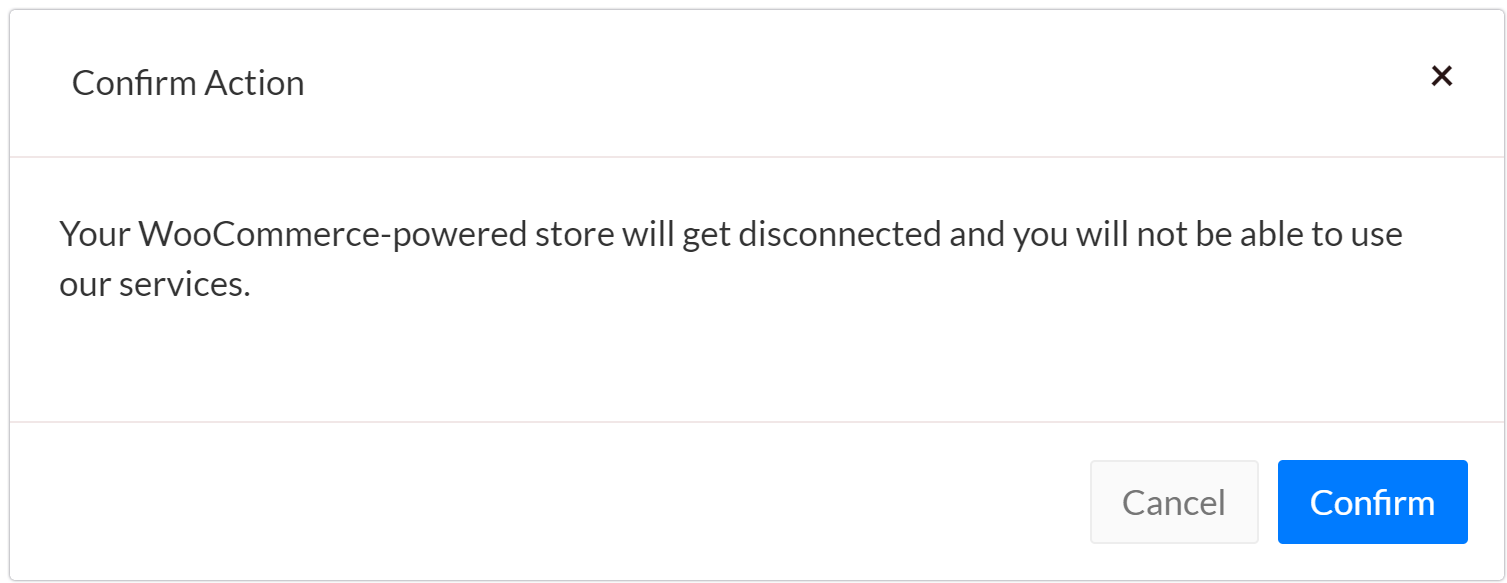
- Next, click on the button titled 'Remove Integration'.
- Once you click on the 'Remove Integration' button, a pop-up would appear on-screen prompting you to confirm your decision. Click on the 'Confirm' button present within the pop-up, in order to finally remove the WooCommerce integration.
Wrapping up
- So, there exists more than one way to integrate your online store with NotifyVisitors. No matter whichever method or process you choose, you can quickly establish this connection by means of a few simple steps.
- Consequently, via the NotifyVisitors marketing automation software, you can deploy personalized campaigns and journeys, display relevant banners and sign-up forms on specific pages of your store, dispatch precisely-timed notifications and automated product/service reminders to visitors, track customer activity/engagement and much more.
- In essence, you put your business growth on auto-pilot once you begin using NotifyVisitors.
Updated almost 2 years ago