Configure Notification Center
Set functionalities to show push notification.
Notification Center UI
If you want to integrate our designed notification center into your app, then you can use the code below according to your use case. If you have broadcast Push in the panel, NV-SDK offers two ways to use our Notification Center UI:
Method 1:- Show Notification Center
This will show you all your push notifications from the panel. You can set the expiry of the notifications from the panel.
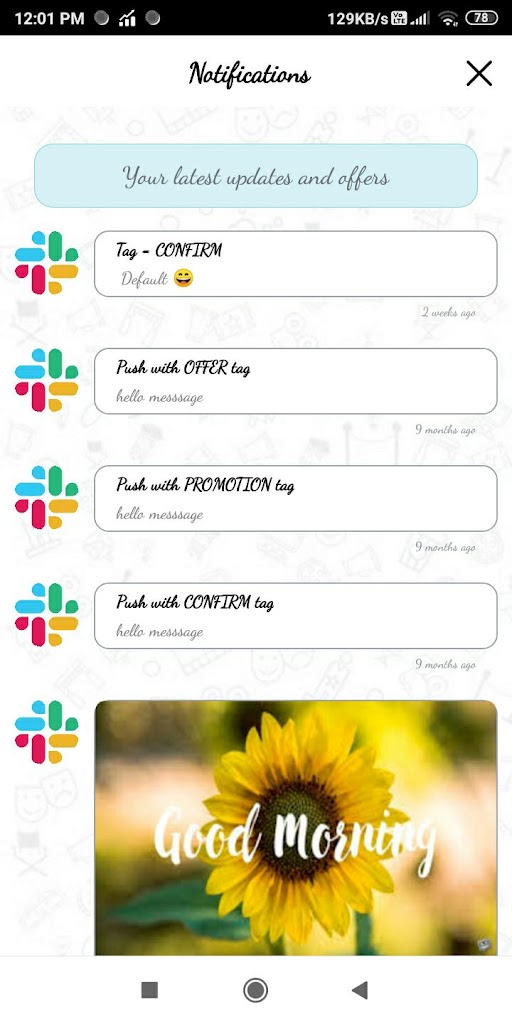
NotifyVisitorsApi.getInstance(activityContext).showNotifications(dismiss (int), config (Object));
NotifyVisitorsApi.getInstance(activityContext).showNotifications(dismiss: Int, config: NVCenterStyleConfig?)
To use the above code, refer to the following example,
NotifyVisitorsApi.getInstance(activityContext).showNotifications(0, null);
NotifyVisitorsApi.getInstance(activityContext).showNotifications(0, null)
If you call the function as in the example above, you will get the output of UI as shown in the following screenshot.
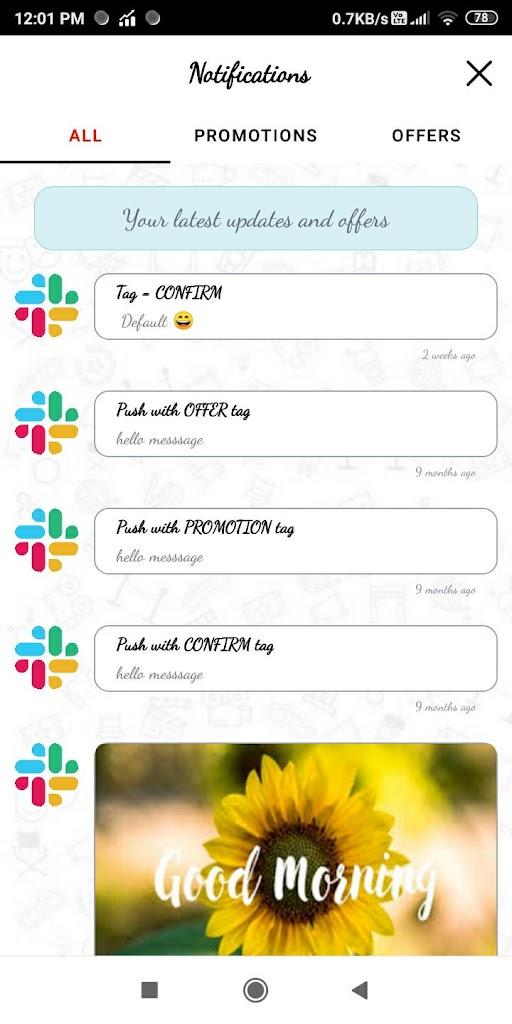
Method 2:- Show Notification Center with Tabs.
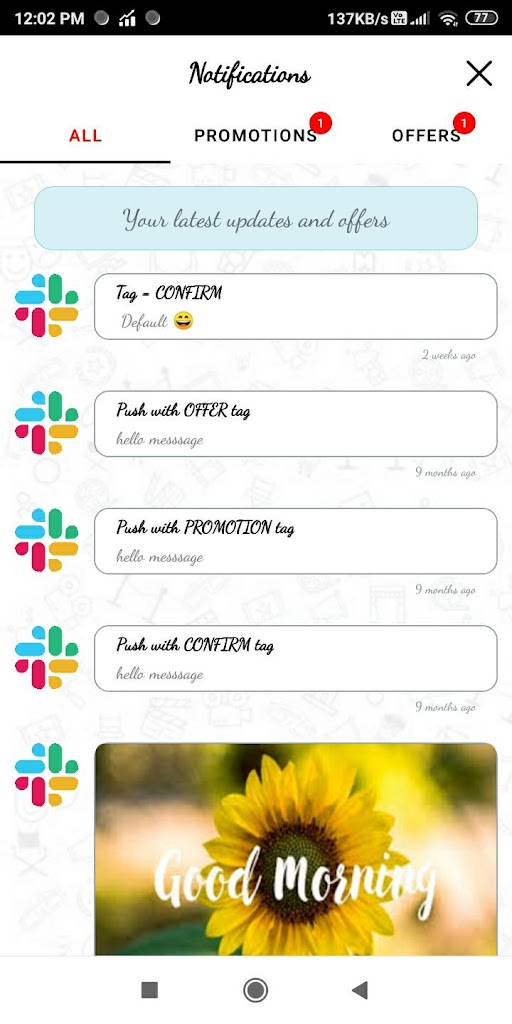
This way, you receive push notifications based on labels or categories you have configured in the app and panel. In this method, SDK also provides you with a separate unread count badge over the tab name against each tab which will be shown in the UI.
For the app, you need to call the below function,
NVCenterStyleConfig config = new NVCenterStyleConfig();
config.setFirstTabDetail(firstTabLabel (string), firstTabName (string));
config.setSecondTabDetail(secondTabLabel (string), secondTabName (string));
config.setThirdTabDetail(thirdTabLabel (string), thirdTabName (string));
config.setSelectedTabColor(selectTabColor (hexCode in string));
config.setUnSelectedTabColor(unSelectTabColor (hexCode in string));
config.setSelectedTabIndicatorColor(selectTabIndicatorColor (hexCode in string));

NotifyVisitorsApi.getInstance(activityContext).showNotifications(dismiss (int), config (Object));
val config = NVCenterStyleConfig()
config.setFirstTabDetail(firstTabLabel: String, firstTabName: String)
config.setSecondTabDetail(secondTabLabel: String, secondTabName: String)
config.setThirdTabDetail(thirdTabLabel: String, thirdTabName: String)
config.setSelectedTabColor(selectTabColor: String (hexCode))
config.setUnSelectedTabColor(unSelectTabColor: String (hexCode))
config.setSelectedTabIndicatorColor(selectTabIndicatorColor: String (hexCode))

NotifyVisitorsApi.getInstance(activityContext).showNotifications(0, config)
To use the above code, refer to the following example,
NVCenterStyleConfig config = new NVCenterStyleConfig();
config.setFirstTabDetail("all", "All");
config.setSecondTabDetail("promotion", "Promotions");
config.setThirdTabDetail("offer", "Offers");
config.setSelectedTabColor("#FF0000");
config.setUnSelectedTabColor("#000000");
config.setSelectedTabIndicatorColor("#000000");

NotifyVisitorsApi.getInstance(activityContext).showNotifications(0, config);
val config = NVCenterStyleConfig()
config.setFirstTabDetail(“all”, “All”)
config.setSecondTabDetail(“promotion”, “Promotions”)
config.setThirdTabDetail(“offer”, “Offers”)
config.setSelectedTabColor(“#FF0000”)
config.setUnSelectedTabColor(“#000000”)
config.setSelectedTabIndicatorColor(“#000000”)

NotifyVisitorsApi.getInstance(activityContext).showNotifications(0, config)
Method 3:- Notification Center with Callback.
- With default center
NotifyVisitorsApi.getInstance(activityContext).showNotifications(0, null, new OnBuildUiListener() {
   @Override
   public void onCenterClose() {
       //do your task here
   }
});
NotifyVisitorsApi.getInstance(activityContext).showNotifications(0, null, object : OnBuildUiListener {
       override fun onCenterClose() {
           //do your task here
       }
})
- Centre with tabs
NVCenterStyleConfig config = new NVCenterStyleConfig();
config.setFirstTabDetail(“offer”, “Offer”);
config.setSecondTabDetail(“promotion”, “Promotions”);
config.setThirdTabDetail(“other”, “Others”);

NotifyVisitorsApi.getInstance(activityContext).showNotifications(0, config, new OnBuildUiListener() {
   @Override
   public void onCenterClose() {
       //do your task here
   }
});
val config = NVCenterStyleConfig()
config.setFirstTabDetail(“offer”, “Offer”)
config.setSecondTabDetail(“promotion”, “Promotions”)
config.setThirdTabDetail(“other”, “Others”)

NotifyVisitorsApi.getInstance(activityContext).showNotifications(0, config, object : OnBuildUiListener {
       override fun onCenterClose() {
           //do your task here
       }
})
For the panel, you need to configure labels first. In the panel, you can configure labels in Analytics Section. Go to the Settings option from the left side menu. Another left-side menu will appear, see at the bottom of this menu, you will find Campaign Labels in the Setup section.
Here you can create as many campaign labels as per your requirements. When creating push notifications, select the desired label in Advanced Options → Select Label. If you click here on this section, a list of all labels will appear. From this list, you can add single or multiple labels according to your requirements.
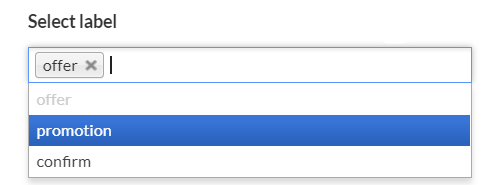
For example- Suppose, your created push notification describes two categories like promotion and offer. So, here you can add 2 labels for the same push notification.
Now, when you call the function like the above example, you will get the output of UI as shown in the below screenshot.
Following are some points to be noted in this Tab UI method-
- The label name passed in the app should be the same as configured in the panel.
- If you have passed only one tab configuration in the function then SDK will show you the default UI.
For example,
NVCenterStyleConfig config = new NVCenterStyleConfig();
config.setFirstTabDetail("all", "All");
config.setSelectedTabColor("#FF0000");
config.setUnSelectedTabColor("#000000");
config.setSelectedTabIndicatorColor("#000000");
NotifyVisitorsApi.getInstance(this).showNotifications(0, config);
- If you don’t pass any color for the selected tab or unselected tab or selected indicator then SDK will use its default color (combination of dark blue & light blue).
- We have 2 labels (“all” and “others”) in SDK which we say as default which means you don’t need to configure these labels in the panel but if you want to show them in the app then you need to mention them in the function. You can check the above examples
| The difference between “all” & “others” label |
|---|
| “all” label will show all broadcasted push notifications. |
| “others” label will show you only those push notifications which are broadcasted and also whose tabs are not configured in the function. |
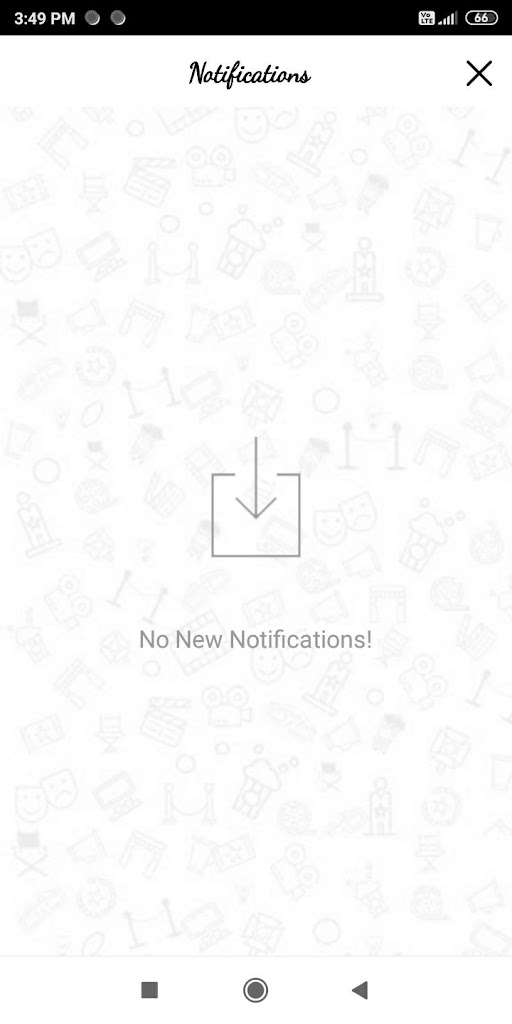
In case you don’t have any push notifications in the panel, the NV-SDK will show you an empty screen view. Refer to the below screenshot-
Notification Center Unread Count(s)
This function provides the unread count(s) of push notifications. This functionality can be used to show the user an unread push count as a badge on the bell icon created in your app.
Integrate the below function in your app-
NVCenterStyleConfig config = new NVCenterStyleConfig();
config.setFirstTabDetail(firstTabLabel (string), firstTabName (string));
config.setSecondTabDetail(secondTabLabel (string), secondTabName (string));
config.setThirdTabDetail(thirdTabLabel (string), thirdTabName (string));
config.setSelectedTabColor(selectTabColor (hexCode in string));
config.setUnSelectedTabColor(unSelectTabColor (hexCode in string));
config.setSelectedTabIndicatorColor(selectTabIndicatorColor (hexCode in string));

NotifyVisitorsApi.getInstance(activityContext).getNotificationCenterCount(new OnCenterCountListener() {
   @Override
   public void getCount(JSONObject counts) {
       //do your task here
   }
}, config (Object)));
val config = NVCenterStyleConfig()
config.setFirstTabDetail(firstTabLabel: String, firstTabName: String)
config.setSecondTabDetail(secondTabLabel: String, secondTabName: String)
config.setThirdTabDetail(thirdTabLabel: String, thirdTabName: String)

NotifyVisitorsApi.getInstance(activityContext).getNotificationCenterCount(object : OnCenterCountListener {
       override fun getCount(response: JSONObject) {
           //do your task here
       }
   }, config)
If you want only the total count of unread notifications then you can pass the config parameter as null like mentioned in the following example-
NotifyVisitorsApi.getInstance(activityContext).getNotificationCenterCount(new OnCenterCountListener() {
   @Override
   public void getCount(JSONObject counts) {
       //do your task here
   }
}, null));
NotifyVisitorsApi.getInstance(activityContext).getNotificationCenterCount(object : OnCenterCountListener {
       override fun getCount(response: JSONObject) {
           //do your task here
       }
   }, null)
However, if you want unread notifications for each tab to be counted separately with the total number, you need to specify the tab details as in the following example
NVCenterStyleConfig config = new NVCenterStyleConfig();
config.setFirstTabDetail("all", "All");
config.setSecondTabDetail("promotion", "Promotions");
config.setThirdTabDetail("offer", "Offers");
config.setSelectedTabColor("#FF0000");
config.setUnSelectedTabColor("#000000");
config.setSelectedTabIndicatorColor("#000000");

NotifyVisitorsApi.getInstance(activityContext).getNotificationCenterCount(new OnCenterCountListener() {
   @Override
   public void getCount(JSONObject counts) {
       //do you task here
   }
}, config);
val config = NVCenterStyleConfig()
config.setFirstTabDetail("all", "All")
config.setSecondTabDetail("promotion", "Promotions")
config.setThirdTabDetail("offer", "Offers")

NotifyVisitorsApi.getInstance(activityContext).getNotificationCenterCount(object: OnCenterCountListener {
       override fun getCount(it: JSONObject) {
            //do your task here
       }
   }, config)
Now, when you call the function like any of the above examples, you will get the output in the following format-
{
   "totalCount":5,
   "tabOneCount":3,
   "tabTwoCount":0,
   "tabThreeCount":2
}
DISMISS (int) Parameter
In this parameter there are two values to be passed either 0 or 1. Here, 0 means the notification center page will not get dismissed and 1 means the page will get dismissed.
Let’s take an example to understand it. I have opened the app & then open the notification center page & clicked on any push notification and I get redirected to the third page of the app. Now, if I have passed 0 in the function then when I come back from the third page the notification center page will be present there. But if I pass 1 in the function then when I come back from the third page the notification center page will not be there but instead of it your app’s main page will be there.
Notification Center Data (No UI)
This function provides notification center data as JSONArray in the callback. This functionality can be used in a case if you want to create your custom notification center UI.
For now, this will only provide you with data for a default configuration. No details will be shared for labels.
Integrate the below function in your app to get data-
NotifyVisitorsApi.getInstance(activityContext).getNotificationDataListener(new NotificationListDetailsCallback() {
   @Override
   public void getNotificationData(JSONArray notificationListResponse) {
       //do your task here
   }
}, dismiss (int));
NotifyVisitorsApi.getInstance(activityContext).getNotificationDataListener(object : NotificationListDetailsCallback {
       override fun getNotificationData(response: JSONArray) {
            //do your task here
       }
}, 0)
New Method [Recommended] (Supported from SDK v5.4.11)
NotifyVisitorsApi.getInstance(activityContext).getNotificationCenterData(new OnCenterDataListener() {
   @Override
   public void getData(JSONObject response) {
       //do your task here
   }
});
NotifyVisitorsApi.getInstance(activityContext).getNotificationCenterData(object : OnCenterDataListener {
       override fun getData(response: JSONObject) {
            //do your task here
       }
})
NOTE:- About ‘dismiss’ parameter already mentioned above in the Notification Center UI section.
Now, when you call the function like in the above code, you will get the output in the following format-
In case you broadcast a push from the panel.
[
  {
      "title":"Rich Title",
      "message":"Rich Message 😂 Rich Message 😂 Rich Message 😂 Rich Message 😂 Rich Message 😂",
      "summary":"",
      "type":"2",
      "icon":"https:\/\/s3.amazonaws.com\/notifypush\/images\/default_icon_app_5509.png",
      "target":"4",
      "url":"9999999999",
      "btnTitleOne":"Click Me",
      "btnUrlOne":"com.tnpnv_.pnbcodeapp.MainActivity",
      "btnTargetOne":"0",
      "btnResourceOne":"",
      "btnTitleTwo":"",
      "btnUrlTwo":"",
      "btnTargetTwo":"0",
      "btnResourceTwo":"",
      "time":"1 year ago",
      "send_time":"2020-12-19 00:00:00",
      "notificationID":"75820",
      "richImageUrl":"https:\/\/pushimages.notifyvisitors.com\/images\/push_rich_icon_75820.jpg",
      "parameters":{
         "default":{
            "rich_image_url":"<p><img class=\"fr-draggable\" src=\"blob:https:\/\/mail.notifyvisitors.com\/32f9e3f5-9146-4fcc-a927-3c65ad126695\" width=\"188\" height=\"94\"><\/p> <p>Hello @{name}@, your email-id is @{email}@.<\/p>",
            "banner_position":"1",
            "show_banner":"true"
         }
      }
   }
]
In case, when you have no broadcasted push in the panel.
["No Notification"]
Updated 11 months ago