Android Integration
Configure AndroidManifest.xml
Add the permissions mentioned below to your app’s manifest.xml file.
<manifest….>
   <uses-permission android:name="android.permission.SYSTEM_ALERT_WINDOW"/>
   <uses-permission android:name="android.permission.WAKE_LOCK"/>
   <uses-permission android:name="android.permission.ACCESS_NETWORK_STATE"/>
   <uses-permission android:name="android.permission.ACCESS_WIFI_STATE"/>
   <uses-permission android:name="android.permission.ACCESS_FINE_LOCATION"/>
   <uses-permission android:name="android.permission.CHANGE_NETWORK_STATE"/>
   <uses-permission android:name="android.permission.CHANGE_WIFI_STATE"/>

 <application>
    <meta-data
        android:name="notifyvisitors_bid"
        android:value="xxxx" />
    <meta-data
        android:name="notifyvisitors_bid_e"
        android:value="xxxxxxxxxxxxxxxxxxxxxxxxxxxxxxxx"/>
 </application>
</manifest>
Note
Kindly login to your NotifyVisitors account to see your credentials.
Add the permissions mentioned below to your app’s manifest.xml file.
<manifest….>
   <uses-permission android:name="android.permission.SYSTEM_ALERT_WINDOW"/>
   <uses-permission android:name="android.permission.WAKE_LOCK"/>
   <uses-permission android:name="android.permission.ACCESS_NETWORK_STATE"/>
   <uses-permission android:name="android.permission.ACCESS_WIFI_STATE"/>
   <uses-permission android:name="android.permission.ACCESS_FINE_LOCATION"/>
   <uses-permission android:name="android.permission.CHANGE_NETWORK_STATE"/>
   <uses-permission android:name="android.permission.CHANGE_WIFI_STATE"/>
Initialize SDK
A. If you have an Application class Otherwise skip this step.
Import below package
import com.flutter.notifyvisitors.NotifyvisitorsPlugin;
Call the above method in onCreate()
NotifyvisitorsPlugin.register(this);

//Example

public void onCreate() {
    super.onCreate();
    NotifyvisitorsPlugin.register(this);
}
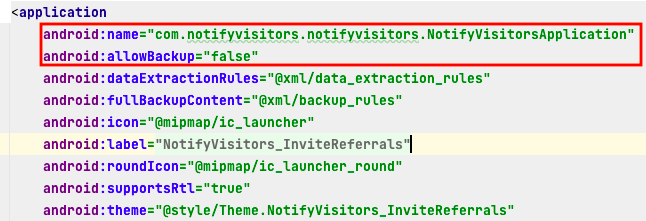
B. If you don't have an Application class. Then add the undermentioned line to your app manifest.xml.
android:name="com.notifyvisitors.notifyvisitors.NotifyVisitorsApplication"
C. Set android:allowBackup to false.

Initialize application class and allow backup
A. Incorporate our registration method into the onCreate() function of your application class. If you haven't created your own yet, go ahead and set one up.
package com.example;

import android.app.Application;
import com.flutter.notifyvisitors.NotifyvisitorsPlugin;

public class ApplicationClass extends Application {

   // NOTE: Replace the below with your own NOTIFYVISITORS_BRAND_ID & NOTIFYVISITORS_BRAND_ENCRYPTION_KEY
   private String NOTIFYVISITORS_BRAND_ENCRYPTION_KEY = "##################################";
   private int NOTIFYVISITORS_BRAND_ID = #####;

   @Override
   public void onCreate() {
       super.onCreate();

       NotifyvisitorsPlugin.register(this, NOTIFYVISITORS_BRAND_ID, NOTIFYVISITORS_BRAND_ENCRYPTION_KEY);

   }
}
package com.example

import android.app.Application
import com.flutter.notifyvisitors.NotifyvisitorsPlugin

class MyApplication : Application() {

   // NOTE: Replace the below with your own NOTIFYVISITORS_BRAND_ID & NOTIFYVISITORS_BRAND_ENCRYPTION_KEY
   private val NOTIFYVISITORS_BRAND_ENCRYPTION_KEY: String = "##################################"
   private val NOTIFYVISITORS_BRAND_ID: Int = #####

   override fun onCreate() {
       super.onCreate()

       NotifyvisitorsPlugin.register(this, NOTIFYVISITORS_BRAND_ID, NOTIFYVISITORS_BRAND_ENCRYPTION_KEY);

   }
}
B. Set android:allowBackup to false.

initialize application class and allow backup
Configure build.gradle
If have done FCM integration. These steps may exist in build.gradle files. So you can skip these steps.
Add the below code in build.gradle (module-level) at the bottom. If you don't have.
apply plugin: 'com.google.gms.google-services'
Add the below code in build.gradle (project-level). If you don't have.
buildscript {
  dependencies {
   	 // Add this line
    	classpath 'com.google.gms:google-services:4.0.1'
  }
}
Configure FCM's Sender ID and Private Key
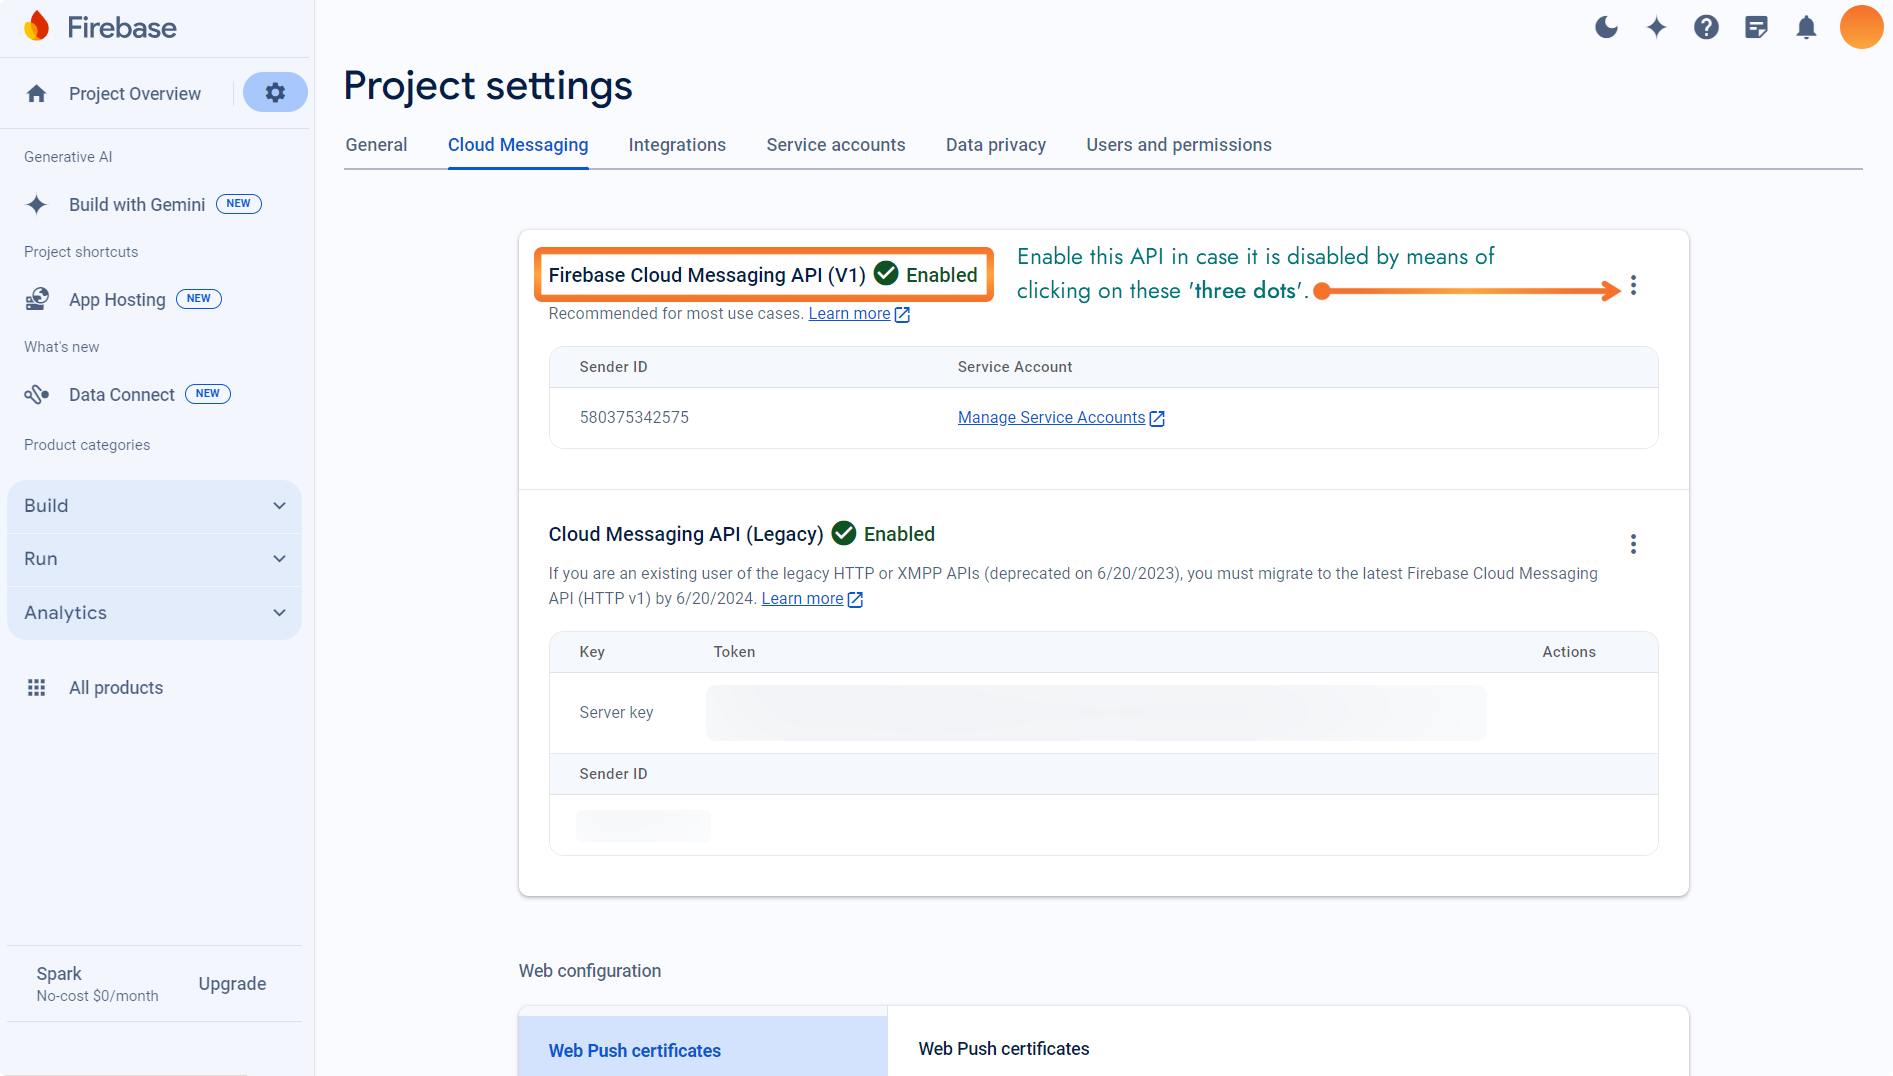
Select the 'Cloud Messaging' tab to find out the 'SENDER ID' for FCM.

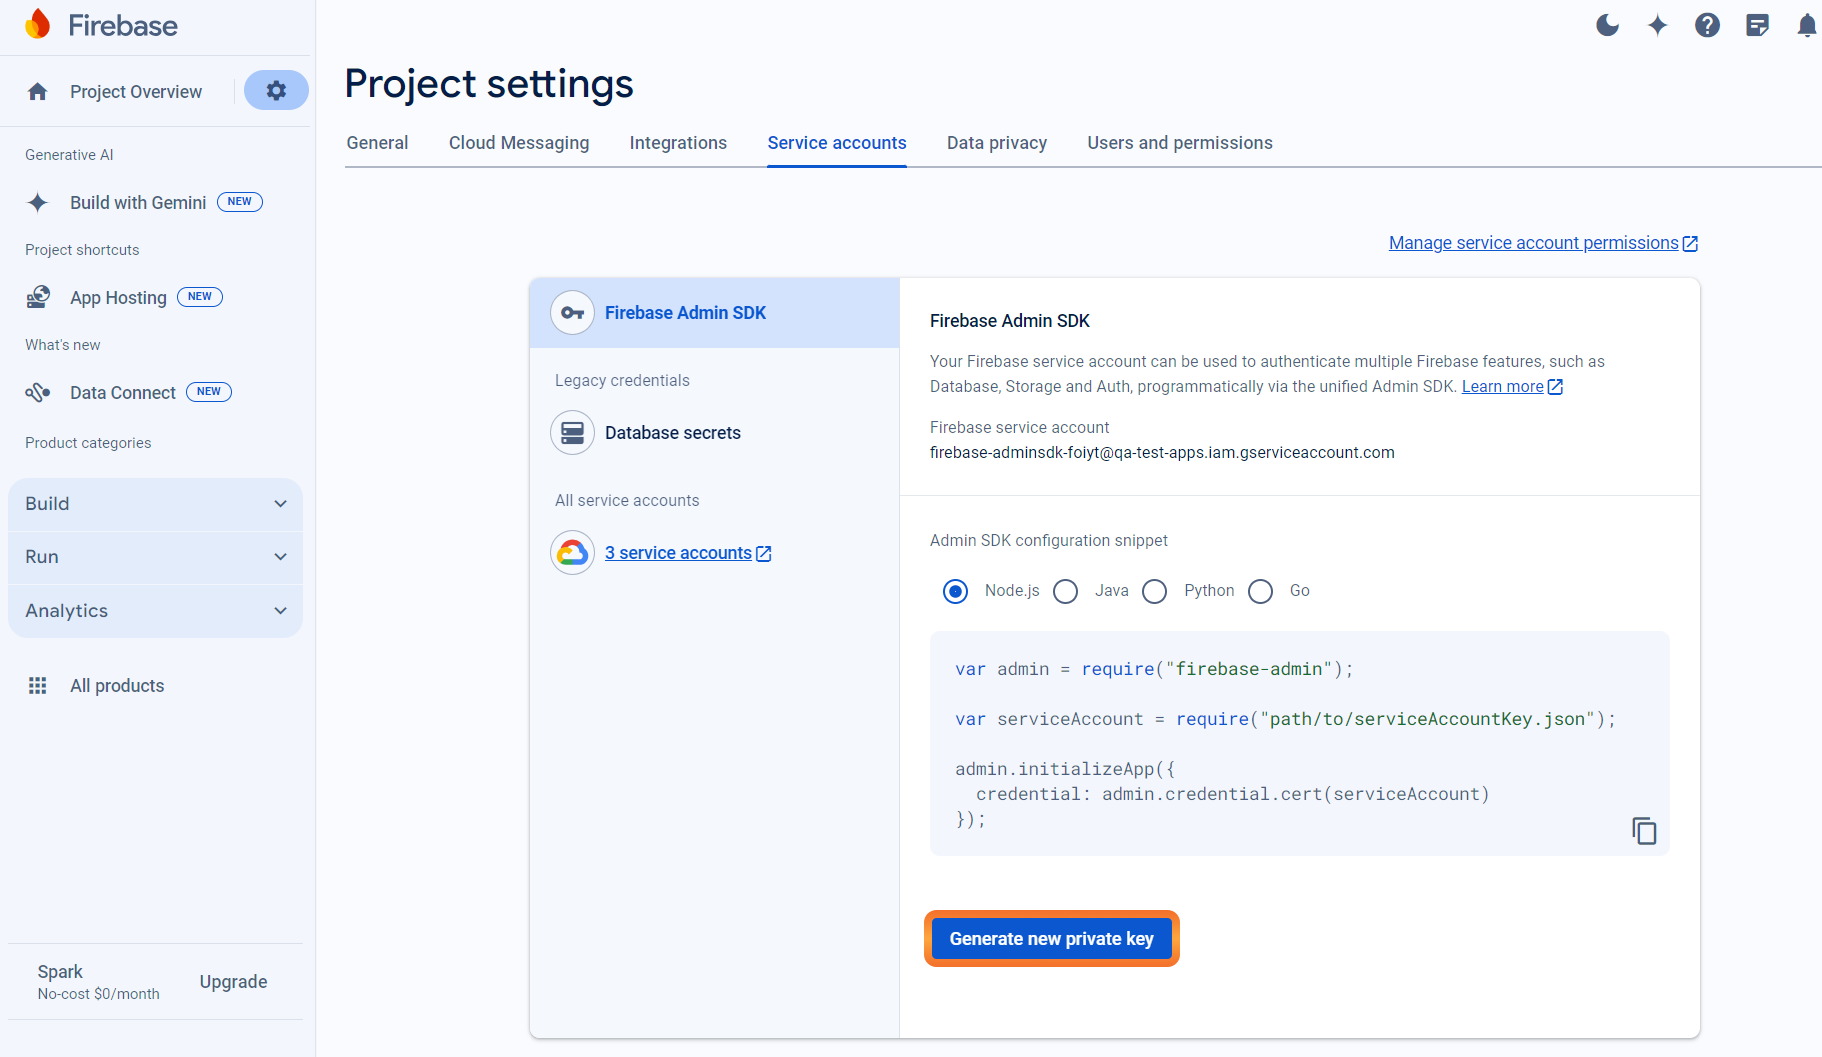
Select the 'Service Accounts' tab to generate 'PRIVATE KEY' for FCM.

Click on the 'Generate new private key' button. This will download a JSON file. Refer below for sample JSON file format.

Store this JSON file on your system.
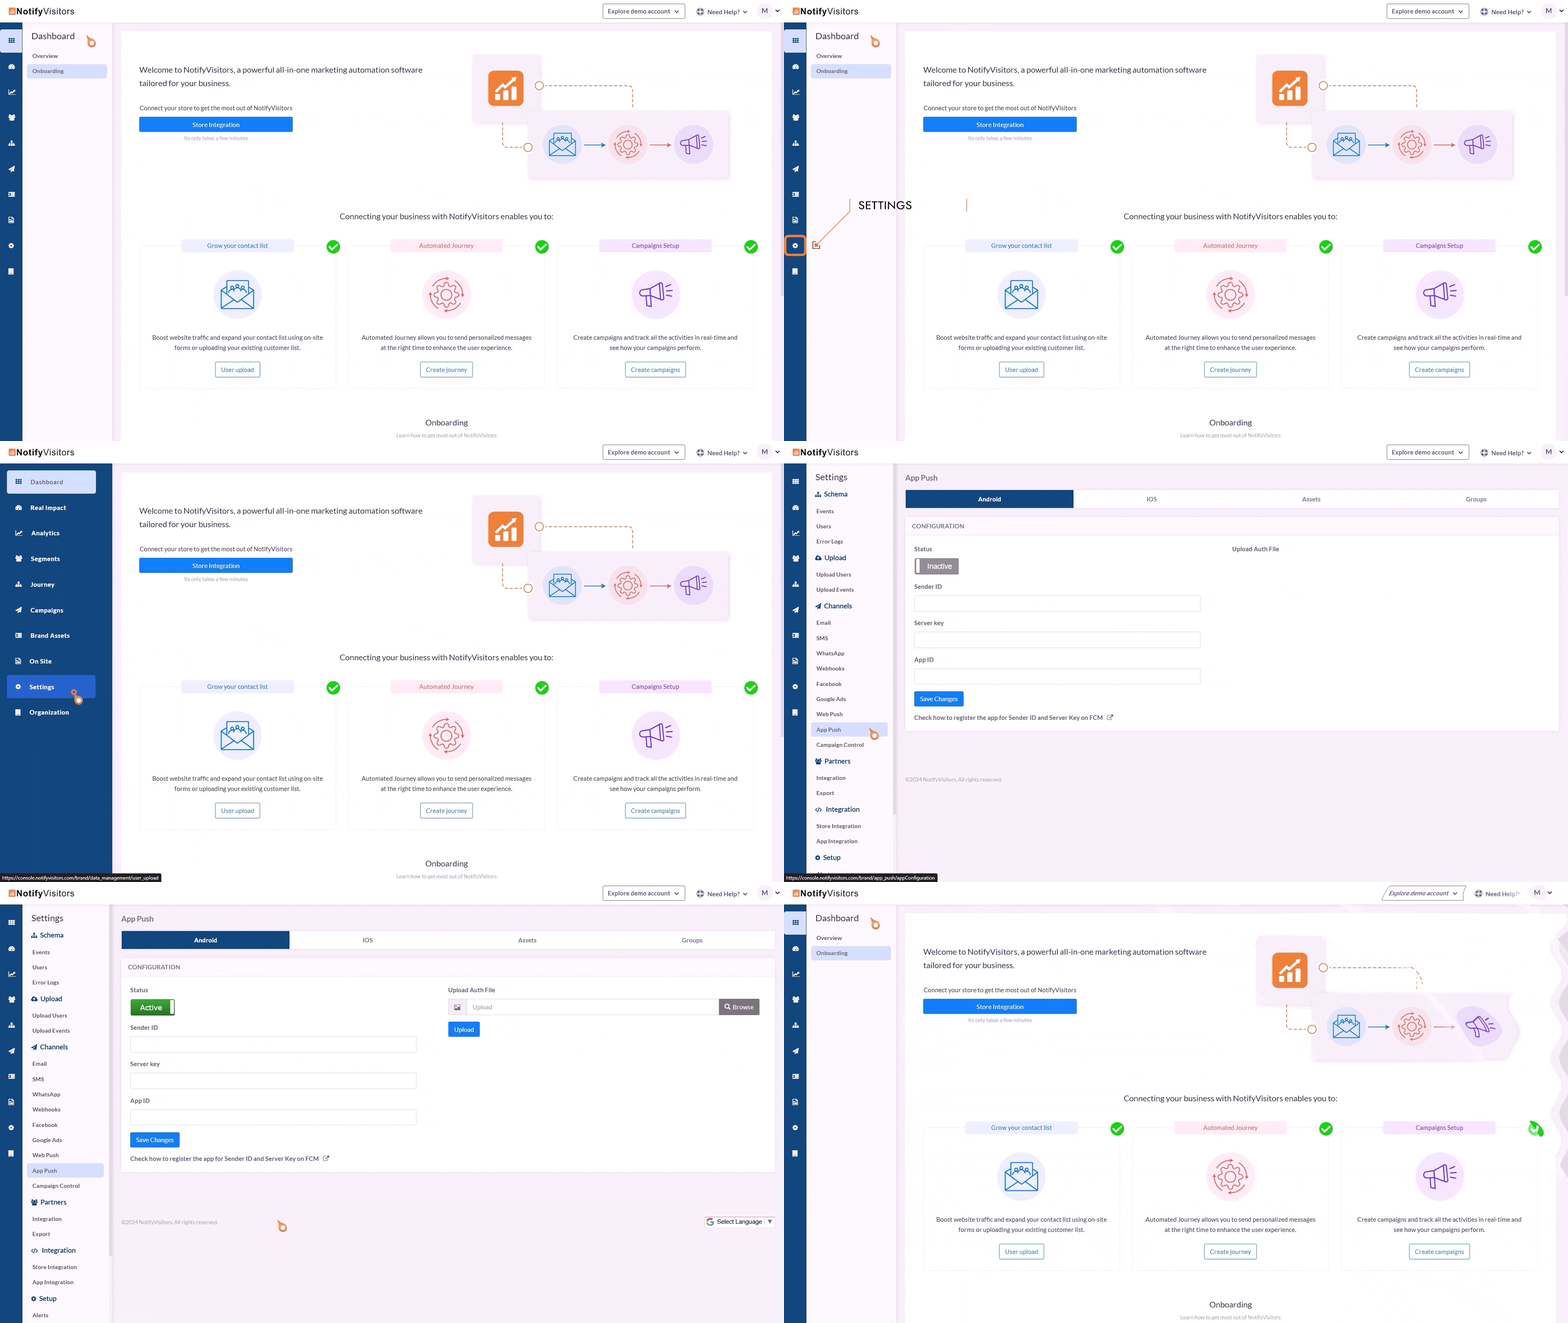
Login to your NotifyVisitors Account.
Navigate to Settings > App Push > Android tab.

Upload your downloaded private key JSON file in the 'Upload Auth File' section.
Add 'Sender ID' from your 'Cloud Messaging' section.
Add 'App ID (project ID)' from your downloaded private key JSON file.
Save the changes i.e., click on the button titled 'Save Changes'.
Push Notification Icon
Create a monochrome png icon and the size must be 200×200. The name of the icon should be sm_push_logo.png Paste into your-project/android/app/src/main/res/drawable/.
Updated about 1 year ago
